In this set of guides I explore different ways of controlling things using push button switches. The guides start with basic techniques and slowly build to more complex methods.
Guide Index
1 – Introduction
2 – Press for on, release for off
3 – Toggle Switch
4 – Start and stop an action
5 – Using two push button switches, one for on, one for off
6 – Multiply states from a single push button switch
7 – Start a Timer
Introduction
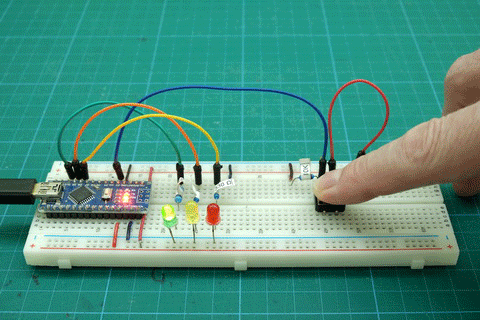
One of the first projects many people start with is to turn on/off or blink an LED and there many many guides on line that show how to do this. Unfortunately, many of the guides never go beyond the very basic first sketch. In this guide, I hope to help with the next step.
Besides the obvious fact that blinking an LED is cool in its own right it is a good exercise because switching an LED on and off is the same process for switching any digital device on and off. Once you can create the code to blink an LED you can create code to control almost anything.
LEDs are also good to use as examples because they (mostly) do not require a lot of power and can be connected directly to an Arduino. Switching high voltage devices, such as solenoids and motors is covered in a later article.
Polling vs Interrupts
There are many solutions to turning an LED on and off and a lot depends on how you want your sketch to work, how quickly you need the Arduino to react and what interface you want to use; one button switch, two button switches, a key pad, etc. Here I cover some of the ways I do it using a single button switch. The first section uses polling and the second covers using interrupts.
Polling is where you are constantly checking the status of something. In the following examples, inside the loop() function I use digitalRead() to continuously check the state of a pin and I do not know if the pin status has changed until I check it.
Polling is like waiting for a delivery but your door bell is broken so you need to check the front door every minute to see if the postman is delivering your new Arduino.
Interrupts, as the name may suggest, is where the current process is interrupted and a new process is performed. In context of tthese guides, the Arduino reacts when a pin state changes. It does this automatically and so you do not need to keep checking the pin. This means the code does not need to worry about the pin until the Arduino tells it to.
Interupts is a working door bell. You are watching a DVD Blueray movie on streaming and the door bell rings. You stop the movie and go check who is at the door. You sign for your new Arduino and go back to watching the movie from the point you paused it. Because the door bell is working, you do not need to keep checking the door. You simply react when you hear the bell ring.
These guides focus on polling techniques.
Connecting Arduino pins directly to VCC
In the examples the Arduino pin is connected to a switch and also connected to GND using a 10K ohm resistor. This means the pin is pulled low and when read using digitalRead() will show LOW.
The other side of the switch is connected directly to VCC (in this case +5V) and when the switch is closed VCC over powers the 10K resistor to GND and connects the Arduino pin directly to VCC making the pin HIGH.
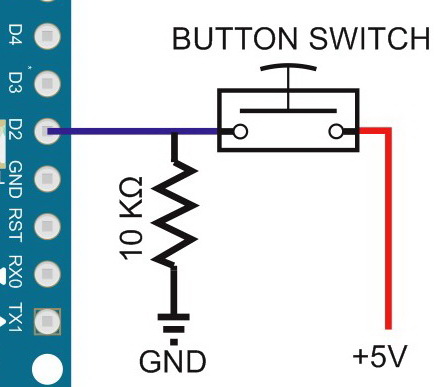
Normally, connecting an Arduino pin directly to 5V can be a bad idea but we can do it here because the pin is set to INPUT and when Arduino digital pins are set for INPUT they have a very high impedance, similar to having a 100 megohm resistor in front of the pin. This means we can safely connect the pin directly to 5V. For more information about this see www.arduino.cc/en/Tutorial/DigitalPins
This configuration could be considered as hobbyist and you could create a similar circuit without the 10k resistor by using the Arduinos internal PULLUP resistor, however, this reverses the switch state logic, HIGH when open, LOW when closed. I leave this for you to research and implement and a good place to start is Digital Pins on the Arduino website