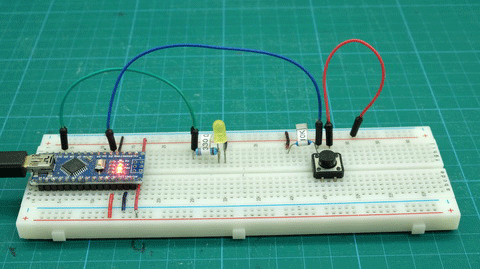
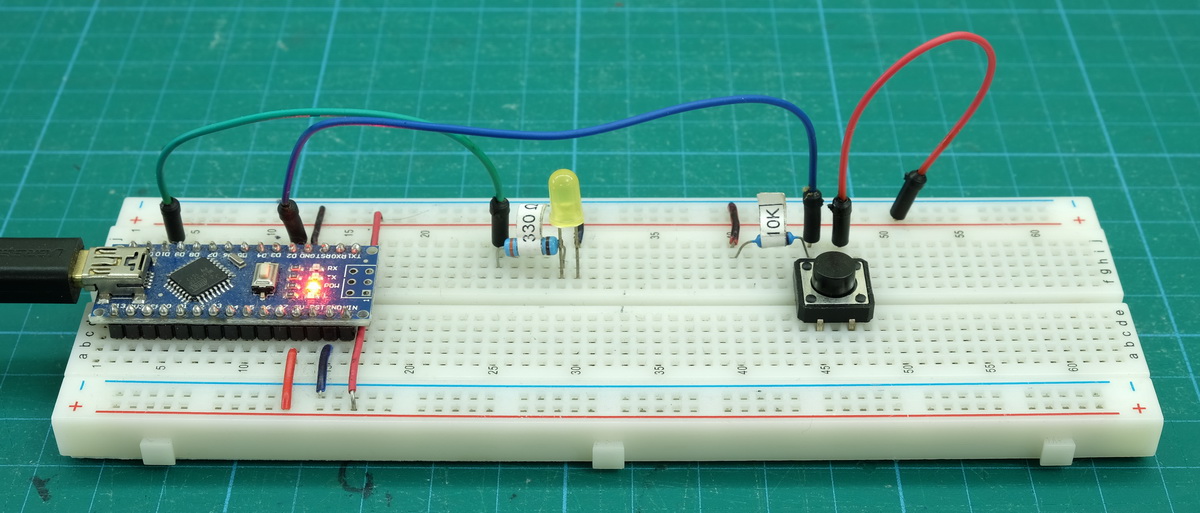
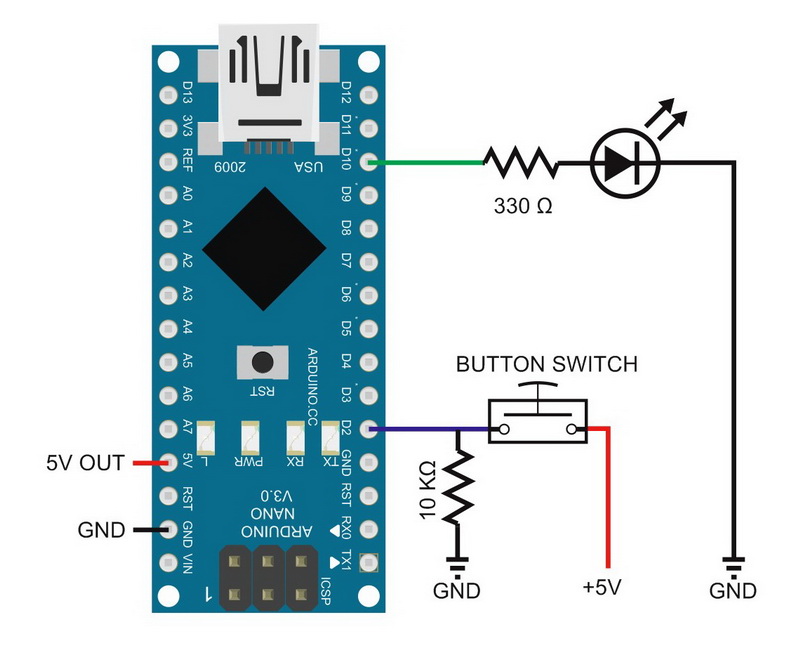
The first example keeps things as simple as they can be. We have a button switch and an LED. When the button switch is pressed the LED comes on. When the button switch is released the LED goes off.
Circuit
Pin D10 – 330 ohm resistor + LED to GND
Pin D2 – 10K ohm resistor to GND + push button switch to VCC
Sketch: Very simple press for on, release for off
//  Sketch : Very simple press for on, release for off
//  www.martyncurrey.com
//
//  A very simple example of turning an LED on and off using a button switch
//
//  Pins
//  D10 to resister and LED
//  D2 to push button switch
//

// Define the pins being used
int pin_LED = 10;
int pin_switch = 2;

void setup()
{
    Serial.begin(9600);
    Serial.print("Sketch:   ");   Serial.println(__FILE__);
    Serial.print("Uploaded: ");   Serial.println(__DATE__);
    Serial.println(" ");

    pinMode(pin_LED, OUTPUT);
    digitalWrite(pin_LED,LOW);

    pinMode(pin_switch, INPUT);
}

void loop()
{
    if ( digitalRead(pin_switch) == HIGH)
    {
       digitalWrite(pin_LED, HIGH);
    }
    else
    {
       digitalWrite(pin_LED, LOW);
    }
}
The code
When addressing Arduino pins you can simply use the relevant number, for example 2,3, 4 etc. This works fine but can lead to readability issues in the code, especially in large sketches or code that takes a while to develop. You may think it is perfectly clear that pin 10 is the LED but at some point you are likely to forget. To make code readable (or easier to follow) I find it better to use variables with meaningful names instead of the pin numbers. In this example; pin_LED and pin_switch. At the start of the sketch 2 variables used for the pins are defined and set. From the variable names it should be obvious what the pins are used for.
int pin_LED = 10;
int pin_switch = 2;
The next step is to tell the Arduino how we want to use the pins. The pins can be used for inputs or outputs (or both if you know what you are doing). The LED pin is set to OUTPUT and the switch pin is set to INPUT.
pinMode(pin_LED, OUTPUT);
pinMode(pin_switch, INPUT);
If you connect an LED and forget to set the pin to OUTPUT it will not work correctly. The pin will still switch but it will not have the full voltage on it and the LED will light very dimly.
I also set the LED pin to LOW. This is habit I picked up many years ago and it is not really needed on the Arduino but it makes me feel better.
digitalWrite(pin_LED,LOW);The sketch is fairly simply. Inside the loop() function the switch pin is checked
if ( digitalRead(pin_switch) == HIGH)and if the pin is HIGH the LED is turned on by setting the LED pin HIGH.
digitalWrite(pin_LED, HIGH);If the switch pin is not HIGH (i.e. LOW) the LED is turned off with
digitalWrite(pin_LED, LOW);You should be able to see that the sketch is constantly checking the switch and turning the LED on or off accordingly. This means not only is the switch pin being constantly checked but the LED is constantly being turned on and off. For this short simply sketch this is fine and works well but may run in to issues when used in larger more complex sketches.
Although we cannot get away from continuously checking the switch pin (this is what polling is) we can stop setting the LED pin every time and only set it if the state of the switch has changed.
Press for on, release for off. Slightly refined
The next step is to add some logic to the LED status so that the LED is only tuned on and off when required, not all the time as in the the previous example. To achieve this a couple of switch status variables are used; one for the current switch pin state and one for the previous switch pin state. By using 2 variables, previous and current) we are able to compare them to see if there has been a change, and, if there has been, either turn the LED on or turn it off. This means we are not wasting time setting the LED pin when we do not need to.
We are using exactly the same circuit as above.
Sketch: Press for on, release for off. Slightly refined.
//  Sketch: Press for on, release for off. Slightly refined
//  www.martyncurrey.com
//
//  An  example of turning an LED on and off using a button switch
//
//  Pins
//  D10 to resister and LED
//  D2 to push button switch
//

// Define the pins being used
int pin_LED = 10;
int pin_switch = 2;

// variables to hold the new and old switch states
boolean oldSwitchState = LOW;
boolean newSwitchState = LOW;

void setup()
{
    Serial.begin(9600);
    Serial.print("Sketch:   ");   Serial.println(__FILE__);
    Serial.print("Uploaded: ");   Serial.println(__DATE__);
    Serial.println(" ");

    pinMode(pin_LED, OUTPUT);
    digitalWrite(pin_LED,LOW);

    pinMode(pin_switch, INPUT);
}

void loop()
{
    newSwitchState = digitalRead(pin_switch);

    if ( newSwitchState != oldSwitchState )
    {
       if ( newSwitchState == HIGH ) { digitalWrite(pin_LED, HIGH);  }
       else                          { digitalWrite(pin_LED, LOW);   }

       oldSwitchState = newSwitchState;
    }
}
This sketch appears to do exactly the same as the first sketch. Press the button switch and the LED comes on. Release the switch and the LED goes out. The difference is that we now only change the LED pin when the switch state has changed.
Two new variables have been added; oldSwitchState and newSwitchState.
boolean oldSwitchState = LOW;
boolean newSwitchState = LOW;
The state of the switch is read and the value placed in newSwitchState. This is then compared to oldSwitchState. If they are the same we know no change has taken place and we do not need to do anything. But if they are not the same, then we know the switch has changed and we need turn the LED either on or off.
 if ( newSwitchState != oldSwitchState )
    {
       if ( newSwitchState == HIGH ) { digitalWrite(pin_LED, HIGH);  }
       else                                         { digitalWrite(pin_LED, LOW);   }
“!=” is NOT equal and is the same as “<>”
To determine if the LED needs to be turned on or off we are still using the switch state but now the state is stored in the newSwitchState variable.
Of course, if all you want is an LED to come on when you press a button switch you do not need an Arduino, simply wire the LED and switch in series and connect to power. Closing the button switch will complete the circuit and the LED will come. Release the switch and the LED turns off.
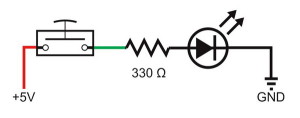
This does exactly the same as the above 2 examples without the Arduino.