Using similar methods as used in Toggle Switch and Multiple states from a single push button switch we can start or stop any task or function. In the below examples I am ublinking an LED but the same principles apply to things like motors and sensors.
When the button switch is pressed the LED starts to blink. When it is pressed again the LED stops blinking. The blinking LED is achieved by using a technique known as blinking without delay This is a slightly more advanced technique that allows the Arduino to perform 2 or more things at once.
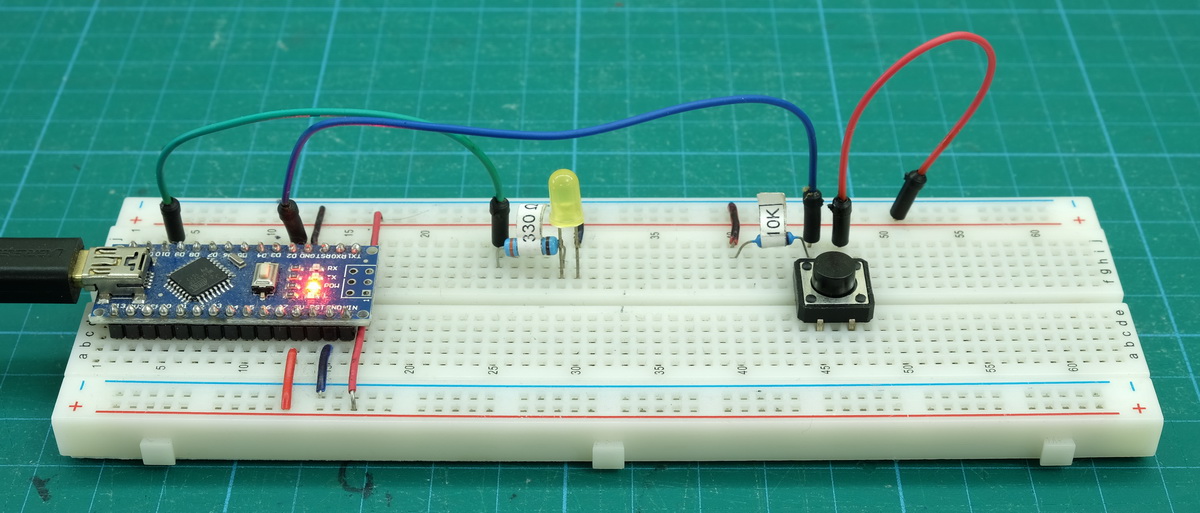
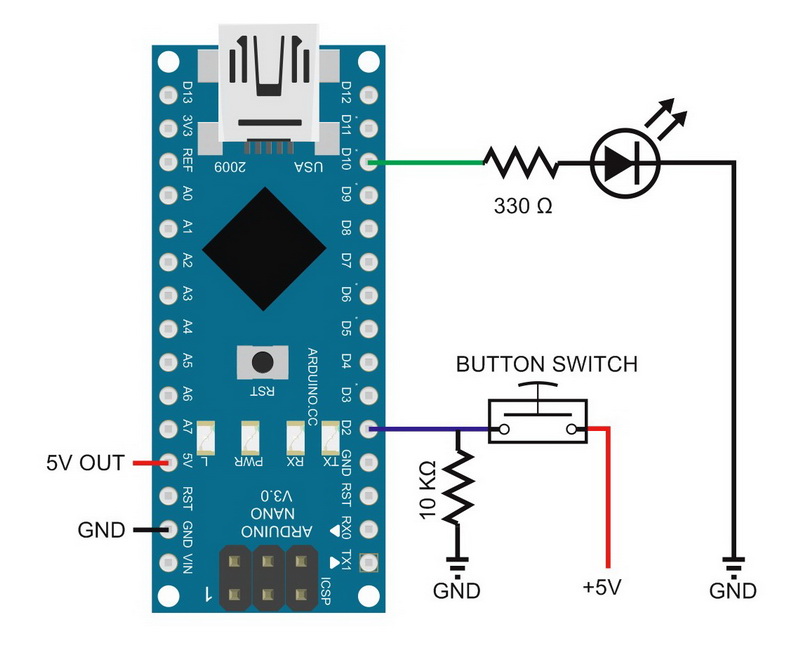
Circuit
Uses the same circuit as previous guides:
Pin D10 – 330 ohm resistor + LED
Pin D2 – 10K ohm resistor to GND + push button switch to VCC
Sketch: Using a push button switch to turn on and off a blinking LED
//  Sketch: Using a push button switch to turn on and off a blinking LED
//  www.martyncurrey.com
//
//  An  example of using a button switch as a toggle switch to turn a blinking LED on or off
//
//  Pins
//  D10 to resister and LED
//  D2 to push button switch
//

// Define the pins being used
int pin_LED = 10;
int pin_switch = 2;


// variables to hold the new and old switch states
boolean oldSwitchState = LOW;
boolean newSwitchState1 = LOW;
boolean newSwitchState2 = LOW;
boolean newSwitchState3 = LOW;

// variables to hold the times
unsigned long timeNow = 0;
unsigned long timePrev = 0;
unsigned int timeWait = 100;

// variables used to control the LED
boolean flashingLEDisON = false;
boolean LEDstatus = LOW;
boolean keyPressed = false;


void setup()
{
    Serial.begin(9600);
    Serial.print("Sketch:   ");   Serial.println(__FILE__);
    Serial.print("Uploaded: ");   Serial.println(__DATE__);
    Serial.println(" ");

    pinMode(pin_LED, OUTPUT);
    digitalWrite(pin_LED,LOW);

    pinMode(pin_switch, INPUT);
}

void loop()
{
    newSwitchState1 = digitalRead(pin_switch);      delay(1);
    newSwitchState2 = digitalRead(pin_switch);      delay(1);
    newSwitchState3 = digitalRead(pin_switch);

    if (  (newSwitchState1==newSwitchState2) && (newSwitchState1==newSwitchState3) )
    {
        if ( newSwitchState1 != oldSwitchState )
        {
            if ( newSwitchState1 == HIGH ) { keyPressed = true; } else { keyPressed =  false; }
            oldSwitchState = newSwitchState1;
        }
    }


    if ( keyPressed )
    {
         // turn on or turn off the blinking LED
         if ( flashingLEDisON == false)
         {
             flashingLEDisON = true;
         }
         else
         {
              flashingLEDisON = false;
              // the LED may be on so to be safe we turn it off. If you wished you could check LEDstatus
              LEDstatus = LOW;  digitalWrite(pin_LED, LEDstatus);
         }
         keyPressed = false;
    }


    // if the blinking LED is on. See if it is time to blink it
    if ( flashingLEDisON == true )
    {
        timeNow = millis();
        if (timeNow-timePrev >= timeWait )
        {
              timePrev = timeNow;
              if (LEDstatus == LOW) { LEDstatus = HIGH; } else { LEDstatus = LOW; }
              digitalWrite(pin_LED, LEDstatus);
        }
    }
}
This sketch is a little more complex than the previous ones but should be fairly straight forward to understand.
When the switch is pressed, instead of turning an LED on or off the variable keyPressed is set to true.
The value of keyPressed is then checked. If it is true the value of the variable flashingLEDisON is reversed; either true to false, or false to true. flashingLEDisON is used to tell the sketch if it should be blinking the LED or not.
To blink the LED we need a timer, this is used in the third section. This section checks to see:
1 – are we blinking the LED (is flashingLEDisON == true),
2 – and if so, is it time to turn the LED on or off
To blink the LED I have used a very standard technique referred to as “blink without delay“. The “blink without delay” allows you to do several things at once. This can be almost anything not just blinking an LED. In this example it allows me to blink the LED while still constantly checking for key presses.
There are a few new variables.
boolean flashingLEDisON = false;
boolean LEDstatus = LOW;
boolean keyPressed = false;
These new variables act as flags to show
– if the button switch as been pressed,
– if the LED is blinking or not, and,
– if the LED is on or off.
I also added a variable to record the key presses so that the code can start to be modular. This will then allow the use of functions which will help to further separate the code. The next example expands this.
Basically:
When the button switch is pressed KeyPressed is set to true.
If keyPressed == true the value of flashingLEDisON is toggled (either TRUE to FALSE, or FALSE to TRUE). When flashingLEDisON is true we know to blink the LED.
LEDstatus lets us know if the LED is on or off.
In the loop() function, the first part of the code checks the button switch and if it has been pressed (goes from LOW to HIGH) sets keyPressed to TRUE.
    newSwitchState1 = digitalRead(pin_switch);      delay(1);
    newSwitchState2 = digitalRead(pin_switch);      delay(1);
    newSwitchState3 = digitalRead(pin_switch);

    if (  (newSwitchState1==newSwitchState2) && (newSwitchState1==newSwitchState3) )
    {
        if ( newSwitchState1 != oldSwitchState )
        {
            if ( newSwitchState1 == HIGH ) { keyPressed = true; } else { keyPressed =  false; }
            oldSwitchState = newSwitchState1;
        }
    }
The next section checks keyPressed, and if it is TRUE, knows we are, either starting the blinking LED or stopping it. Again, this part is self contained and simply flips the value of the flashingLEDisON variable.
When the button switch is pressed to stop the blinking LED, the LED may be turned on so, just in case, it is turned off. If you wished you could check LEDstatus first and only turn of the LED if it is actually on.
At the end, keyPRESSED is reset to FALSE ready for next time.
    if ( keyPressed )
    {
         // turn on or turn off the blinking LED
         if ( flashingLEDisON == false)
         {
             flashingLEDisON = true;
         }
         else
         {
              flashingLEDisON = false;
              // the LED may be on so we turn it off just is case
              LEDstatus = LOW;  digitalWrite(pin_LED, LEDstatus);
         }
         keyPressed = false;
    }
The final section is the bit that actually blinks the LED. New variables have been introduced to hold the times and the rate of blink (timeWait). This is straight from the blink without delay example. We store the previous time, then get the current time. If the difference between the current time and the previous time is equal or greater than the blink rate we flip LEDstatus. The value of LEDstatus is used to either turn on or turn off the LED.
// variables to hold the times
unsigned long timeNow = 0;
unsigned long timePrev = 0;
unsigned int timeWait = 100; // This is the LED blink rate
// if the blinking LED is on. See if it is time to blink it
if ( flashingLEDisON == true )
{
timeNow = millis();
if (timeNow-timePrev >= timeWait )
{
timePrev = timeNow;
if (LEDstatus == LOW) { LEDstatus = HIGH; } else { LEDstatus = LOW; }
digitalWrite(pin_LED, LEDstatus);
}
}Do I Really Need So Many Status Variables?
No you don’t and if all you want to do is turn on and off a blinking LED the code can be made a lot shorter. However, separating the code in to parts or chunks makes updating and expanding the code a lot easier. It also makes the code easier to read and understand. With that in mind, the next step is add further separation by using functions.
Sketch: Using a push button switch to turn on and off a blinking LED with added functions
This sketch does exactly the same as the one above. The only difference is that I have introduced functions; one that checks if the button switch has been pressed, one to start and stop blinking the LED, and a third that blinks the LED.
This means the loop() function is a lot shorter and by using names that describe what the functions do, the code is easier to read:
void loop()
{
    keyPressed = checkButtonSwitch();
    if ( keyPressed )
    {
        keyPressed = false;
        startAndStop();
    }
    if ( flashingLEDisON == true )  { blinkTheLED();   }
}
I also moved the newSwitchState1/2/3 initialization in to the function. These then become local variables.
Sketch: Using a push button switch to turn on and off a blinking LED with added functions
//  Sketch: Using a push button switch to turn on and off a blinking LED with added functions
//  www.martyncurrey.com
//
//  An  example of using a button switch as a toggle switch to turn a blinking LED on or off
//  now using functions
//
//  Pins
//  D10 to resister and LED
//  D2 to push button switch
//

// Define the pins being used
int pin_LED = 10;
int pin_switch = 2;


// variables to hold the new and old switch states
boolean oldSwitchState = LOW;

// variables to hold the times
unsigned long timeNow = 0;
unsigned long timePrev = 0;
unsigned int timeWait = 100; // This is the LED blink rate

// variables used to control the LED
boolean flashingLEDisON = false;
boolean LEDstatus = LOW;
boolean keyPressed = false;


void setup()
{
    Serial.begin(9600);
    Serial.print("Sketch:   ");   Serial.println(__FILE__);
    Serial.print("Uploaded: ");   Serial.println(__DATE__);
    Serial.println(" ");

    pinMode(pin_LED, OUTPUT);
    digitalWrite(pin_LED,LOW);

    pinMode(pin_switch, INPUT);
}

void loop()
{
    keyPressed = checkButtonSwitch();
    if ( keyPressed )
    {
        keyPressed = false;
        startAndStop();
    }
    if ( flashingLEDisON == true )  { blinkTheLED();   }
}


boolean checkButtonSwitch()
{
    boolean key = false;

    boolean newSwitchState1 = digitalRead(pin_switch);      delay(1);
    boolean newSwitchState2 = digitalRead(pin_switch);      delay(1);
    boolean newSwitchState3 = digitalRead(pin_switch);

    if (  (newSwitchState1==newSwitchState2) && (newSwitchState1==newSwitchState3) )
    {
        if ( newSwitchState1 != oldSwitchState )
        {
            if ( newSwitchState1 == HIGH ) { key = true; } else { key =  false; }
            oldSwitchState = newSwitchState1;
        }
    }
    return key;
}

void startAndStop( )
{
     // turn on or turn off the blinking LED
     if ( flashingLEDisON == false)
     {
         flashingLEDisON = true;
     }
     else
     {
         flashingLEDisON = false;
         // the LED may be on so we turn it off just is case
         LEDstatus = LOW;
         digitalWrite(pin_LED, LEDstatus);
     }
}


void blinkTheLED()
{
    timeNow = millis();
    if (timeNow-timePrev >= timeWait )
    {
          timePrev = timeNow;
          if (LEDstatus == LOW) { LEDstatus = HIGH; } else { LEDstatus = LOW; }
          digitalWrite(pin_LED, LEDstatus);
    }
}
Hopefully the code is self explanatory. If not leave a comment below.
This is an excellent series. Helped me a lot