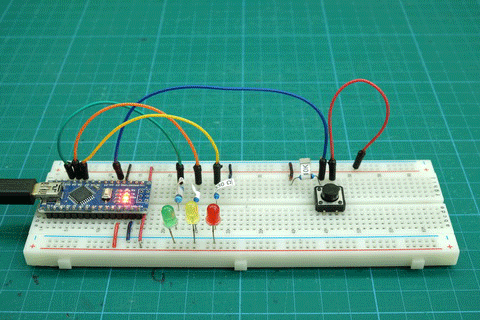
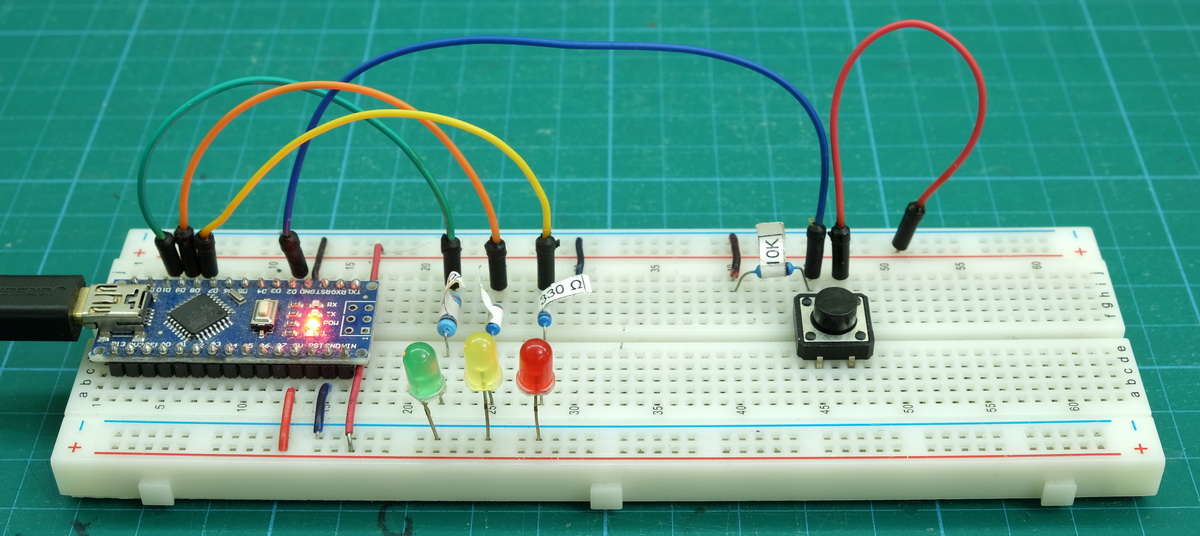
Control 3 LEDs with a single button switch. Every time the switch is closed the next LED lights up. On the 4th press the LEDs reset to all off.
Circuit
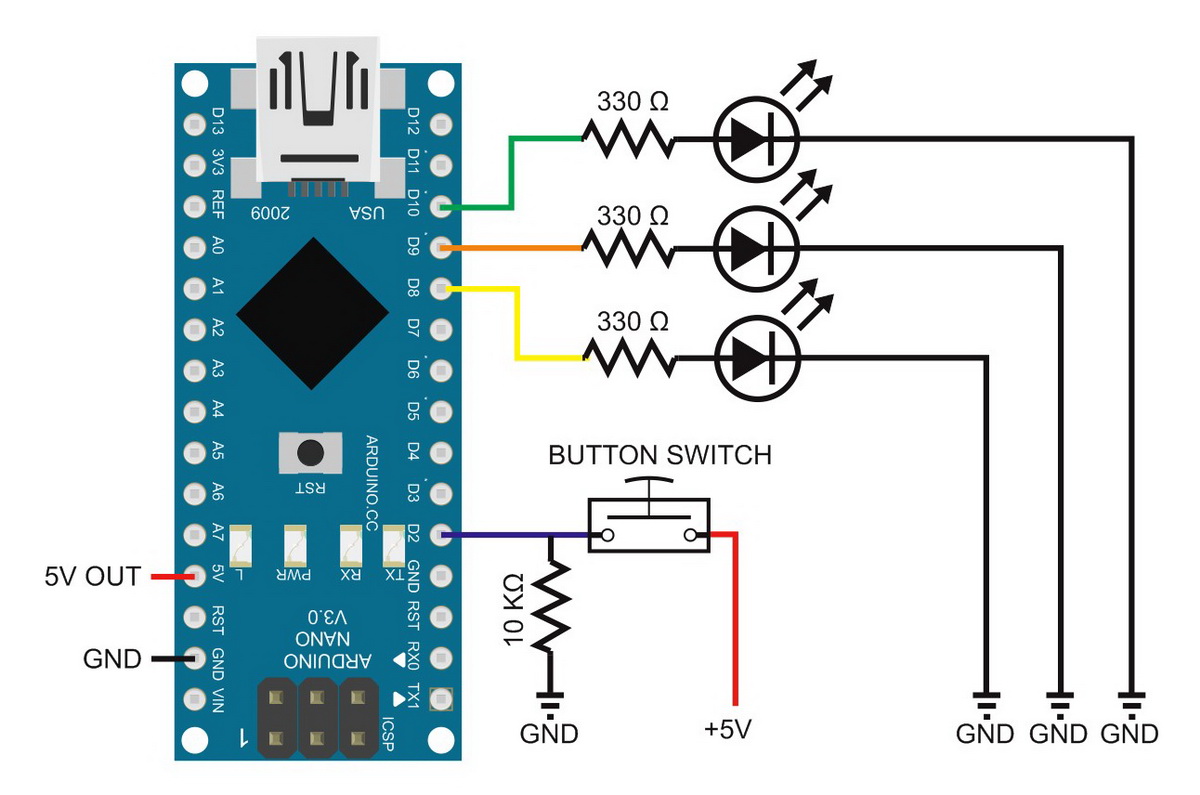
Added 2 new LEDs (plus resistors), one to pin 9 and one to pin 8.
Code Notes
Since we now have 3 LEDS we need to define the 3 pins being used
// Define the pins being used
int pin_LEDgreen = 10;
int pin_LEDyellow = 9;
int pin_LEDred = 8;
The pins are then initialized and set LOW in the setup() function.
pinMode(pin_LEDgreen, OUTPUT);    digitalWrite(pin_LEDgreen,LOW);
pinMode(pin_LEDyellow, OUTPUT);   digitalWrite(pin_LEDyellow,LOW);
pinMode(pin_LEDred, OUTPUT);      digitalWrite(pin_LEDred,LOW);
To keep track of where we are, a new variable called state is used. state is a byte that can have 1 of 4 values (0 to 3):
– state = 0 – all LEDs off
– state = 1 – green LED on
– state = 2 – yellow LED on
– state = 3 – red LED on
Every time the button switch is pressed the value of state is increased by 1. When state is greater than 3 it is reset to 0.
// increase the value of state
state++;
if (state > 3) { state = 0; }
“state++” is exactly the same as “state = state + 1”
I have kept the logic as simple as possible and the LEDs are controlled with a series of if statements. Since state can only have 1 value at a time and the value does not change within the IFs I do not need to use else if, a simple list of basic if statements is all that is required. You could also use a switch/case statement.
if (state==1) { digitalWrite(pin_LEDgreen, HIGH);  }
if (state==2) { digitalWrite(pin_LEDyellow, HIGH);  }
if (state==3) { digitalWrite(pin_LEDred, HIGH);  }
There are different ways to do this but, as always, I like to keep it simple and straight forward and believe when learning it is important to understand what is happening so that you can get things working as quickly as possible. If the code is unnecessarily complex you may be able to copy and paste it but you won’t understand it and so you won’t be able to adapt it to your own needs.
If I were using more LEDs I would put the pin values in an array and then use the state variable as the array index. See example below.
Sketch: Multiple states from a single button switch
//  Sketch: Multiple states from a single button switch
//  www.martyncurrey.com
//
//  An  example of using a single button switch to set multiple states or conditions
//
//  Pins
//  D10 to resister and green LED
//  D9 to resister and yellow LED
//  D8 to resister and red LED
//  D2 to push button switch
//
//  state holds the current status.
//  0 = all off.
//  1 = green LED
//  2 = yellow LED
//  3 = red LED

// Define the pins being used
int pin_LEDgreen = 10;
int pin_LEDyellow = 9;
int pin_LEDred = 8;

int pin_switch = 2;

// variables to hold the new and old switch states
boolean oldSwitchState = LOW;
boolean newSwitchState1 = LOW;
boolean newSwitchState2 = LOW;
boolean newSwitchState3 = LOW;

byte state = 0;

void setup()
{
    Serial.begin(9600);
    Serial.print("Sketch:   ");   Serial.println(__FILE__);
    Serial.print("Uploaded: ");   Serial.println(__DATE__);
    Serial.println(" ");

    pinMode(pin_LEDgreen, OUTPUT);    digitalWrite(pin_LEDgreen,LOW);
    pinMode(pin_LEDyellow, OUTPUT);   digitalWrite(pin_LEDyellow,LOW);
    pinMode(pin_LEDred, OUTPUT);      digitalWrite(pin_LEDred,LOW);

    pinMode(pin_switch, INPUT);
}

void loop()
{
    newSwitchState1 = digitalRead(pin_switch);
    delay(1);
    newSwitchState2 = digitalRead(pin_switch);
    delay(1);
    newSwitchState3 = digitalRead(pin_switch);

    // if all 3 values are the same we can continue
    if (  (newSwitchState1==newSwitchState2) && (newSwitchState1==newSwitchState3) )
    {

        if ( newSwitchState1 != oldSwitchState )
        {

           // has the button switch been closed?
           if ( newSwitchState1 == HIGH )
           {
                // increase the value of state
                state++;
                if (state > 3) { state = 0; }

                // turn all LEDs off. Doing it this way means we do not need to care about the individual LEDs
                // simply turn them all off and then turn on the correct one.
                digitalWrite(pin_LEDgreen, LOW);
                digitalWrite(pin_LEDyellow, LOW);
                digitalWrite(pin_LEDred, LOW);

                // Turn on the next LED
                // Because the value of state does not change while we are testing it we don't need to use else if
                if (state==1) { digitalWrite(pin_LEDgreen, HIGH);  }
                if (state==2) { digitalWrite(pin_LEDyellow, HIGH);  }
                if (state==3) { digitalWrite(pin_LEDred, HIGH);  }

           }
           oldSwitchState = newSwitchState1;
        }
    }
}
You may notice that there is no “if (state==0)” statement. To change which LED is on we first need to turn off the current LED. You may be tempted to put digitalWrite(pin, LOW) statements in all the “if” statements but this is not required. Since we know that we need to turn a LED off every time we can simply turn them all off and then turn on the new LED.
Setting a pin LOW that is already LOW has no effect and will not hurt the Arduino.
Multiple states from a single push button switch refined
I mentioned in the previous example that if I were using more LEDs I would use an array to hold the pin numbers. Arrays allow you do to more than just hold the pin numbers though. An array can also be used to hold the on/off sequence. Here I use an array to hold the sequence; green, yellow, red, yellow, green, etc. With arrays this is fairly easy. Without them it can become complex.
The circuit is exactly the same as used in the example above.
Code Notes
I have introduced 2 arrays. One for the pin numbers and one for the LED sequence. I also added a variable to store the sequence length. Although not really required in this simple sketch, using squenceLength means we can quickly change the sequence without changing the main code. All we need to do is update squenceLength to match the new array length.
char LED_Pins_array[] = { 10, 9, 8};

char LED_Sequence_array[] = { 10, 9, 8, 9};
byte squenceLength = 4;
Now that there is an an array holding the pin numbers, we can use it when initializing the pins.
for (byte i=0; i< 3; i++)
{
      pinMode(LED_Pins_array[i], OUTPUT);    digitalWrite(LED_Pins_array[i],LOW);
}
In the loop() function, now that we have a variable storing the length of the LED sequence array and it can be used reset the state variable. Remember that arrays in C start at position 0 so we need to reduce the squenceLength value by 1.
state++;
if (state > (squenceLength -1) ) { state = 0; }
The LED sequence array, with the state variable as the index, can be used for the pin number to turn on the next LED.
digitalWrite(LED_Sequence_array[state],HIGH);LED_Sequence_array[] holds the pin number to use.
Here is what using an array looks like:
Sketch: Multiple states from a single button switch, refined
//  Sketch: Multiple states from a single button switch, refined
//  www.martyncurrey.com
//
//  An  example of using a single button switch to set multiple states or conditions
//  Now using an array to store the LED pins
//
//  Pins
//  D10 to resister and green LED
//  D9 to resister and yellow LED
//  D8 to resister and red LED
//  D2 to push button switch
//
//  state holds the current status.
//  0 = all off.
//  1 = green LED
//  2 = yellow LED
//  3 = red LED

// Define the pins being used fro the LEDs
//                    green/yellow/red
char LED_Pins_array[] = { 10, 9, 8};

// Array to hold the LED sequence. green, yellow, red, yellow, green.
// position 0 is not used (considered not good practice but keeps the code easy to understand)
char LED_Sequence_array[] = { 10, 9, 8, 9};
byte squenceLength = 4;

int pin_switch = 2;

// variables to hold the new and old switch states
boolean oldSwitchState = LOW;
boolean newSwitchState1 = LOW;
boolean newSwitchState2 = LOW;
boolean newSwitchState3 = LOW;

byte state = -1;

void setup()
{
    Serial.begin(9600);
    Serial.print("Sketch:   ");   Serial.println(__FILE__);
    Serial.print("Uploaded: ");   Serial.println(__DATE__);
    Serial.println(" ");

    for (byte i=0; i< 3; i++)
    {
         pinMode(LED_Pins_array[i], OUTPUT);    digitalWrite(LED_Pins_array[i],LOW);
    }
    pinMode(pin_switch, INPUT);
}

void loop()
{
    newSwitchState1 = digitalRead(pin_switch);
    delay(1);
    newSwitchState2 = digitalRead(pin_switch);
    delay(1);
    newSwitchState3 = digitalRead(pin_switch);

    // if all 3 values are the same we can continue
    if (  (newSwitchState1==newSwitchState2) && (newSwitchState1==newSwitchState3) )
    {
        if ( newSwitchState1 != oldSwitchState )
        {

           // has the button switch been closed?
           if ( newSwitchState1 == HIGH )
           {

                state++;
                if (state > (squenceLength -1) ) { state = 0; }

                // turn all LEDs off. Doing it this way means we do not need to care about the individual LEDs
                // simply turn them all off and then turn on the correct one.
                for (byte i=0; i< 3; i++)
                {
                     digitalWrite(LED_Pins_array[i],LOW);
                }

                // Turn on the next LED
                digitalWrite(LED_Sequence_array[state],HIGH);
           }
           oldSwitchState = newSwitchState1;
        }
    }
}
Something To Try
Now that we are using arrays, try putting the newSwitchState variables into an array rather than using 3 separate variables.
Move the code that checks the button switch to its own function. This would make loop() cleaner.
really good article.