Some examples showing how to use a timer to turn of an LED.
The first example uses a button switch to turn on an LED and a delay() to time when to turn of the LED. It is a very basic how you shouldn’t do it using delay(). After that the examples expands the techniques learnt from the previous guides and I introduce a flashing LED.
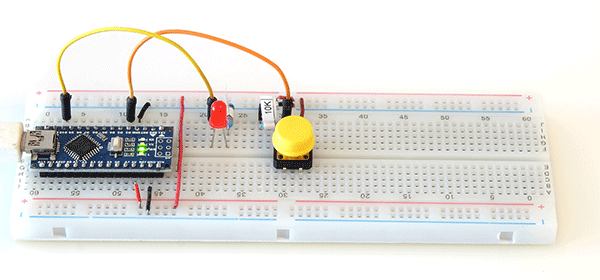
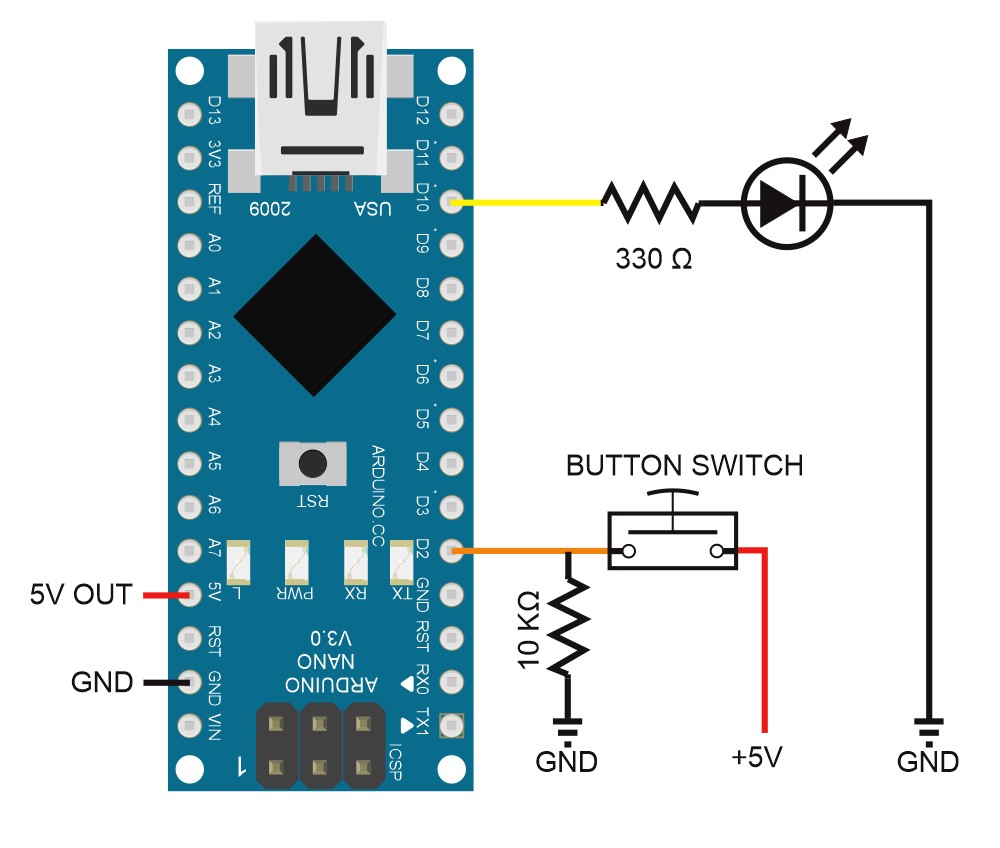
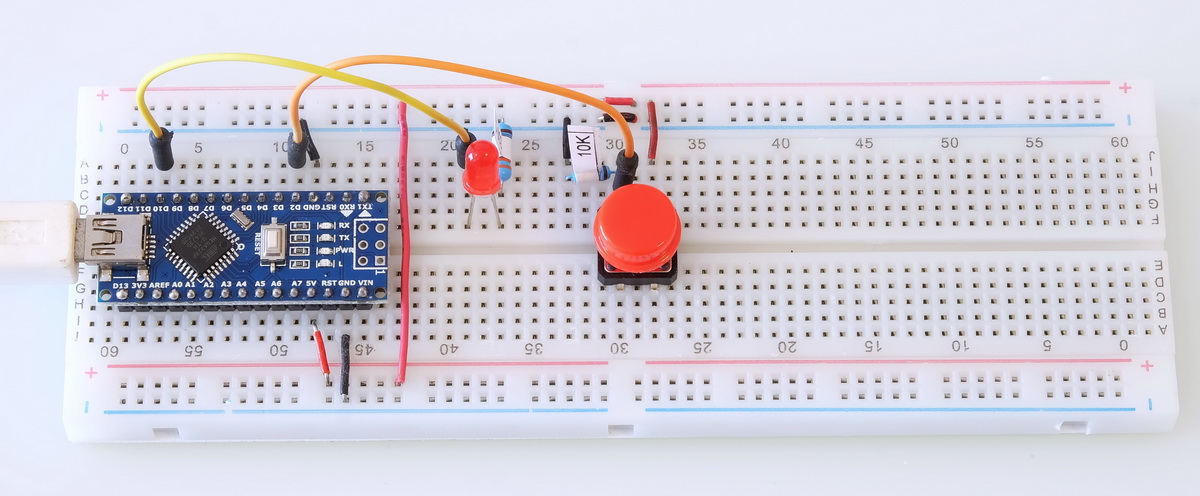
Circuit
All examples below use the same circuit. Which just happens to be the same as used in an earlier guide. Although this time I got out a new breadboard and a new switch :-)
Pin D10 – 330 ohm resistor + LED to GND
Pin D2 – 10K ohm resistor to GND + push button switch to VCC
Example 1: How use a push button switch to turn on an LED with an auto off timer
I think, for many people, when they need a sketch to wait for something they automatically reach for the delay() function. Using a delay() can work but it isn’t usually the best solution.
//  Sketch: Using a push button switch to turn on an LED with a timer to turn it off. Not the best way.
//  www.martyncurrey.com
//
//  Pins
//  D10 to 330 ohm resister and LED
//  D2 to push button switch with 10K ohm pull down resistor
//

// Define the pins being used
int pin_LED = 10;
int pin_switch = 2;

// variables
boolean oldSwitchState = LOW;
boolean keyPressed = false;
long timer_timeWait = 2000;  // the timer time. 2000ms = 2 seconds

void setup()
{
    Serial.begin(9600);
    Serial.print("Sketch:   ");   Serial.println(__FILE__);
    Serial.print("Uploaded: ");   Serial.println(__DATE__);
    Serial.println(" ");

    pinMode(pin_LED, OUTPUT);
    digitalWrite(pin_LED,LOW);
    pinMode(pin_switch, INPUT);
}

void loop()
{
    keyPressed = checkButtonSwitch();

    if ( keyPressed == true )
    {
         digitalWrite(pin_LED, HIGH);
         delay(timer_timeWait);
         digitalWrite(pin_LED, LOW);
    }

}  // loop


boolean checkButtonSwitch()
{

  boolean key = false;
  boolean newSwitchState1 = digitalRead(pin_switch);      delay(1);
  boolean newSwitchState2 = digitalRead(pin_switch);      delay(1);
  boolean newSwitchState3 = digitalRead(pin_switch);

  if (  (newSwitchState1==newSwitchState2) && (newSwitchState1==newSwitchState3) )
  {
    if ( newSwitchState1 != oldSwitchState )
    {
      if ( newSwitchState1 == HIGH ) { key = true;  }
      else                           { key = false; } // not required and can be removed. key already set to false;
      oldSwitchState = newSwitchState1;
    }
  }
  return key;
}
The sketch works. When the button switch is pressed the LED turns on for a set period of time. This is achieved by turning on the LED and using a delay(). After the delay() completes the LED is turned off and the process starts again.
void loop()
{
    keyPressed = checkButtonSwitch();

    if ( keyPressed == true )
    {
         digitalWrite(pin_LED, HIGH);
         delay(timer_timeWait);
         digitalWrite(pin_LED, LOW);
    }

}  // loop
Unfortunately, delay() blocks the code. Blocking is where the Arduino cannot do anything else and has to wait for whatever is causing the block to complete. While delay() is active the Arduino just sits and waits.
What if we want to do other things while the LED is on, you can’t. Using delay() means you are stuck. You need to get rid of the delay() and use a a different technique. The following examples do this by introducing a timer.
The following examples continue with the modular code approach and use functions for the main bits. Hopefully this will mean the code, especially the bit in the loop() function, is clear and easy to read.
Example 2: Using a push button switch to turn on an LED and a timer to turn off the LED
The previous example works but it is not very flexible and very difficult to expand. Let’s change that.
The sketches are becoming a little more complex now and it is worth thinking about what I want to achieve before banging away on the keyboard. This time we control when the LED turns off with a timer. The plan is:
- Press the button switch to turn on the LED.
- Start a timer
- Wait for the timer to finish,
- Turn off the LED.
- Wait for the button press again
Since delay() is a timer (of sorts) the new example is exactly the same as before! So what’s different? Using a timer rather than delay() means we can do other things while the LED is on. Using a timer is a major step in being able to create more advanced code.
I already have a sketch that starts a blinking LED when a push button switch is pressed, however, the same button is used to stop the blinking. I want to change the off part to a timer.
Here is the sketch:
//  Sketch: Using a push button switch to turn on an LED with a timer to turn off the LED
//  www.martyncurrey.com
//
//
//  Pins
//  D10 to 330 ohm resister and LED
//  D2 to push button switch with 10K ohm pull down resistor
//

// Define the pins being used
int pin_LED = 10;
int pin_switch = 2;

// variables to hold the new and old switch states
boolean oldSwitchState = LOW;

// variables used to control the LED
boolean LEDisON = false;
boolean keyPressed = false;

// variables used for the timer
long timer_timeStart = 0;
long timer_timeWait = 2000;  // the timer time. 2000ms = 2 seconds
boolean timerIsActive = false;


void setup()
{
    Serial.begin(9600);
    Serial.print("Sketch:   ");   Serial.println(__FILE__);
    Serial.print("Uploaded: ");   Serial.println(__DATE__);
    Serial.println(" ");

    pinMode(pin_LED, OUTPUT);
    digitalWrite(pin_LED,LOW);
    pinMode(pin_switch, INPUT);
}


void loop()
{
    keyPressed = checkButtonSwitch();  //  check the status of the button switch

    if ( keyPressed == true )  //  if the button switch is pressed do something
    {
        keyPressed = false;
        turnOnLED();
        startTimer();
    }

    if ( LEDisON == true )  //  if the LED is on check to see if it is time to turn it off
    {
        timerIsActive = checkTimer();
        if (timerIsActive == false) {  stopTimer(); turnOfLED();  }
    }

}  // loop


boolean checkButtonSwitch()
{

  boolean key = false;
  boolean newSwitchState1 = digitalRead(pin_switch);      delay(1);
  boolean newSwitchState2 = digitalRead(pin_switch);      delay(1);
  boolean newSwitchState3 = digitalRead(pin_switch);

  if (  (newSwitchState1==newSwitchState2) && (newSwitchState1==newSwitchState3) )
  {
    if ( newSwitchState1 != oldSwitchState )
    {
      if ( newSwitchState1 == HIGH ) { key = true;  }
      else                           { key = false; } // not required and can be removed. key already set to false;
      oldSwitchState = newSwitchState1;
    }
  }
  return key;
}


void startTimer()
{
  timer_timeStart = millis();
  timerIsActive = true;
}

void stopTimer()
{
  timerIsActive = false;
  timer_timeStart = 0;
}

boolean checkTimer()
{
  boolean timerOn = false;
  if ( millis() - timer_timeStart < timer_timeWait )  { timerOn = true;  }
  return timerOn;
}

void turnOnLED()
{
  digitalWrite(pin_LED, HIGH);
  LEDisON = true;
}


void turnOfLED ()
{
  LEDisON = false;
  digitalWrite(pin_LED, LOW);
}
As with most of these examples, on first glance it looks like I have far too many functions, however, even a cursory glance should tell you what the sketch does. And, using separate functions for the main parts of the code makes expanding the sketch far easier.
The above works. Press the button switch and the LED comes on for the desired time and then goes off. However, if you keep pressing the button switch while the LED is on, the LED never goes off. Each time the button switch is pressed the timer is reset. Great if this is what you want. Not so good if it isn’t.
To update the sketch to stop the timer being reset all we need to do is only check the button switch if the timer is not active.
Change
keyPressed = checkButtonSwitch();to
if (timerIsActive == false) { keyPressed = checkButtonSwitch(); }
// can also use   if (!timerIsActive) { keyPressed = checkButtonSwitch(); }
That’s it. Give it a try.
You could change the logic slightly. Check the button switch and then check the timer, and if the timer is not active turn on the LED. This way the button switch is usable for other things, such as turn off the LED early.
Example 3: Using a push button switch to turn on a blinking LED with a timer
In the previous example I talked about doing other things while the LED is on. Let’s try that by blinking the LED. The total length of time the LED in active is still controlled by a timer but this time, the LED blinks while it is active. We blink the LED by using a second timer. A timer within a timer. Inception timers!
The plan is:
- The LED if off
- When the button switch is closed, start a timer, start blinking the LED
- When the timer is finished, stop the LED blinking/turn off the LED
- Go back to 1.
Although I started with an earlier sketch quite a bit has changed. The loop() function is now larger, the switch check is still there but there are now new functions that:
- start the timer
- stop the timer
- check the timer status (active or not)
- stop the LED blinking
The blinking part is somewhat similar to the on/off timer. Both use time and millis().
It was not absolutely necessary to use so many functions, but separating the code like this keeps the loop() as short and clean as possible, and, when using descriptive variable names, makes it easy to see what is happening. It also means expanding the code later is easier.
Here is what I now have:
//  Sketch: Using a push button switch to turn on a blinking LED with auto off via a timer
//  www.martyncurrey.com
//
//
//  Pins
//  D10 to 330 ohm resister and LED
//  D2 to push button switch with 10K ohm pull down resistor
//

// Define the pins being used
int pin_LED = 10;
int pin_switch = 2;


// variables to hold the new and old switch states
boolean oldSwitchState = LOW;

// variables to hold the times
unsigned long flashLED_timeNow = 0;
unsigned long flashLED_timePrev = 0;
unsigned int  flashLED_blinkRate = 100; // This is the LED blink rate

// variables used to control the LED
boolean flashingLEDisON = false;
boolean LEDstatus = LOW;
boolean keyPressed = false;

// variables used for the timer
long timer_timeStart = 0;
long timer_timeWait = 2000;  // the timer length of time. 2000ms = 2 seconds
boolean timerIsActive = false;


void setup()
{
    Serial.begin(9600);
    Serial.print("Sketch:   ");   Serial.println(__FILE__);
    Serial.print("Uploaded: ");   Serial.println(__DATE__);
    Serial.println(" ");

    pinMode(pin_LED, OUTPUT);
    digitalWrite(pin_LED,LOW);
    pinMode(pin_switch, INPUT);
}

void loop()
{
    keyPressed = checkButtonSwitch();

    if ( keyPressed == true )
    {
        keyPressed = false;
        startTimer();
        flashingLEDisON = true;
    }


    if ( flashingLEDisON == true )
    {
        timerIsActive = checkTimer();
        if (timerIsActive == true)  { blinkTheLED(); }
        else                        { stopTimer(); turnOfLED();  }
    }

}  // loop


boolean checkButtonSwitch()
{
  boolean key = false;
  boolean newSwitchState1 = digitalRead(pin_switch);      delay(1);
  boolean newSwitchState2 = digitalRead(pin_switch);      delay(1);
  boolean newSwitchState3 = digitalRead(pin_switch);

  if (  (newSwitchState1==newSwitchState2) && (newSwitchState1==newSwitchState3) )
  {
    if ( newSwitchState1 != oldSwitchState )
    {
      if ( newSwitchState1 == HIGH ) { key = true;  }
      else                           { key = false; } // not required and can be removed. key already set to false;
      oldSwitchState = newSwitchState1;
    }
  }
  return key;
}


void startTimer()
{
  timer_timeStart = millis();
  timerIsActive = true;
}

void stopTimer()
{
  timerIsActive = false;
  timer_timeStart = 0;
}

boolean checkTimer()
{
  boolean timerOn = false;
  if ( millis() - timer_timeStart < timer_timeWait )  { timerOn = true;  }
  return timerOn;
}

void blinkTheLED()
{
  flashLED_timeNow = millis();
  if (flashLED_timeNow - flashLED_timePrev >= flashLED_blinkRate )
  {
    flashLED_timePrev = flashLED_timeNow;
    if (LEDstatus == LOW)   { LEDstatus = HIGH; }
    else                    { LEDstatus = LOW;  }
    digitalWrite(pin_LED, LEDstatus);
  }
}

void turnOfLED ()
{
  flashingLEDisON = false;
  digitalWrite(pin_LED, LOW);
}
In loop(), the button switch is checked and if pressed (closed) keyPressed is set to TRUE.
Next, keyPressed is checked, and if TRUE, startTimer() is called and flashingLEDisON is set to TRUE.
In this smallish sketch, using a variable to hold the key pressed status is not really required but coding this way sets a good foundation for larger and more complex sketches.
void startTimer()
{
  timer_timeStart = millis();
  timerIsActive = true;
}
startTimer() records the current time and sets timerIsActive to TRUE.
    if ( flashingLEDisON == true )
    {
        timerIsActive = checkTimer();
        if (timerIsActive == true)  { blinkTheLED(); }
        else                        { stopTimer(); turnOfLED();  }
    }
Next, flashingLEDisON is checked, and if TRUE, the timer is checked by calling the checkTimer() function.
checkTimer() returns a boolean value, TRUE or FALSE. TRUE means the timer is active. FALSE means the timer if off.
If the timer is active the function blinkTheLED() is called. If the timer is off, stopTimer() and turnOfLED() are called. Simples!
boolean checkTimer()
{
  boolean timerOn = false;
  if ( millis() - timer_timeStart < timer_timeWait )  { timerOn = true;   }
  return timerOn;
}
checkTimer() takes the current time, subtracts the timer start time and sees if the result is smaller than the timer time. If it is, timerOn is set to TRUE.
Finally, the function returns the timer status with return timerOn;
I could have reversed the condition. The below has the same logic as used in the flashing LED funtion and has gives the same result.
boolean checkTimer()
{
  boolean timerOn = true;
  if ( millis() - timer_timeStart >= timer_timeWait )  { timerOn = false;   }
  return timerOn;
}
Upload the sketch and give it a try. It works, except, if you press the button switch before the timer finishes you reset the timer. This may be a good solution for some applications or it may not.
In the next example I make a small update that stops the timer reset.
Example 4: Using a push button switch to turn on a blinking LED with a timer – no timer reset
There are two ways to stop a second button press resetting the timer
1 – don’t check the switch while the timer is active
2 – check the switch, but while the timer is active don’t initialize the timer or the LED.
For me, option 2 is better. I still check the switch bit choose to ignore if when I want to. Then, later I can still use the switch should I want to.
For example, when the LED is blinking and second button press could be to used to change the blink rate
All that is required it add the following inside the if (keyPress == true) condition:
        if ( checkTimer() == false )
        {
          startTimer();
          flashingLEDisON = true;
        }
Now, instead of just calling startTimer() and setting flashingLEDisON to TRUE. A check is first made to see if the timer is already active and only if it is not active is startTimer() called.
if ( checkTimer() == false ) can also be written as if ( !checkTimer() )
– ! means NOT and invert the logic.
if (! checkTimer() ) means if NOT checkTimer == TRUE, or more simply, if checkTimer is FALSE.
Here is the full sketch
//  Sketch: Using a push button switch to turn on a blinking LED with a timer - no timer reset
//  www.martyncurrey.com
//
//
//  Pins
//  D10 to 330 ohm resister and LED
//  D2 to push button switch with 10K ohm pull down resistor
//

// Define the pins being used
int pin_LED = 10;
int pin_switch = 2;


// variables to hold the new and old switch states
boolean oldSwitchState = LOW;

// variables to hold the times
unsigned long flashLED_timeNow = 0;
unsigned long flashLED_timePrev = 0;
unsigned int  flashLED_blinkRate = 100; // This is the LED blink rate

// variables used to control the LED
boolean flashingLEDisON = false;
boolean LEDstatus = LOW;
boolean keyPressed = false;

// variables used for the timer
long timer_timeStart = 0;
long timer_timeWait = 2000;  // the timer time. 2000ms = 2 seconds
boolean timerIsActive = false;


void setup()
{
    Serial.begin(9600);
    Serial.print("Sketch:   ");   Serial.println(__FILE__);
    Serial.print("Uploaded: ");   Serial.println(__DATE__);
    Serial.println(" ");

    pinMode(pin_LED, OUTPUT);
    digitalWrite(pin_LED,LOW);
    pinMode(pin_switch, INPUT);
}


void loop()
{
    keyPressed = checkButtonSwitch();

    if ( keyPressed == true )
    {
        keyPressed = false;

        if ( checkTimer() == false )
        {
          startTimer();
          flashingLEDisON = true;
        }

    }

    if ( flashingLEDisON == true )
    {
        timerIsActive = checkTimer();
        if (timerIsActive == true) { blinkTheLED(); }
        else                       { stopTimer(); turnOfLED();  }
    }

}  // loop


boolean checkButtonSwitch()
{

  boolean key = false;
  boolean newSwitchState1 = digitalRead(pin_switch);      delay(1);
  boolean newSwitchState2 = digitalRead(pin_switch);      delay(1);
  boolean newSwitchState3 = digitalRead(pin_switch);

  if (  (newSwitchState1==newSwitchState2) && (newSwitchState1==newSwitchState3) )
  {
    if ( newSwitchState1 != oldSwitchState )
    {
      if ( newSwitchState1 == HIGH ) { key = true;  }
      else                           { key = false; } // not required and can be removed. key already set to false;
      oldSwitchState = newSwitchState1;
    }
  }
  return key;
}


void startTimer()
{
  timer_timeStart = millis();
  timerIsActive = true;
}

void stopTimer()
{
  timerIsActive = false;
  timer_timeStart = 0;
}


boolean checkTimer()
{
  boolean timerOn = false;
  if ( millis() - timer_timeStart < timer_timeWait )  { timerOn = true;   }
  return timerOn;
}


void blinkTheLED()
{
  flashLED_timeNow = millis();
  if (flashLED_timeNow - flashLED_timePrev >= flashLED_blinkRate )
  {
    flashLED_timePrev = flashLED_timeNow;
    if (LEDstatus == LOW)   { LEDstatus = HIGH; }
    else                    { LEDstatus = LOW;  }
    digitalWrite(pin_LED, LEDstatus);
  }
}

void turnOfLED ()
{
  flashingLEDisON = false;
  digitalWrite(pin_LED, LOW);
}
Things to Try
Try making the timer longer and adding back the LED off function. Use the button switch to manually turn of the LED when the LED if flashing.
And that be it for this section.
Your guides and very good.
Thank you so much. I struggled with this for a long time before finding your website.
Your guides gave me everything I needed. They are well written and very comprehensive.
A novice, I appreciate the details and evolutionary options that make the example designs work and be flexible. I am going to use Example 2 in a multi-LED flickering candle set. I have extensively programmed – but not in C++ – based code. Looking forward to seeing more guides from you.
Just two inconsequential comments: 1) the IDE shows Boolean is replaced by Bool, and 2) though it does not matter, it looks like the breadboard flips the position of the LED and its current limit resistor as shown in the diagram at beginning.
A novice, I appreciate the details and evolutionary options that make the example designs work and be flexible. I plan to use Example 2 in a multi-LED flickering candle set. Looking forward to seeing more guides .
Just two inconsequential comments: 1) the IDE shows Boolean is replaced by Bool, and 2) though it does not matter, it looks like the breadboard flips the position of the LED and its current limit resistor as shown in the diagram at beginning.
Many thanks for that, just what I needed for a bathroom fan.
After many attempts myself and a rather unhelpful forum, this is the first one that works.
It’s far better for beginners to get something working out of a box, than being teased or abused verbally by so-called experts.
it’s not that people are lazy, they just want help.