A slight variation on the single push button switch flashing LED guide. This time with a free bonus switch. That’s right, two switches for twice the cost!
All I am doing is adding a second button switch. This means I will have one switch that turns on the flashing LED and another switch that turns of the flashing LED.
The second button isn’t really required and if all you want is to start and stop an LED but I hope the below an easy way to add another switch.
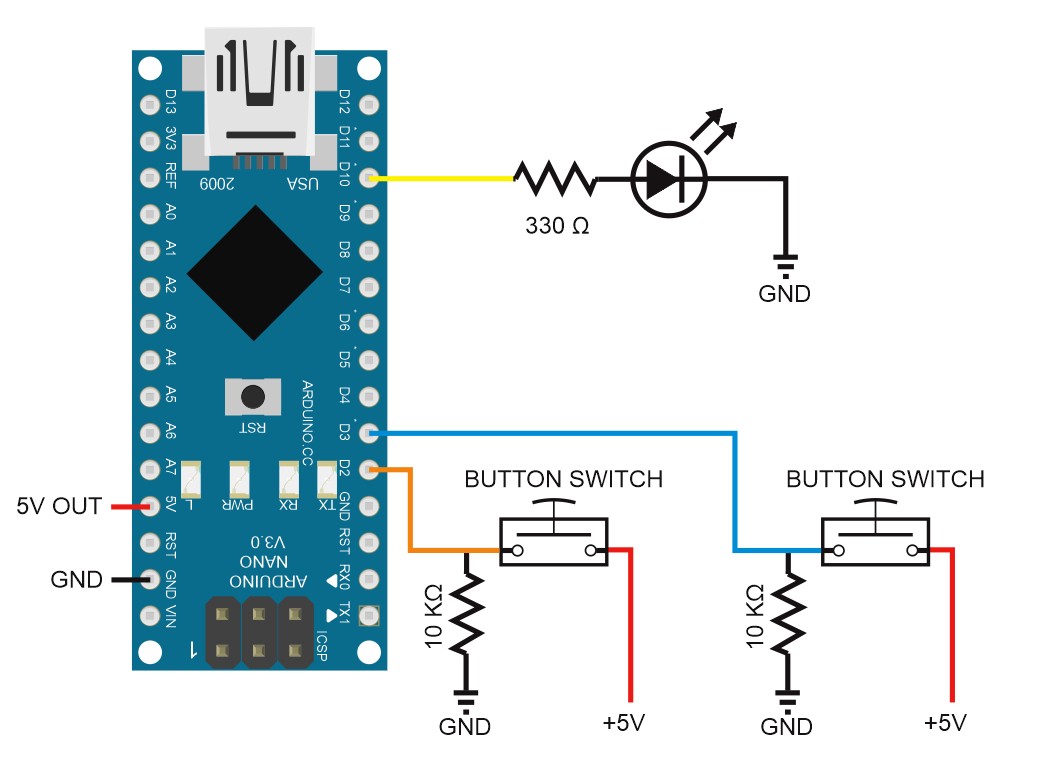
Circuit
Pin D10 – 330 ohm resistor + LED to GND
Pin D2 – 10K ohm resistor to GND + push button switch to VCC
Pin D3 – 10K ohm resistor to GND + push button switch to VCC
The example keeps things simple, to look after the second switch I simply duplicate existing variables and create a second switch check function to check the new push button switch. The new function copies code from the checkButtonSwitch() function in the previous guide. If you have no idea what I am talking about go see Start And Stop An Action Using a Push Button Switch.
Duplicating code like this may not be the best solution but sometimes, like here, it can be good to take the easiest route, especially when developing the sketch. After everything is working the character count can be reduced if required.
//  Sketch: Using two push button switches to turn an LED on and off
//  www.martyncurrey.com
//
//  Pins
//  D10 to 330 ohm resister and LED
//  D2 to push button switch with 10K ohm pull down resistor
//

// Define the pins being used
int pin_LED = 10;
int pin_switch1 = 2;
int pin_switch2 = 3;

// variables
boolean oldOnSwitchState = LOW;
boolean oldOffSwitchState = LOW;
boolean onKeyPressed = false;
boolean offKeyPressed = false;

boolean LEDisFlashing = false;

boolean LEDstatus = LOW;
long timeNow = 0;
long timePrev = 0;
int LEDflashTime = 100;


void setup()
{
    Serial.begin(9600);
    Serial.print("Sketch:   ");   Serial.println(__FILE__);
    Serial.print("Uploaded: ");   Serial.println(__DATE__);
    Serial.println(" ");

    pinMode(pin_LED, OUTPUT);
    digitalWrite(pin_LED,LOW);
    pinMode(pin_switch1, INPUT);
    pinMode(pin_switch2, INPUT);
}

void loop()
{
    onKeyPressed = checkOnSwitch();
    offKeyPressed = checkOffSwitch();

    if ( onKeyPressed && !LEDisFlashing )  { startLEDFlashing(); }
    if ( offKeyPressed && LEDisFlashing  ) { stopLEDFlashing();  }

    if ( LEDisFlashing ) { flashTheLED(); }

}  // loop


boolean checkOnSwitch()
{

  boolean switchStatus = false;
  boolean newSwitchState1 = digitalRead(pin_switch1);      delay(1);
  boolean newSwitchState2 = digitalRead(pin_switch1);      delay(1);
  boolean newSwitchState3 = digitalRead(pin_switch1);

  if (  (newSwitchState1==newSwitchState2) && (newSwitchState1==newSwitchState3) )
  {
    if ( newSwitchState1 != oldOnSwitchState )
    {
      if ( newSwitchState1 == HIGH ) { switchStatus = true;  }
      oldOnSwitchState = newSwitchState1;
    }
  }
  return switchStatus;
}

boolean checkOffSwitch()
{

  boolean switchStatus = false;
  boolean newSwitchState1 = digitalRead(pin_switch2);      delay(1);
  boolean newSwitchState2 = digitalRead(pin_switch2);      delay(1);
  boolean newSwitchState3 = digitalRead(pin_switch2);

  if (  (newSwitchState1==newSwitchState2) && (newSwitchState1==newSwitchState3) )
  {
    if ( newSwitchState1 != oldOffSwitchState )
    {
      if ( newSwitchState1 == HIGH ) { switchStatus = true;  }
      oldOffSwitchState = newSwitchState1;
    }
  }
  return switchStatus;
}


void startLEDFlashing()
{
  LEDisFlashing = true;
}


void stopLEDFlashing()
{
  LEDisFlashing = false;
  digitalWrite(pin_LED,LOW);
}

void flashTheLED()
{
    timeNow = millis();
    if (timeNow - timePrev >= LEDflashTime )
    {
          timePrev = timeNow;
          if (LEDstatus == LOW) { LEDstatus = HIGH; } else { LEDstatus = LOW; }
          digitalWrite(pin_LED, LEDstatus);
    }
}
All the action happens in the loop() function, which, thanks to using other functions, is fairly concise.
void loop()
{
    onKeyPressed = checkOnSwitch();
    offKeyPressed = checkOffSwitch();

    if ( onKeyPressed && !LEDisFlashing )  { startLEDFlashing(); }
    if ( offKeyPressed && LEDisFlashing  ) { stopLEDFlashing();  }

    if ( LEDisFlashing ) { flashTheLED(); }

}  // loop
First the two switches are checked and the variables holding the switch status are set.
Then a check is made to see if a button has been pressed and if the flashing LED should be started or stopped.
LEDisFlashing is used to hold the flash status. TRUE for flashing. FALSE for off.
Finally, if LEDisFlashing is TRUE the flashTheLED() function is called.
This may seem fairly convoluted. I certainly don’t need to use so many variables and have so many separate functions. However, doing it this way makes expanding the code later easier and keeps the code readable. And, just by looking at the loop() function you should be able to tell what the sketch does.
I like to group similar things together so I have
    onKeyPressed = checkOnSwitch();
    offKeyPressed = checkOffSwitch();
followed by
if ( onKeyPressed && !LEDisFlashing )  { startLEDFlashing(); }
if ( offKeyPressed && LEDisFlashing  ) { stopLEDFlashing();  }
You may wish to move things around and the beauty of using this style of code is you can easily move the logic around without worrying about large blocks of code getting messed up. The below does exactly the same in a more character conservative way. Not so easy to understand though.
    if ( checkOnSwitch() && !LEDisFlashing )  { startLEDFlashing(); }
    if ( checkOffSwitch() && LEDisFlashing  ) { stopLEDFlashing();  }

    if ( LEDisFlashing ) { flashTheLED(); }
That’s it. Short and sweet.
Thank you
Exactly what I wanted.