This this the first part of the new and improved Arduino Serial series of guides. Here are all the new guides:
Introduction, Using The Serial Monitor, and More
A Look at the Different Serial Libraries
Serial Commands Explained
Serial Data
Getting Started With Using Serial Communication To Send Commands
ASCII Data and Using Markers to Separate Data
In my opinion a basic understanding of the Serial Monitor is crucial when using the Arduino IDE. Not only will it allow you to output messages while developing sketches but also give you an easy way to help with debugging.
If you are very new to Arduino try these simple examples to get you started. If you are already familiar with the serial monitor feel free to jump ahead.
Arduino Serial Monitor
This is a basic example of displaying text in the serial monitor. Connect the Arduino to a PC, upload the following sketch, open the serial monitor and be amazed…
// Basic serial print example 01. Hello World

void setup()
{
    Serial.begin(9600);
    while (!Serial);
    Serial.print("Hello World");
}

void loop()
{
}
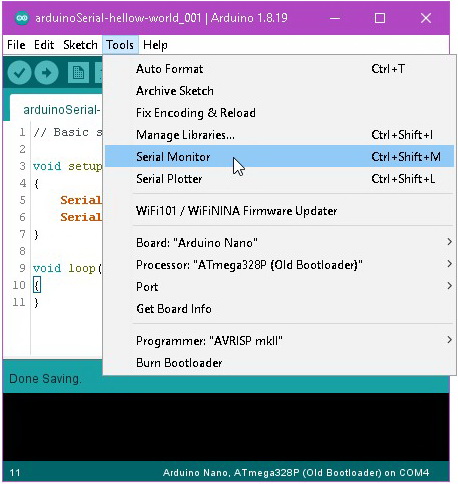
After uploading the sketch, open the serial monitor.
To open the Serial Monitor, go to Tools and click Serial Monitor (or, on Windows, press ctrl+shift+m on the keyboard).
If you see the “Hello World” message you have everything set up correctly.
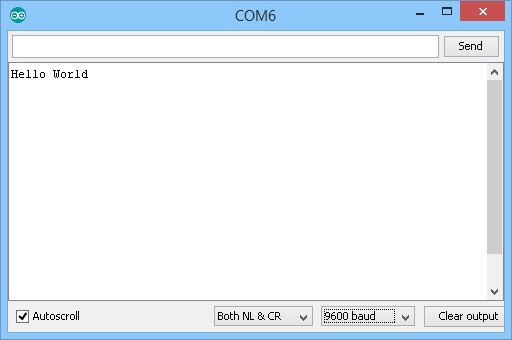
If you do not see the “Hello World” message you need to figure out what is wrong. If you managed to upload the sketch I think we can safely assume the Arduino is connected to the computer. This means it is likely you have the wrong baud rate selected.

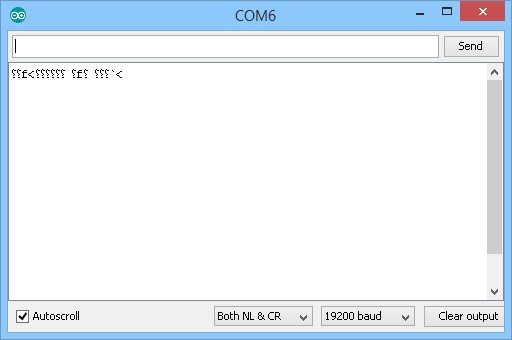
Here I have a baud rate of 4800 and also 19200. You can see that I have garbage characters. This kind of output in the serial monitor is indicative of a baud rate mismatch.
If the mismatch is large you may not get anything at all.
When using serial communications you need to make sure you are using the same baud rate at both ends. So how do you know what baud rate to use? It is the value you use when you begin the serial channel.
Serial.begin(9600);
This tells the Arduino to open a serial channel at 9600 baud rate.It is actually telling the Arduino to open a hardware serial channel but we will get to that a little later. You then select the same value in the serial monitor.

Why 9600? No reason. There are many different rates I could have used. The important thing is to use the same speed at both sides.
Note: baud rate is important when you try using faster rates. See Different Arduino Serials
while (!Serial)
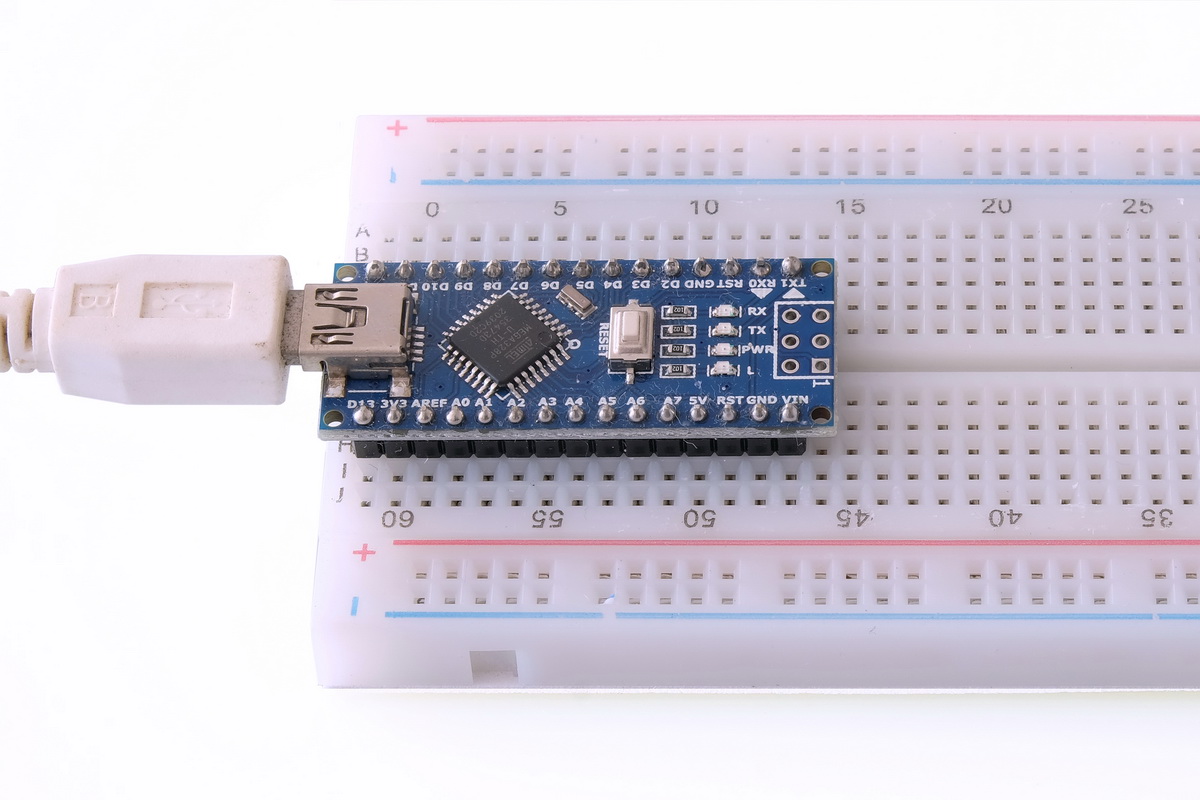
On regular Arduinos such as the Uno, Mega, Nano (boards with a FT232 chip or other USB->Serial bridge chip like the CH340), the serial channel starts straight away and printing to the Serial Monitor can be done right after the Serial.begin(9600); command.
Boards with a direct USB connection, such as the Leonardo, take a short time to start the serial channel and if you try to print too quickly, the data is lost. To avoid this you can add while (!Serial). while (!Serial) waits for the serial channel to be ready. Basically, the Arduino will sit and wait until Serial == TRUE which means the serial channel has been initiated and is ready.
! means NOT in Arduino land, so while(!Serial) means, wait here while NOT Serial. This has the same logic as using while(Serial==False).
End of Line Characters
If you print two strings you will see that they appear together on a single line in the Serial Monitor.
// Basic serial print example 02. No line break

void setup()
{
    Serial.begin(9600);
    while (!Serial);
    Serial.print("Hello World");
    Serial.print("Another string");
}

void loop()
{
}
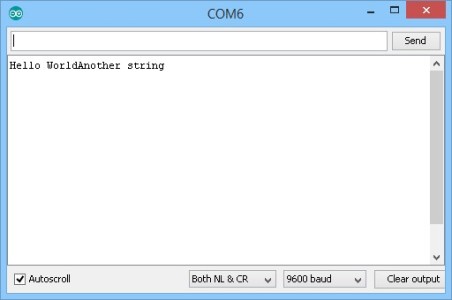
This is because we didn’t tell the serial monitor to start a new line after the “Hello World” message.
There are two line end characters; new line and carriage return. These are non visible, non printable characters that act as controls telling the serial monitor to go to the start of the next line. There are two ways we can add the end of line (EOL) characters
1 – add “\r\n” to what we are printing, or
2 – use Serial.println()
Both produce the same results and Serial.println() simply adds the “\r\n” characters to what it is printing.
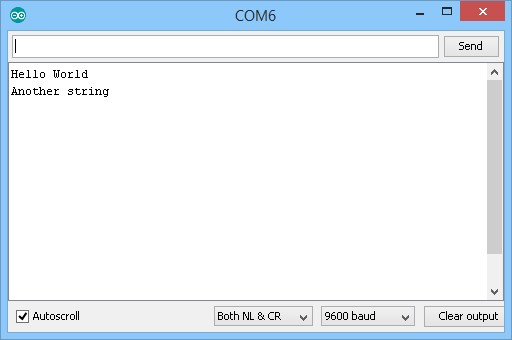
// Basic serial print example 03. Add line breaks with println

void setup()
{
    Serial.begin(9600);
    while (!Serial);
    Serial.println("Hello World");
    Serial.println("Another string");
}

void loop()
{
}
Using Serial.println() the EOL characters are added and the two messages are displayed on separate lines.
On a Windows system:
\r (Carriage Return). Moves the cursor to the beginning of the line without advancing to the next line
\n (Line Feed). Moves the cursor down a line without returning to the beginning of the line
\r\n (End Of Line): Combination of \r and \n
Serial monitor: Formatting output using the tab command
For quick and easy formatting spaces can be used but the output can become messy when the data has variable lengths. A better solution is the tab command “\t”. This works in exactly the same way tab works in a word processor; it moves the cursor over to the next column and lines up the output.
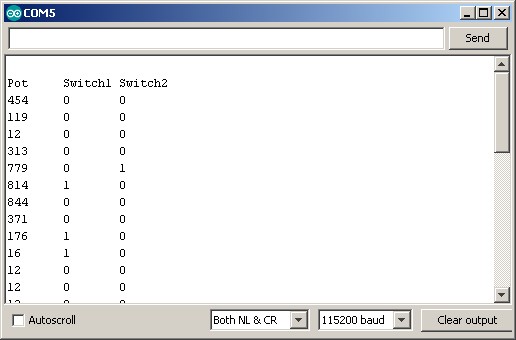
For this example there are button switches connected to pin 14(A0) and 15(A1) and a potentiometer on pin A3
byte potPin = 17;
byte switch1_pin = 14;
byte switch2_pin = 15;

int potVal = 0;
boolean switch1State = 0;
boolean switch2State = 0;

void setup()
{
  Serial.begin(115200);
  while (!Serial);
  Serial.println("");
  Serial.println("Pot\tSwitch1\tSwitch2");
}

void loop()
{

  potVal = analogRead(potPin);
  switch1State = digitalRead(switch1_pin);
  switch2State = digitalRead(switch2_pin);

   Serial.print(potVal);  Serial.print("\t");  Serial.print(switch1State);  Serial.print("\t");  Serial.println(switch2State);

  delay(500);

}
Using tab means the columns stay aligned regardless of how small or large potVal is (not totally true. If the value becomes too large the tab character will move the cursor over to the next tab column).
How fast is serial
Baud rate 9600bps mean 9600s bits per second. The Arduino uses the common 8N1 protocol which uses 10 bits for every character. This means (9600/10) 960 characters per second. This may seen fast but it is actually quite slow. A typically Arduino can perform millions of operations per second.
If you look at sketches and example online, you will notice a wide range of baud rates being used. 38400bps and 115200bps are very common. These are quicker, 3840 and 11520 characters a second. Faster but still fairly slow by Arduino standards.
How fast can it go? Hardware serial on a 16 MHz Arduino is more than capable of 2,000,000 bps and with special considerations 2,500,000 bps is possible. As the speed gets higher you need to consider the processor clock speed and a myriad of other factors though.
What baud rate should I use?
This can depend on many things; what Arduino you are using, what you are communicating with, how much data you are transmitting, and if you are using hardware serial or software serial. Transmission error can also play a part.
What is 8N1
8N1 is one of the more common serial protocols and means; 8 bits, no parity and 1 stop bit. It is slightly misleading as there are actually 10 bits, we also have a start bit. For more details about UART and 8N1 see the Serial UART And How It Works guide.
What is Transmission Error
Transmission error is the amount of error due to different frequencies being used by the host microprocessor and the baud rate. When the baud rate, does not match exactly the Arduino frequency there is a small % error that can cause timing drift.
It’s basically errors that happen when there are two clocks ticking at different rates. Sometimes the ticks happen at the same time, sometimes they don’t. When the ticks are at the same time, great, perfect sync. When the ticks are close, the system kind of self corrects and things are normally good. When the ticks are far apart, things don’t work, at best garbled message, at worst, nothing, silence.
Unless you have special requirements there is no need to worry too much about transmission error. Serial on the Arduino has a margin of error built in.
Buffer Size
Most Arduinos, that is Arduinos with 1023 bytes or more of RAM, have a 64 character buffer for serial input and output. For most uses this is fine but care needs to be taken when a lot of data is being received.
When the input buffer is full any new data received is discarded, it simply disappears. This can lead to issues with data disappearing, sometimes in the unexpected ways.
Imagine you are receiving 200 bytes of data. The Arduino receives the first 64 bytes and the buffer gets full. The data is still arriving and if the buffer is not emptied bytes 65 to 200 are lost.
Now imaging that you start to read the data at around the point that byte 100 is received. Bytes 65 to 99 are still lost but the buffer now has space so bytes 100 on wards are stored. This means to have a chunk of data in the middle of the sequence missing (bytes 65 to 100).
The only way around this is to keep emptying the buffer and ensure you always have space for new data (or change the buffer size but that is advanced tinkering).
Sending data is different; when data is transmitted if the output buffer is full the print/write function blocks until there is space for the remaining data.
If you want to know more about UART, what it is and how it works, jump to https://www.martyncurrey.com/serial-uart/
Martyn, thanks so much for the post.Really thank you! Keep writing.
Very useful article! You explained many doubts to me. Thank you.
Well done Marty.
Wonderful explanations. Suddenly, everything becomes clear :-)
Keep posting please!
Will Arduino Serial Part 2 be completed?
It is already completed.
Arduino Serial: A Look at the Different Serial Libraries
Very well done tutorial. Thank you Martyn for sharing your knowledge. You have great pedagogical talents.
Jacques Bourdouxhe
Great document, thanks.
Thankyou …. I can now run in the light with the Arduino instead of walking in the dark .. unfortunately you don’t know me and you will never know how much you have helped someone who struggles to program Thankyou a (1000); times
You can change the serial buffer size. It is a #define in the code. You can modify the source file directly or your ide may allow you to override the #define at the project level.
For the board I’m using currently it is SERIAL_RX_BUFFER_SIZE, located in
C:Program Files (x86)ArduinohardwarearduinoavrcoresarduinoHardwareSerial.h
For a Teensy using Serial1 it is SERIAL1_RX_BUFFER_SIZE located in
C:Program Files (x86)Arduinohardwareteensyavrcoresteensy3serial1.c
steve
Really very grateful for such an explanatory article, great work. Very few explanations have this quality and detail. PURA VIDA / Costa Rica
This is just great. Kudos from Sri Lanka. Thank you for this amazing article.
Hello.
Excellent treatment of the problem.
One question, how can two Nanos communicate. I can communicate with one through serial software and I want to be able to write the second one but also to read … thank you very much.
Google Translate.
I don’t have a directly linked Arduino to Arduino guide but have a look at the connection by Bluetooth and take out the Bluetooth.
https://www.martyncurrey.com/arduino-to-arduino-by-bluetooth/
Unable to send Bytes 254 and 255.
For sending ASCII characters – OK.
For MODBUS RTU – not applicable.