If you look at the Arduino reference for serial you will see that serial has the following commands available:
begin()
end()
If (Serial)
print()
println()
write()
availableForWrite()
read()
readBytes()
readBytesUntil()
available()
setTimeout()
find()
findUntil()
parseFloat()
parseInt()
peek()
flush()
serialEvent()
That’s quite a lot. Fortunately you probably don’t need most of them.
It is very possible to produce very complex serial sketches without using most of these commands. I generally only use about 5 of the commands.
Some commands, such as find() and findUntil(), I don’t find useful and prefer to create my own routines that perform similar functions. Having said that, I do feel it is useful to have an understanding of the commands and how they work.
begin(baudRate) / begin(baudRate, settings)
If you have read the earlier guide, you will have seen begin() used to start or enable serial. Serial doesn’t work unless you initiate it and if you forget to add the begin() statement, the sketch will compile but nothing will be sent out over serial.
Remember to use the same baud rate at both ends.
Serial.begin(9600);Baud Rate
Baud rate is how fast data is transmitted and is normally expressed in bits-per-second or bps. In theory the baud rate can be any value you like, the important things is to use the same rate at both ends. In reality there is a common set of speeds such as 1200, 2400, 4800, 19200, 38400, 57600, and 115200.
Serial Settings
Serial data is sent in small packets and the packet has many different formats. The Arduino default setting is 8N1 which means 8 data bits, no parity, and 1 stop bit. There are many different schema or formats, click here to see a full list of the ones the Arduino can use.
Data Bits
This is the actual data.
Parity
Parity can be used as a very simple check against corrupted data. There are 2 typical options
N = No
E = Even. If the total data bits is odd then a parity bit is set to 1 to make the packet even.
O = Odd. If the total number data bits is even then a parity bit is set to 1 to make the packet odd.
Stop Bits
Stop bits mark the end of the packet. There can be either 1 or 2 stop bits but 1 stop bit is the most common.
Serial.begin(9600, SERIAL_8N1);Serial settings are optional and when not specified the Arduino will use the default 8N1 format this means Serial.begin(9600); is the same as Serial.begin(9600, SERIAL_8N1);
end()
end() closes or disables serial. For hardware serial this is not normally required but can be used if you ever need to use the RX and TX pins for other things after using serial. The serial RX and TX pins, Pins D0 and D1, can be used as regular pins when not using serial. I can’t think of a reason why you would want to do this though. If you need to use pins 0 and 1 then you are highly unlikely to use them for serial communication.
end() can be useful when using software serial. You can implement more than one software serial but can use only one channel at a time. This means you need to open and close channels as you want to use them.
Serial.end();If (Serial)
Checks to see if serial communication is available but take care, on most Arduinos Serial always returns TRUE even if you have not initiated the serial channel.
This command is only useful when used for boards like the Leonardo and Micro Pro (and other Arduinos that have a usb CDC connection) and works as you may expect; TRUE when serial is available and FALSE when it is not. It does not work with Serial1 on the Leonardo though. This always always returns TRUE.
In some of the examples on the site you may have noticed
// wait for the serial port to connect.
while (!Serial) { ; }
This is for the Leonardo and tells the Arduino to wait until serial is available before continuing.
print(), println() and write()
I have already mentioned the difference between print() and println(). println() adds carriage return and new line characters (\r\n) and print() does not. But what does print() and println() actually do and how are they different to write()?
According to the Arduino reference
Serial.write() writes binary data to the serial port.
Serial.print() prints data to the serial port as human-readable ASCII text.
This sounds fairly straight forward but there is more to it that that and isn’t all data binary anyway.
print() and write() may at first seem to be the same but there are some key differences. print() and println() convert all numeric values to human-readable ASCII text. write() doesn’t convert anything. It simply sends what you give it. This makes write() more efficient and faster than print/println().
What is the difference between binary and human-readable ASCII text? It is the difference between the value 1 and the character that represents a 1. IE ASCII 48 which is “1”.
Serial.print(123); displays “123” in the serial monitor (3 characters). The value 123 is converted to the ASCII characters “1” + “2” + “3”. Serial.write(123) sends a single byte with the value of 123. (123 is the ascii code for the “{” character so Serial.write(123) displays a “{” in the serial monitor). This seems straight forward but Serial.write() can handle strings. Serial.write(“123”) sends the ASCII characters “1” + “2” + “3”, this is because you are giving a string to the write command not a value. Sometimes it is easy to mix up string representations of numbers and actual values. “1” and 1 are not the same.
// Arduino Serial: Print vs Write
// www.martyncurrey.com

void setup()
{
    Serial.begin(9600);
    Serial.println(123);
    Serial.write(123);
}

void loop() { }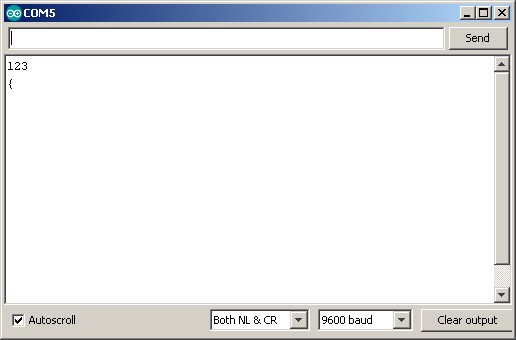
If you are not familiar with the ASCII table it is worth looking up. A good place to start is www.asciitable.com.
As you can see there is some overlap between Serial.print() and Serial.write. For example; Serial.print(“HELLO”) and Serial.write(“HELLO”) results in the same thing, “HELLO”. There are differences though, they handle numbers differently, print() can handle more data types, and has a built in base convertor.
Serial.print() can be used to display numeric values in different base formats. For example as Hexadecimal or binary.
// Arduino Serial: Floating point numbers
// www.martyncurrey.com

void setup()
{
    Serial.begin(9600);
    // wait for the serial port to connect. Required for Leonardo native USB port only
    while (!Serial) {  ;  }

    int value = 65;
    Serial.println(value);       // print as an ASCII-encoded decimal
    Serial.println(value, DEC);  // print as an ASCII-encoded decimal
    Serial.println(value, HEX);  // print as an ASCII-encoded hexadecimal
    Serial.println(value, OCT);  // print as an ASCII-encoded octal
    Serial.println(value, BIN);  // print as an ASCII-encoded binary
}

void loop()
{
}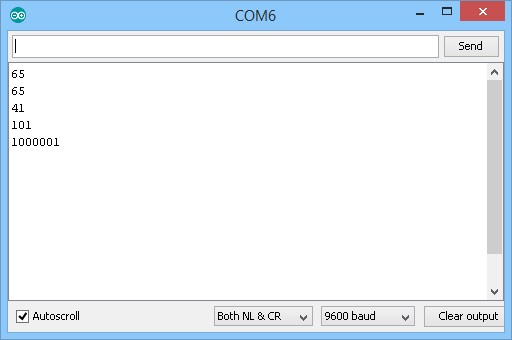
What happens if you use Serial.write(value);? I will leave this to you to find out.
Serial.print() can be used to display floating point numbers. As with other values, the number is converted to ascii, so the value 3.1234 becomes “3.1234”. When printing floats the default number of decimal places is 2. This means
float f = 3.1234;
Serial.print(f)
results in 3.12 being displayed.
As seen above print() has a optional second parameter. We used it above to change the base format. When printing floats the second parameter can be used to specify the number of decimal places.
When truncating a floating point value, print() will round up the value.
// Arduino Serial: Print floats
// www.martyncurrey.com

void setup()
{
    Serial.begin(9600);
    // wait for the serial port to connect. Required for Leonardo native USB port only
    while (!Serial) {  ;  }

     float f;

     f = 3.123456;
     Serial.println(f);
     Serial.println(f,0);
     Serial.println(f,2);
     Serial.println(f,4);
     Serial.println(f,6);

     //print a blank line
     Serial.println("");

     f = 3.747474;
     Serial.println(f);
     Serial.println(f,0);
     Serial.println(f,2);
     Serial.println(f,4);
     Serial.println(f,6);
}

void loop()
{
}
Unfortunately you cannot send a floating point value using write();
If you try the compiler gives you a “call of overloaded ‘write(float&)’ is ambiguous” error. This basically means the write() function can’t handle floats.
availableForWrite()
Returns the number of bytes (an int) in the serial output buffer. It is basically the number of characters left to write.
int numChars = Serial.availableForWrite();Most people probably do not need to worry to much about this but it can be useful in situations where you must be sure all serial data has been sent before doing the next function. Remember, when using the hardware serial, serial data is sent in the background so as soon as the serial.print() command has copied the data to the output buffer your code moves on. This means the next instructions in your code are being executed while data is still being sent. See also Serial.flush().
read()
Reads a single character or byte from the serial input buffer. Data received over serial is stored in the buffer until the sketch reads them. If the buffer is empty read() returns -1
You can see an example of this is the serial pass through sketch in the previous Arduino Serial guides
// Read from hardware serial
if ( Serial.available() )
{
    c = Serial.read();
}
if ( Serial.available() ) checks to see if data is available.
Serial.available() returns the number of bytes in the buffer. Any value > 0 is classed as TRUE (not FALSE).
I am using it here as a check to make sure we have at least 1 character of serial data before trying to read it.
readBytes(buffer, length)
Similar to read() except you can specify how many bytes to read. It is like having read() inside a for loop.
readBytes() expects 2 parameters; the buffer (variable) where to copy the data to and the number of bytes to read.
buffer is a char or byte array (char[] or byte[])
length is an int.
readBytes() returns the number of bytes copied. If nothing was copied it returns 0.
int length = 10;
char buffer [11];
int numberOfBytes = Serial.readBytes(buffer, length)
// if numberOfBytes >0 we have data.
// if numberOfBytes =10 we have all the data.
As with all c arrays, make sure the array or buffer is large enough to hold the data you are copying to it. The compiler won’t tell you if you make a mistake the sketch will simply start acting strange and you will have no idea why.
readBytesUntil(termChar,buffer,length)
Like readBytes() but you can now specify a terminator character/byte. The terminating character is not copied to the buffer.
For example, if you have data that always ends with a byte valued 13 you can use readBytesUntil():
termChar is a char or byte
buffer is a char or byte array (char[ ] or byte[ ])
length is an int.
int length = 10;
char buffer [11];
char termChar = 13;
int numberOfBytes = Serial.readBytesUntil(termChar,buffer, length)
// if numberOfBytes >0 we have data.
This is a handy command if you do not always have the same length data. The command simply reads the data until it finds the terminating character. You have to make sure the receiving buffer is large enough to accommodate the data though.
The default timeout for readBytes() and readBytesUntil() is 1 second (1000ms). This can be changed with setTimeout().
I personally do not like to use readBytes() or readBytesUntil(). They wait until all the bytes are available (or until they timeout) and while waiting they block the sketch. A better way, at least to me, is to create your own loop and use read() to copy the data. This allows you to check availability of data and only copy if data is there. If no data is available you can go and do other things. See examples of “Blink Without Delay” for examples of this technique.
setTimeout()
Change the timeout time used in readBytes() and readBytesUntil(). The time specified is in milliseconds.
The value is a long ctype data value.
Set the timeout to half a second (500ms).
Serial.setTimeout(500);find(searchString)
Serial.find() checks the serial input buffer for a given string (char array). Returns TRUE if the string is found and FALSE if it is not found (times out).
There are a couple of things to be aware off:
1 – it deletes data from the buffer as it searches.
2 – it blocks the sketch while it is doing its thing.
find() reads the serial input buffer, removing characters as it goes, until it finds the search string or it fully empties the buffer and times out. If you have a search string “abc” and the buffer contains “1234567890”, find() will empty the buffer, timeout, and then return FALSE.
If the buffer contains “hello world” and you search for “world”, find() runs through the buffer, deleting characters as it goes, until it finds “world”. find() then returns “TRUE”. In the process of searching for “world” the function removes the string from the serial buffer. This means, if the buffer contains “hello world” and you search for “world”, the function will return TRUE but the serial buffer will be empty. Any data in the buffer after “world” will remain.
find() blocks all other operations on the Arduino while it is working and has to sit and wait until find() is finished before moving to the next operation.
void setup()
{
    Serial.begin(9600);

    // allow time for the serial data to arrive
    delay(4000);

    // serial buffer contains "hello world"
    char searchString[] = "world";
    boolean found = Serial.find(searchString);

    if(found) { Serial.println("The world has been found"); }
    else      { Serial.println("The world has been lost"); }

}

void loop()
{
}
I personally feel find() is not that useful and it is far better to copy the serial data to a buffer and then search the buffer. In almost all my projects I control what data is sent and received so the chances are if data exists it is needed for something so using a command like find() that deletes data is not useful. This may just be me though.
I suppose if you are receiving data that you have no control over and you are only interested in specific values then find() could be used, still better to copy the data to your own buffer and then search this buffer though.
findUntil(searchString, terminatingString)
Similar to find() except findUntil() adds a terminator string. The function searches the serial input buffer looking for the search string until either:
1 – the search string is found
2 – the terminator string is found
3 – nothing is found and it times out.
If the search string is found the function returns TRUE, if not found, it returns FALSE.
If the terminator string is found the function stops looking and returns FALSE.
char searchString[] = "zzz";
char termString[]   = "\n";


void setup()
{
    Serial.begin(9600);

    boolean found = Serial.findUntil(searchString, termString);
    Serial.print("searchString ");
    if(found) { Serial.println("found"); }
    else { Serial.println("not found"); }
}

void loop()
{
}
It is worth remembering that the Arduino sends the EOL charatcers in “\r” “\n” order. If the serial buffer contains “abcd/r/n”. The above will return FALSE and empty the buffer. If you use “\n” as the terminating string, the function will still return FALSE but will leave the “/r” character in the buffer. That remaining character can screw things up when you don’t know it is there.
parseInt()
parseInt() returns the first valid ascii formatted (long) integer number found in the serial buffer. Characters that are not integers are skipped.
parseInt() runs through the serial buffer looking for characters that could be part of an integer. When looking it will delete any non numeric character until it finds an integer. If it does not find a valid value it will empty the buffer, time out and return 0. If an integer is found any characters/data after the integer are left in the serial buffer. If the buffer only contains a valid integer, parseInt() will read the available data and then wait for the timeout before returning the value. This can cause performance issues.
If the buffer contains “12345” then parseInt() returns 12345 and the buffer will be empty.
If the buffer contains “abd1234zxy”. parseInt() returns 1234 and the buffer will contain “xyx”. The “abc” will be deleted.
If the buffer contains “-3434\r\n”. parseInt() returns -3434 and the input buffer will have “\r\n” after the function has finished.
It is worth highlighting that parseInt() returns a long, which in Arduino land is a 4 byte value. parseInt() will work if you use an Arduino int (which is a 2 byte value) as long as the value is < 32,767 but you will run in to problems if the value is > 32,767 because when the long is copied to the int it will lose 2 bytes and so the value will change. For example; the signed long value 2147483640 gets truncated to -8 when converted to a signed int.
long parseIntValue = Serial.parseInt();Always copy the return value into a long variable.
parseFloat()
Serial.parseFloat() returns the first valid ascii formated floating point number from the serial buffer. The function returns empty handed (0) if a floating point number is not found or the timeout is reached. The data does not need to be in the buffer at the time the function is called but the function will block your code while it waits for data to arrive.
parsefloat runs through the serial buffer deleting non floating point characters (non-numbers and non-minus sign) until it finds a number or minus sign. It then reads the floating point data until it reaches another non float character. It then converts the ascii formatted value in to an actual floating point value.
If the serial buffer contains “abc3.1234abcdefg”. parseFloat() will delete the first “abc”, find the 3.1234 and leave “abcdefg” in the serial buffer.
Serial.peek()
Serial.peek() returns the next character in the serial buffer without removing it. It is like read() except it does not delete anything. Very useful if you want to create your own parser and need to see what the next character is without disturbing it.
peek() can only be used to read the first available character. Unlike read() it does not increment the buffer pointer or change the buffer so successive peeks() will return the same character.
Serial.flush()
This is a command many people get wrong, including myself when I first started with the Arduino. It is easy to assume you know what it does from the name especially if you have experience with other programming languages.
The Arduino reference contains the sentence “Waits for the transmission of outgoing serial data to complete. (Prior to Arduino 1.0, this instead removed any buffered incoming serial data.).” Besides knowing that the function changed with IDE 1.0 the important bit is “Waits for the transmission of outgoing serial data to complete.”. What does this mean? It means Serial.flush() does not instantly clear the buffer(s) but makes the Arduino wait until all the current serial data is sent.
Hardware serial works in the background, this is why you can use it while doing other things. When you use Serial.print(“HELLO WORLD”); the Arduino copies the “HELLO WORLD” data to the output buffer and then returns to your main code. It then uses interrupts to actually send the data in the background while still processing your sketch. This is normally a good thing, but, sometimes it can be a problem and you may want to wait until all the data has been sent before continuing with your program. This is where Serial.flush() can be used just keep in mind that the delay can be quite long.
serialEvent()
serialEvent() is not really a Serial command. It is a function that is called once every loop when there is data in the serial input buffer. (The function is actually called outside of the loop() function and hidden from most people but that is not important here). It is like having a if(Serial.available) outside of the main loop() function.
// Arduino Serial: Using serialEvent 01
// www.martyncurrey.com

char c  = ' ';
char buffer [21];
int pos = 0;
bool stringComplete = false;


void setup()
{
    Serial.begin(9600);
    Serial.println("START");
}

void loop()
{
 if (stringComplete)
 {
    Serial.println(buffer);
    buffer[0] = '\0';
    stringComplete = false;
    pos=0;
  }
}

void serialEvent()
{
    char c = (char)Serial.read();
    buffer[pos] = c;
    pos++;
    if (c == 10) {  stringComplete = true;  }
}
You should notice that there is no call to serialEvent() inside the sketch.The call is done outside of the the call to loop().
The above works and is fairly robust but I don’t like to use it. Using
void loop()
{
  if (Serial.available())
  {
    char c = Serial.read();
    // do something with c
  }
}
is far simpler and has exactly the same effect.
The following produces exactly the same output as the one above but uses if (Serial.available()) and is easier to read and maintain.
// Arduino Serial: Using if (Serial.available())
// www.martyncurrey.com

char c  = ' ';
char buffer [21];
int pos = 0;
bool stringComplete = false;

void setup()
{
    Serial.begin(9600);
    Serial.println("START");
}


void loop()
{
   if(Serial.available())
   {
      char c = (char)Serial.read();
      buffer[pos] = c;
      pos++;
      if (c == 10) {  stringComplete = true;  }
   }

   if (stringComplete)
   {
      Serial.println(buffer);
      buffer[0] = '\0';
      stringComplete = false;
      pos=0;
    }
}
your guides are very good.
Very good article! You explained many things I did not know.
Great document, thanks.
Amazing explanation! Especially the way you have included a touch of your thought to the descriptions makes the piece far more interactive. Great work!