The Arduino has several implementations of serial UART. Not all are equal.
Arduino Serial Libraries
– Hardware Serial
– SoftwareSerial
– AltSoftSerial
– NeoSWSerial
Which Serial Library should I use
Using a software UART and USB adapter to talk to a PC
Basic Serial Pass Through Using AltSoftSerial Sketch
Hardware Serial
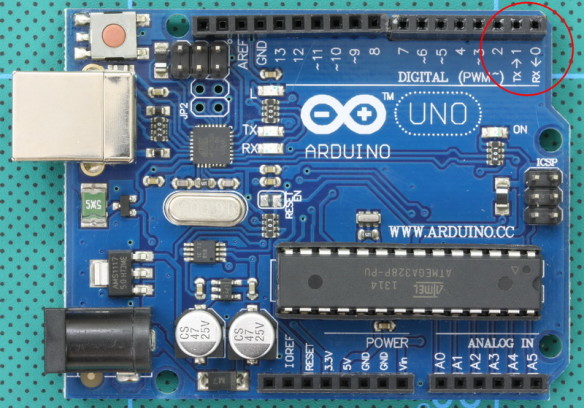
Hardware serial, as the name may suggest, is built in to the Arduino hardware which means it has dedicated pins, the ones labelled RX and TX pins (pins 0 and 1). All Arduinos have at least one hardware serial channel. Some have more.
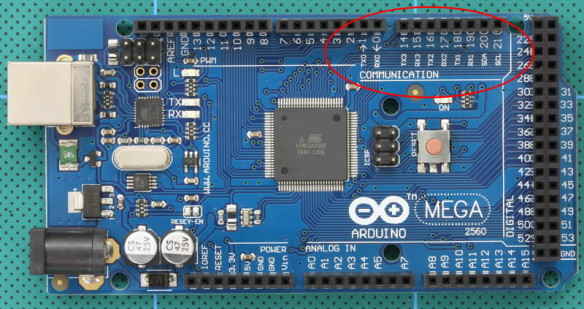
Some Arduinos have multiply hardware serial channels. The Mega, for example, has 4.
If the Arduino has a USB connector it is very likely the serial channel is connected to the USB via a a UART to USB adapter chip. All common Arduinos are like this and this is why you can print to the serial monitor when using usb.
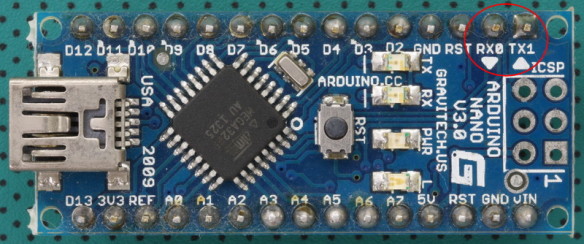
Some Arduinos such as the Mini Pro, or other Arduino compatible boards, do not have the UART to USB chip. This means they cannot be directly connected to a PC and need an adapter.
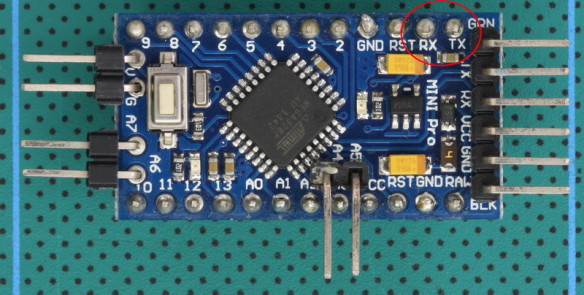
The Mini Pro has the serial pins but no USB connector.
Hardware serial has the best performance and is the most robust and reliable. This is always the best solution when available but it does have a caveat. The Arduino IDE uses the hardware serial to upload to the Arduino so when uploading new sketches you may need to disconnect what ever is connected to the RX and TX pins.
Hardware serial can:
– transmit and receive at the same time
– work while the Arduino is performing other tasks
– handle fast baud rates
Some Arduinos, such as the Mega and the Due, have more than 1 hardware serial. ATMega328 based Arduino have just one.
Hardware serial is integrated in to the IDE and adding a library is not required, all you need to do to initiate a serial connection is use the serial.begin() command.
void setup()
{
    Serial.begin(115200);
    // 115200 is the serial port baud rate
    // remember to select the same baud rate in the serial monitor

    // wait for the serial port to connect.
    while (!Serial) {  ;  }
    Serial.println("Hello World");
}

void loop()
{
}
If this is new to you have a look at Using The Serial Monitor
Hardware Serial links
The rest of the serial implementations are what they call software implementations. This means all the work is done in code. This has benefits and drawbacks. If you want to try out any of the software based serials you will need a usb to serial adapter. See the examples below.
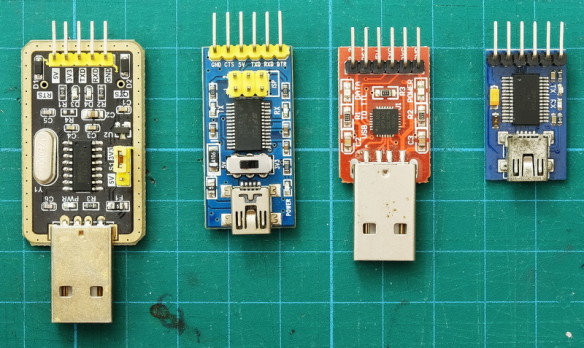
Various Serial UART to USB adapters.
Arduino Software Serial Libraries
There are quite a few software serial libraries now available for the Arduino. Some are standard, some are fairly specialized. Below are the 3 most common.
SoftwareSerial
Software Serial is a library that is part of the standard Arduino IDE. To use it you need to add the library to the sketch and them tell it the pins you want to use. Here it is being initialised with pins 2 and 3. Pin 2 for recieve and pin 3 for transmit.
// Add the SoftwareSerial library
#include <SoftwareSerial.h>

// Initiate an instance of the SoftwareSerial class. Requires the pin numbers used for RX and TX.
SoftwareSerial swSerial(2, 3); // RX, TX
Since SoftwareSerial comes with the IDE and because it can use most of the Arduino pins it is a very convenient solution but does have drawbacks. It is not reliable at very slow or very fast speeds and because of how it works it can cause problems with timings.
SoftwareSerial uses pin-change interrupts when receiving data, and both receive and transmit use delay loops, and while it is delaying, interrupts are disabled. This means it blocks the sketch. The code simply sits and waits for SoftwareSerial to finish before it can do anything else.
Because interrupts are disabled, SoftwareSerial interferes with anything that uses interrupts.
SoftwareSerial:
– comes with the Arduino IDE as standard.
– can be used with almost all pins (see below)
– can not transmit and receive at the same time
– can have multiple instances but only one instance can be active at one time
– not very good at very slow or fast baud rates. The baud rate should be kept in the range 9600 – 38400
– requires a library which comes with the Arduino IDE by default
// Arduino Serial: Using Software Serial
// www.martyncurey.com

// Add the SoftwareSerial library
#include <SoftwareSerial.h>

// Initiate an instance of the SoftwareSerial class. Requires the pin numbers used for RX and TX.
SoftwareSerial swSerial(2, 3); // RX, TX

void setup()
{
    // Start the connection and set the baud rate
    swSerial.begin(9600);
    swSerial.println("Hello, world!");
}

void loop()
{
}
Try using softwareSerial with different baud rates. What is the fastest you can get reliable communication? In my own experiments 38400 is the fastest I been able to get 100% error free communication and this was only when the Arduino wasn’t doing much else. After 38400 I start to see errors.
SoftwareSerial is convenient and is fairly flexible but it is not the best software serial choice.
AltSoftSerial
AltSoftSerial was written by Paul Stoffregen the creator of the Teensy range of boards. It is the best software serial implementation and should be used instead of the default SoftwareSerial where possible.
The AltSoftSerial library is available from the GitHub or through the library manager. AltSoftSerial takes a different approach over the regular SoftwareSerial library. The pins it uses are fixed, see the table below, and uses the 16 bit timer which means PWM on becomes disabled on certain pins.
AltSoftSerial:
– Can transmit and receive at the same time.
– Minimal interference when also using the Hardware Serial and other libraries
– More reliable at higher speeds than the other software serials
– Fixed pins for receive and transmit (see the table below)
– Disables PWM on a specific pin
– Uses the hardware Timer1 (16 bit) and will not work with other libraries that also need the same timer
| Board | Transmit Pin | Receive Pin | Unusable PWM |
| Nano, Uno, Duemilanove, Micro Pro (ATmega328 boards) | 9 | 8 | 10 |
| Mega | 46 | 48 | 44,45 |
| Leonardo, Yun, Micro | 5 | 13 | none |
| Teensy 3.0/3.1/3.2/3.5/3.6 | 21 | 20 | 22 |
// Arduino Serial: Using AltSoftSerial
// www.martyncurey.com

// Add the AltSoftSerial library
#include <AltSoftSerial.h>

// Initiate an instance of the altSerial class
// On ATmega 328 based Arduinos AltSoftSerial uses pin 8 for RX and pin 9 for TX
AltSoftSerial altSerial;

void setup()
{
    altSerial.begin(9600);
    altSerial.println("Hello World");
}

void loop()
{
}
AltSoftSerial Links
AltSoftSerial on the PJRC website
NeoSWSerial
NeoSWSerial was written by Slash Devin and it is the next best choice or at least better than the standard SoftwareSerial library. Like SoftwareSerial it can use most of the regular pins but has a limited range of baud rates, 9600 (default), 19200, 31250 (MIDI) and 38400 only. This isn’t really an issue though. The regular software serial has issues when used below 9600 and above 38400 so slower than 9600 and faster then 38400 shouldn’t be used.
NeoSWSerial:
– Can be used with most pins.
– Can receive and transmit at the same time.
– More friendly to interrupts on RX than SoftwareSerial
– Limited range of baud rates; 9600 (default), 19200, 31250 (MIDI) and 38400 only
Requires a library which can be downloaded from github or added through the library manager.
// Arduino Serial: Using NeoSWSerial
// www.martyncurey.com

// Add the NeoSWSerial library
#include <NeoSWSerial.h>

// initiate an instance of the NeoSWSerial class. Requires the pin numbers used for RX and TX.
// neoSerial( RX pin, TX pin )
NeoSWSerial neoSerial( 2, 3 );

void setup()
{
  neoSerial.begin(9600);
  neoSerial.println("Hello World");
}

void loop()
{
}
So Which Serial Library Should I Use?
Depends on what you are doing and how fast you want to do it. If you have to use a fast baud rate (such as 115200 or even 2,000,000) then the only option is the hardware serial. Software versions cannot handle these speeds.
If you do not need super fast rates and you have pins 8 and 9 available then AltSoftSerial is for you. Don’t have pins 8 or 9 and you are OK with one of the available baud rates then NeoSWSerial. If none of these work you are left with SoftwareSerial.
If you need more than one fast serial connection then you need an Arduino with more than one serial channel such as the Mega.
Using a Serial UART to USB Adapter to Talk to a PC
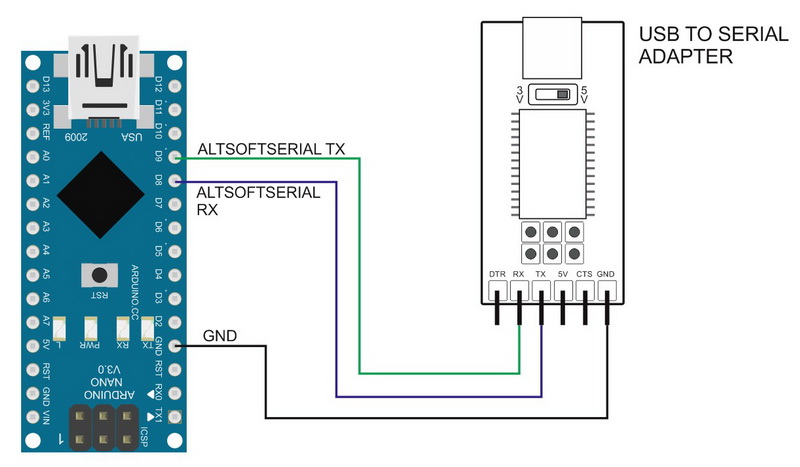
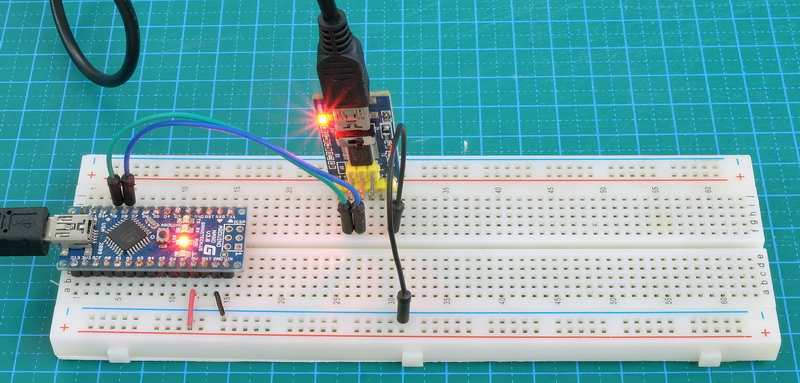
I think most people will have used the hardware serial to communicate with a connected PC using the serial monitor. If not see the examples above. Sometimes though it is useful to have another connection and we can do this using one of the software serials and a usb to serial adapter. Here I am using AltSoftSerial.
Simple circuit. The Arduino is connected to a PC using the standard USB connection and also by a usb to serial adapter. The usb to serial adapter is connected to pins 8 and 9 of the Arduino and AltSoftSerial is used to communicate over the usb to serial adapter. Power is delivered through usb. GNDs are connected.
Having two connections to the same PC gives you 2 COM ports; one for the Arduino and one for the adapter. In my case these are:
– the Arduino is on COM 6, and
– the usb adapter is on either COM 16
// Arduino Serial: Basic serial pass through using AltSoftSerial
// www.martyncurey.com

#include <AltSoftSerial.h>
AltSoftSerial softSerial;

char c=' ';

void setup()
{
    Serial.begin(9600);
    while(!Serial);
    Serial.print("Sketch:   ");   Serial.println(__FILE__);
    softSerial.begin(9600);
    Serial.println("AltSoftSerial started at 9600");
}

void loop()
{

    // Read from the software serial and send to the hardware serial
    if (softSerial.available())
    {
        c = softSerial.read();
        Serial.write(c);
    }

    // Read from hardware serial and send to software serial
    if ( Serial.available() )
    {
        c = Serial.read();
        softSerial.write(c);
    }
}
Plug everything in, upload the sketch and try it out.
If you have the correct drivers installed for the usb to serial adapter you will have 2 COM ports; 1 for the Arduino, and 1 for the adapter. If you now open 2 serial monitors you can talk to yourself.
Remember to set the baud rate to 9600 and select “Both NL & CR” in both Serial Monitors.
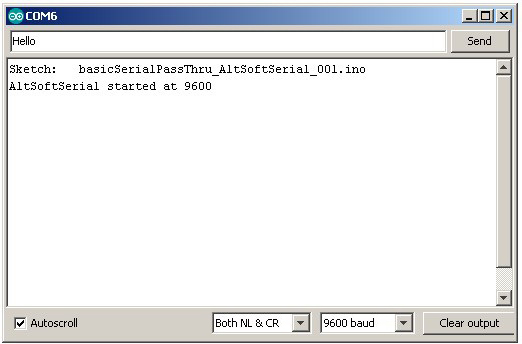
In the Serial Monitor connected to the Arduino USB port you should see the welcome message
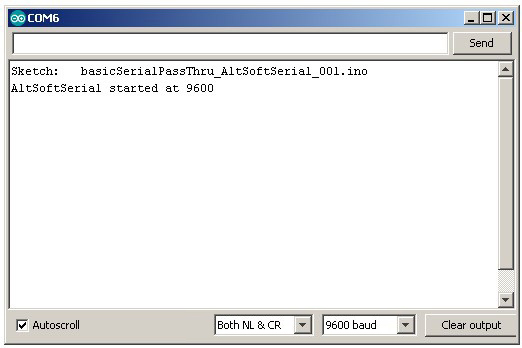
The Serial Monitor connected to the usb adapter should be empty
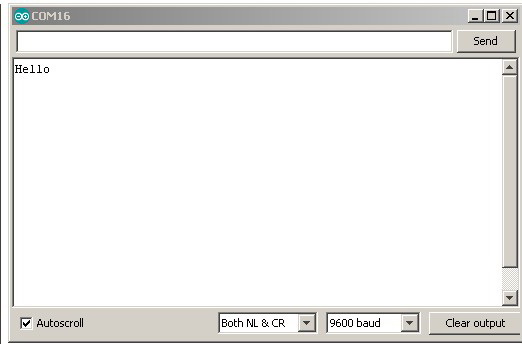
In the Serial Monitor connected to the Arduino, enter “Hello” and click send.
If the world loves you, or even likes you just a bit, “Hello” will appear in the other Serial Monitor.
Now try the other war around. In the Serial Monitor connected to the usb adapter enter “Hello back”.
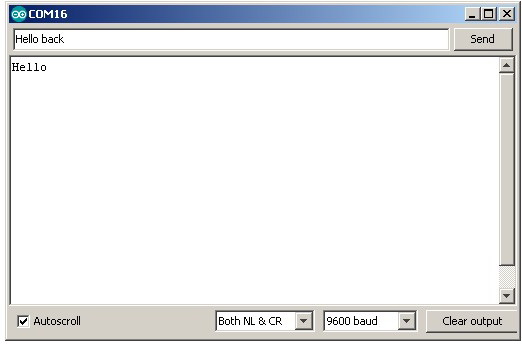
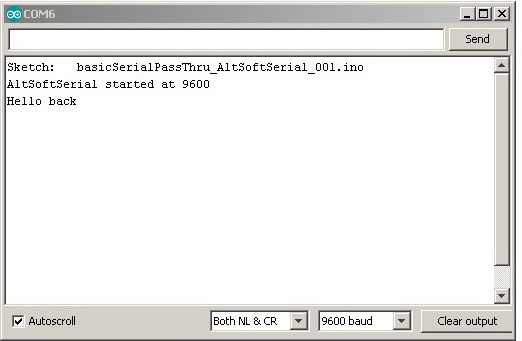
Congratulations! You are successfully talking to yourself.
At first this may appear to be of no use but using the usb to serial adapter can be very useful for debugging, especially when the hardware serial is used for other things.
You should also be able to see that the usb to serial adapter can be replaced with any device that talks UART and there are many, including all the Bluetooth modules I have written about on the rest of this website. It also forms an easy way to get 2 Arduinos talking to each other. One example that I am currently working on is an IOT Wordclock. The Word clock uses an Arduino and an ESP8266. The Arduino does most of the work and the ESP8266 takes care of the wifi stuff like the control webpage and getting the time from a NIST server. The two talk to each other through a UART connection using software serial.
Two Arduinos Talking To Each Other
Here is an example of linking two Arduinos together using AltSoftSerial. Both Arduinos have the basicSerialPassThru_AltSoftSerial_001 sketch from above.
Connect two Arduinos together.
Remember:
– RX on one side goes to TX on the other side.
– to connect the GNDs
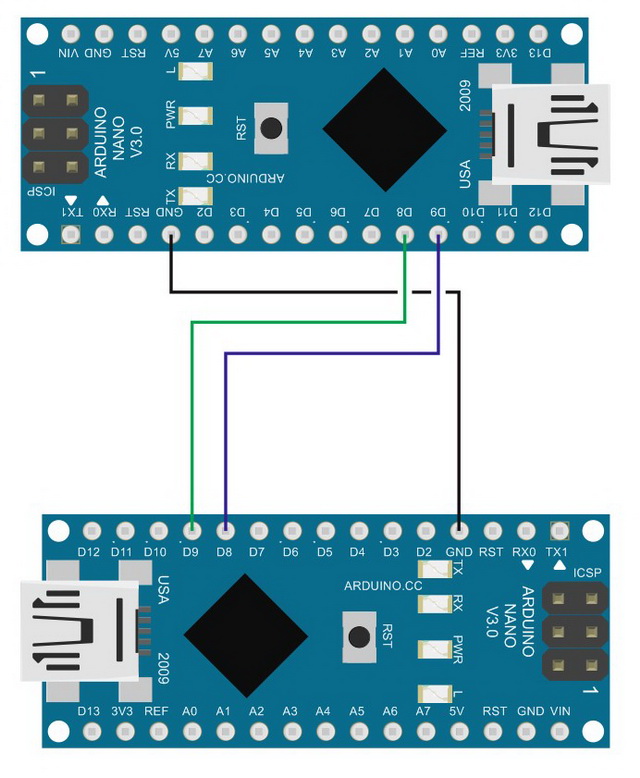
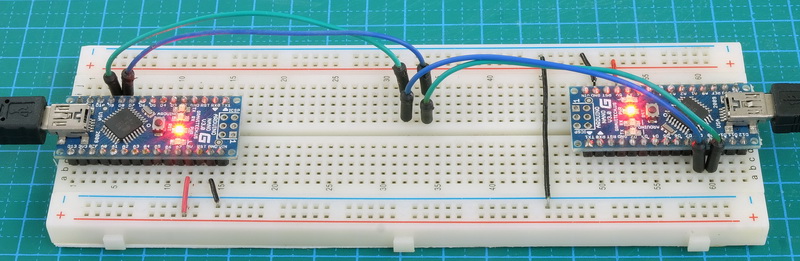
Upload the serial pass through sketch to both Arduinos and open the Serial Monitors.
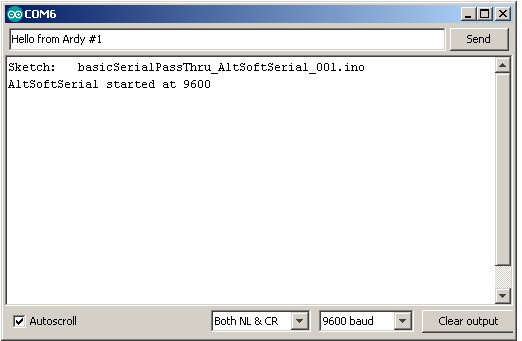
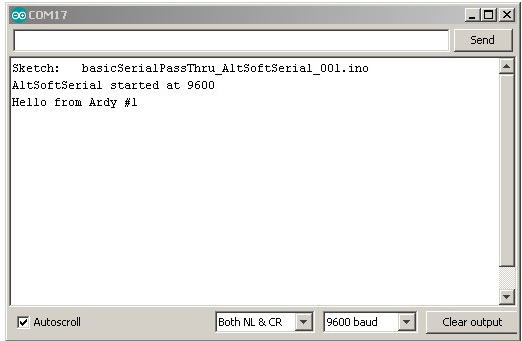
In my case Arduino #1 is using COM 6 and Arduino #2 is using COM 17
Since we are using the serial pass through sketch on both Arduinos you should see the welcome message in both windows.
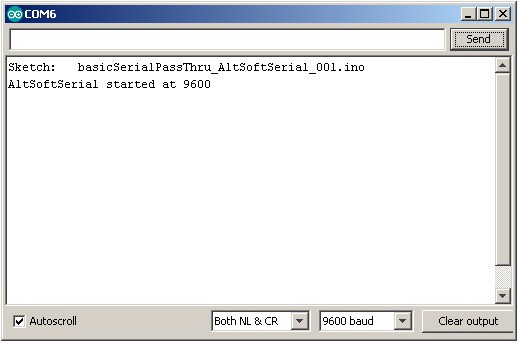
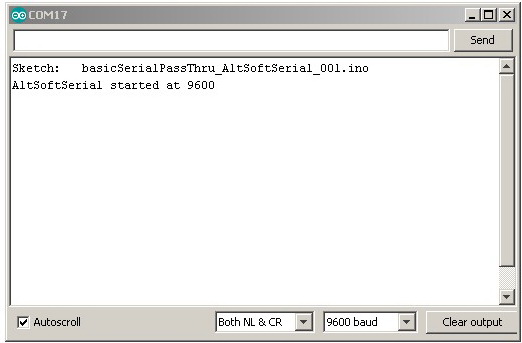
In the first Serial Monitor enter “Hello from Ardy #1” and click send
The message should appear in the second window.
Basic Serial Pass Through Using AltSoftSerial Sketch
I have used this sketch (or a version of it) many times throughout the website. It is the sketch I use when I am experimenting with Bluetooth modules (or anything that uses UART).
// Arduino Serial: Basic serial pass through using AltSoftSerial
// www.martyncurey.com

#include <AltSoftSerial.h>
AltSoftSerial softSerial;

char c=' ';

void setup()
{
    Serial.begin(9600);
    while(!Serial);
    Serial.print("Sketch:   ");   Serial.println(__FILE__);
    softSerial.begin(9600);
    Serial.println("AltSoftSerial started at 9600");
}

void loop()
{

    // Read from the software serial and send to the hardware serial
    if (softSerial.available())
    {
        c = softSerial.read();
        Serial.write(c);
    }

    // Read from hardware serial and send to software serial
    if ( Serial.available() )
    {
        c = Serial.read();
        softSerial.write(c);
    }
}
The sketch is very simple. It first initializes the hardware serial and soft serial and then prints a welcome message to the serial monitor (using the hardware serial channel).
void setup()
{
    Serial.begin(9600);
    while (!Serial);
    Serial.print("Sketch:   ");   Serial.println(__FILE__);
    softSerial.begin(9600);
    Serial.println("AltSoftSerial started at 9600");
}
Before we can initiate AltSoftSerial we need to tell the compiler to load the library
#include <AltSoftSerial.h>
AltSoftSerial softSerial;
Inside the main loop we check to see if there are any characters available on the software serial channel and if there are we read the first one and write it to the hardware serial channel. This prints it in the serial monitor.
// Read from the software serial and send to the hardware serial
if (softSerial.available())
{
    c = softSerial.read();
    Serial.write(c);
}
The sketch then checks the hardware serial. If data is available it reads the first character and sends it to the software serial channel. You should notice that nothing is sent to the serial monitor. You could, if you wish, echo what ever is entered in the serial monitor back to itself.
void loop()
{
// Read from hardware serial and send to software serial
if ( Serial.available() )
{
    c = Serial.read();
    softSerial.write(c);
}
Although only one character is read at a time, because the main loop is constantly looping we eventually get all available characters.
Excellent article! Really well explained.
Well done Marty.
Wonderful explanations. Suddenly, everything becomes clear :-)
Keep posting please!
Very informative and easy to understand example of how to reference the serial function. I have took so much time reading and searching various other references – and its all in this single page. Totally unaware that sofwareSerial is limited to low bauds such as 38000, so presents the options to use the other, more reliable options.
So, as a novice, is it possible to use the hardwareSerial for connected devices such as BT, GSM modules and include softwareSerial (via an FTDI on respective pins) for serial debugging?
yes, and this is how I generally do things.
But, because the usb to serial also uses the hardware serial pins you may need to remove the hardware serial connections when uploading new code.
Great article , can you write article on how to connect mega2560 and nodemcu via serial , i have initiated Software Serial on NodeMCU on pin D2(RX) , D3(T3) and have connected it to mega D18(TX1) , D19(RX1) , also i have connected Ground of arduino to NodeMCU G pin but i have no success with it am getting invalid characters on terminal of mega side , although both serial baud rate is same 9600 , so am not sure what is wrong , few days ago i was able to communicate ok but now i cant not sure how i have done it few days ago as i have disconnected circuit i made few days ago.
Really very grateful for such an explanatory article, great work. Very few explanations have this quality and detail. PURA VIDA / Costa Rica
You say: “Try using softwareSerial with different baud rates. What is the fastest you can get reliable communication? In my own experiments 38400 is the fastest I been able to get 100% error free communication and this was only when the Arduino wasn’t doing much else. After 38400 I start to see errors.”
I have had been working with HC-05 and softwareSerial with a rate of 115200. Too many problems!!
I chose 38400 and works fine!!
Thanks Martyn, your info is very helpfull!!
Javier
This is just great. Kudos from Sri Lanka. Thank you for this amazing article.
Hello.
Excellent treatment of the problem.
One question, how can two Nanos communicate. I can communicate with one through serial software and I want to be able to write the second one but also to read … thank you very much.
Google Translate.
I don’t have a directly linked Arduino to Arduino guide but have a look at the connection by Bluetooth and take out the Bluetooth.
https://www.martyncurrey.com/arduino-to-arduino-by-bluetooth/
Unable to send Bytes 254 and 255.
For sending ASCII characters – OK.
For MODBUS RTU – not applicable.