This is the first part of a guide about using a serial port to connect an Arduino to a Visual Basic app running on a PC. Communication is via the regular USB serial UART channel.
The first example is fairly simple, data is sent from the Arduino and displayed in a Visual Basic app.
This guide has been updated to Visual Studio / Visual Basic 2022, however, to keep things simple the app was created using Windows Forms App (.NET Framework).
Tools Required
Arduino + usb cable
PC with Visual Studio
- At the time of writing the latest version of Visual Studio is 2022. There are three editions;
- Community
- Professional
- Enterprise

Visual Studio Community is a full featured IDE and development system that is free for students, open-source contributors, and individuals. Caveat, you need a Microsoft account :-(
The download is an installer (not the full program), so download, run the installer, select which bits you want and install. Visual Studio supports many different languages and to follow this guide all you need is Windows Forms App (.NET Framework). It’s probably worthwhile installing all flavours of Visual Basic though.
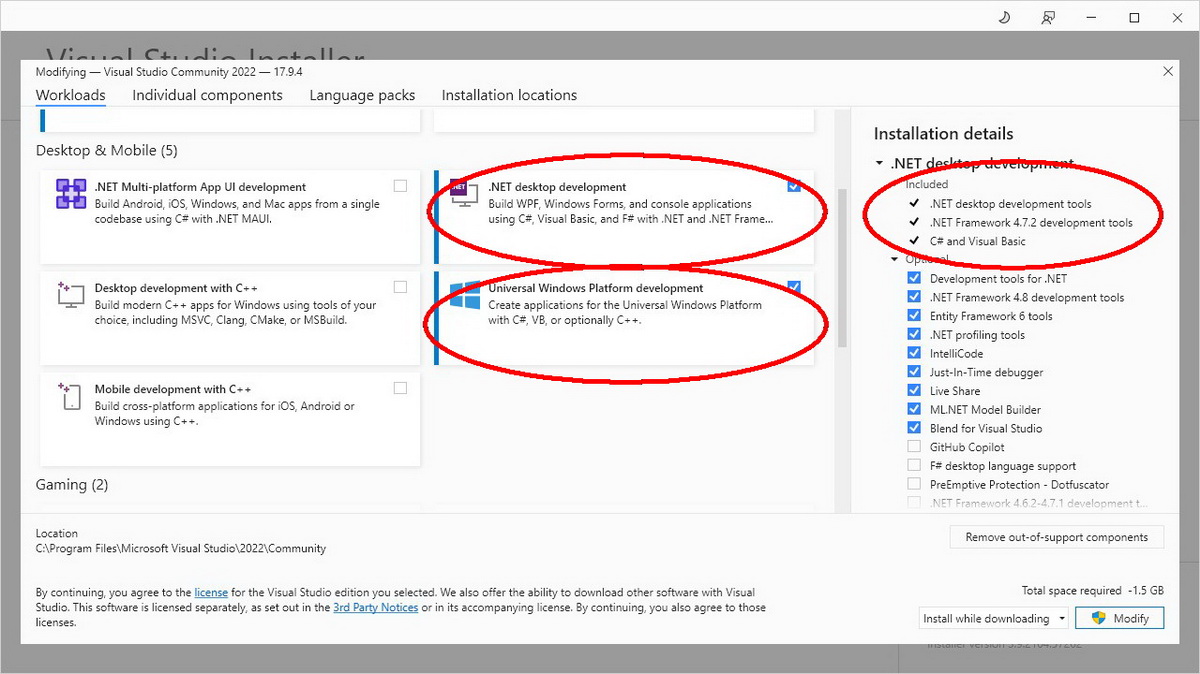
There are two flavours of Visual Basic, Windows Form App (WFA) and WPF Application.
This guide uses Windows Forms App (.NET Framework) which is the older .NET framework (the new one being simply .NET). .NET Framework includes. NET up to version 4.8 and the newer .NET uses version 5+. The current version is version 8.
Windows Forms App (.NET Framework) has the serialPort as part of the designer and it can easily be added by dragging from the Toolbox. The newer .NET has removed serialPort from the designer and serial port creation is done through code only. Using the older framework makes life a little easier but be aware it is the older .NET framework
The main download page is at https://visualstudio.microsoft.com/downloads/
If you are new to the IDE then it would be worth while watching a few guides., Microsoft have some good ones to start with:
Getting started with Visual Studio IDE
Tour the Visual Studio IDE
Arduino to Visual Basic Communication
Rather than building the app step by step (although I kind of do that with the various parts of this guide), it’s easier to have a working version straight away and explain what the parts do. I start with the Arduino Sketch.
The Arduino Sketch
The Arduino Sketch is fairly simple, it sends ASCII data (a count) over the serial connection once every second. At the same time it sends data it blinks the built in LED on pin 13.
It’s worth noting that the Arduino doesn’t care if anything is listening. It blindly sends the data until you turn it off.
/*
* Sketch Arduino and Visual Basic Part 1 - Receiving Data From the Arduino
* Send a count over a serial connection once a second
* https://www.martyncurrey.com/arduino-and-visual-basic-part-1-receiving-data-from-the-arduino/
*/

byte LEDpin = 13;
int count = 1000;

void setup()
{
     pinMode(LEDpin, OUTPUT);
     Serial.begin(9600);
}

void loop()
{
     Serial.println(count);
     count = count + 1;      //  count++;  also works, it's the same

     // flash the onboard LED to show data is being sent
     digitalWrite(LEDpin,HIGH);      delay(100);
     digitalWrite(LEDpin,LOW);       delay(900);
}
To check that the sketch works, upload the code and open the serial monitor. You can also take a note of the COM port. Mine is COM12 yours will likely be different.
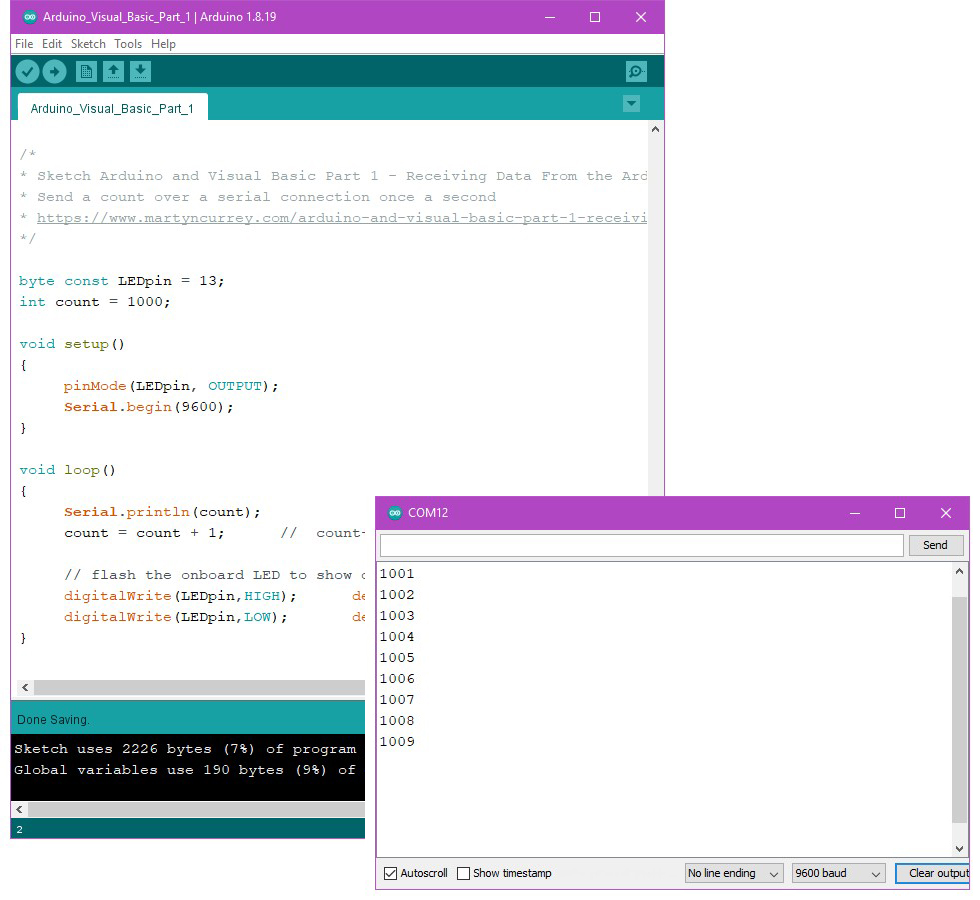
I use version 1 IDE. I use potable IDEs and the new V2 IDE doesn’t support full portable installation yet.
All we are going to do is replace the serial monitor with a Visual Basic app.
Open The Visual Basic App In Visual Studio
Assuming you have Visual Studio installed, download Arduino-Visual-Basic-Part-1 VB project. The download is a zip file, inside the zip file is a folder. Inside the folder are the project files.
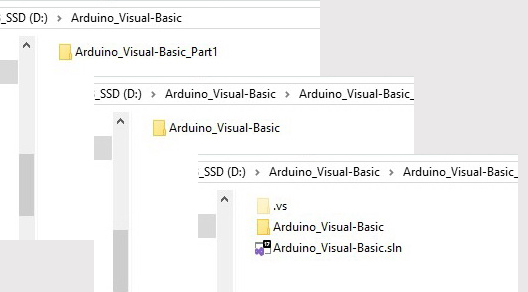
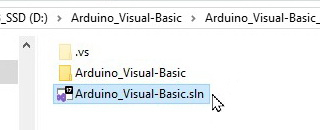
The easiest way to open the project is to double click the .sln file.
Visual Basic apps, generally, have two parts, the form and the code. The form is created using the designer. The code is created using the text editor.
A note for the pedantic. The form can also be created in code should you desire.
Double click the Arduino_Visual-Basic.sln.sln file. This should start Visual Studio and load the project.
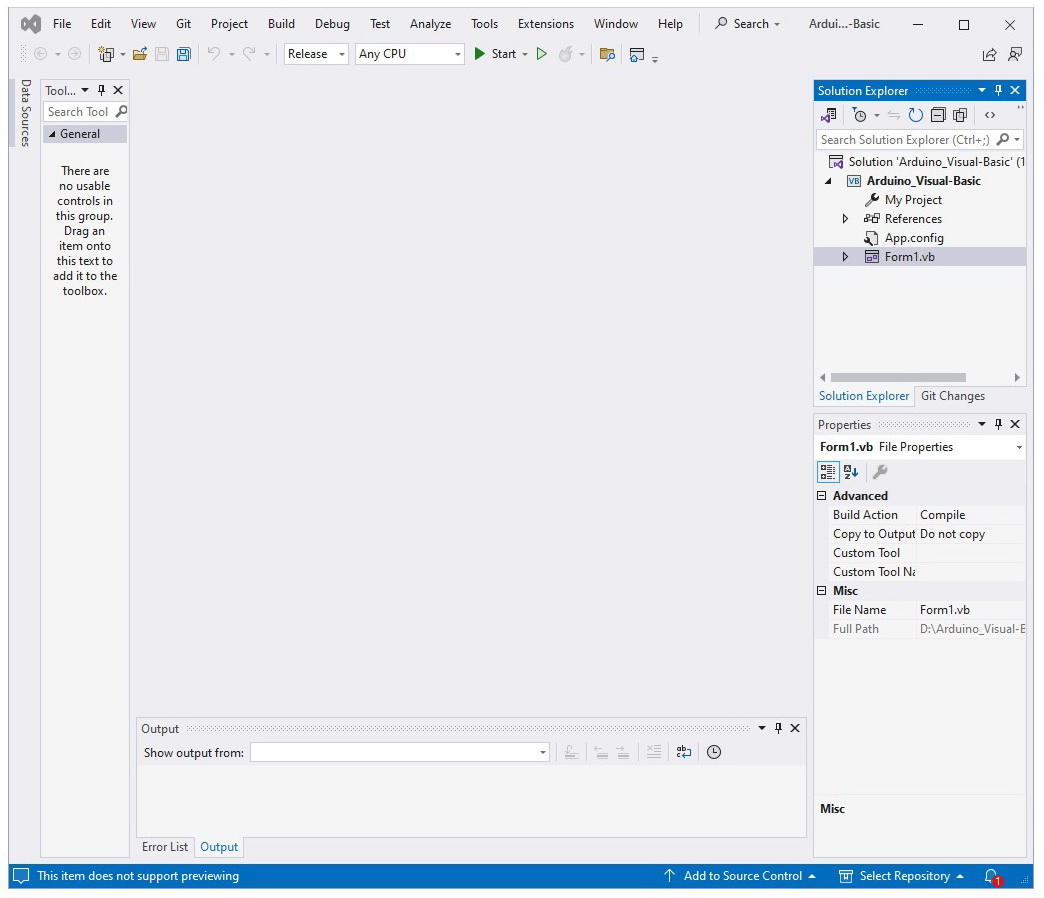
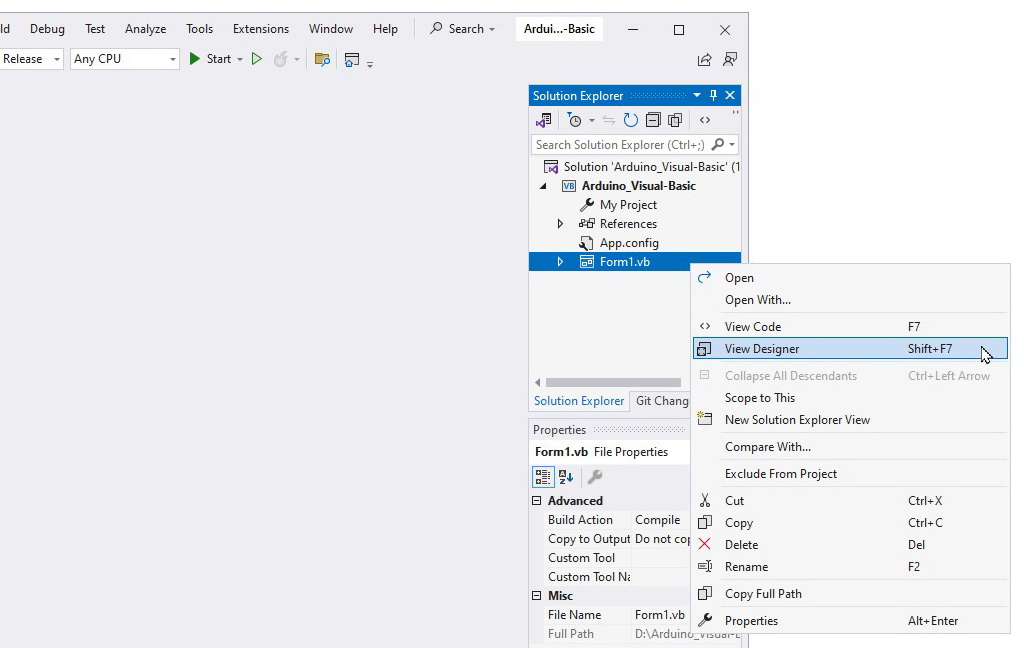
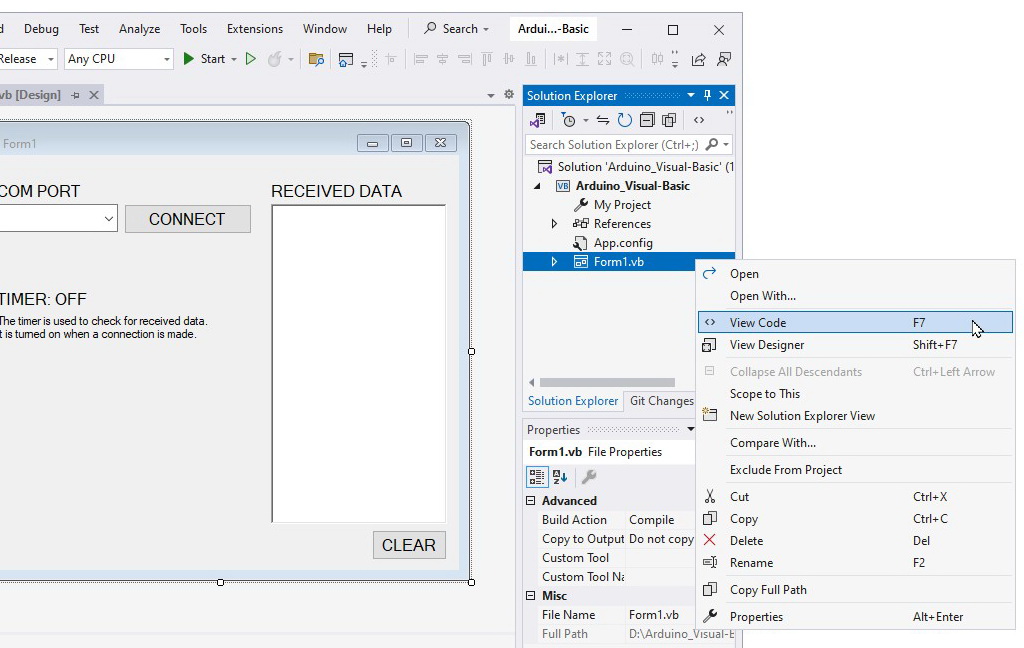
If Visual Studio opens with an empty work space, right click Form1.vb (top right) and select View Designer, or, press Shift + F7 (or simply double click Form1.vb).
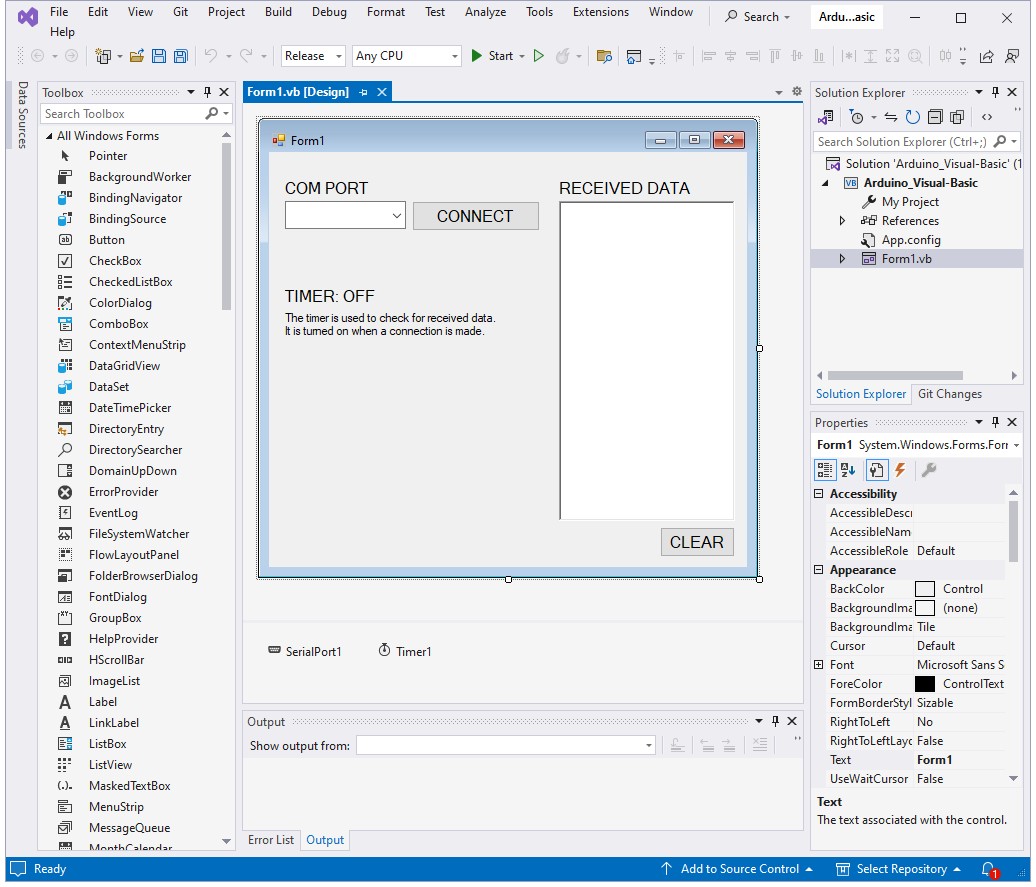
The Main Form
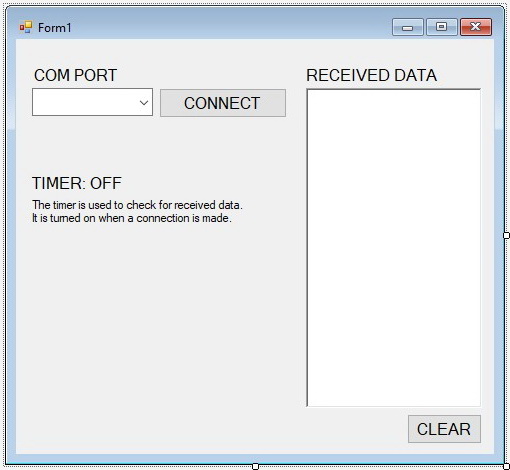
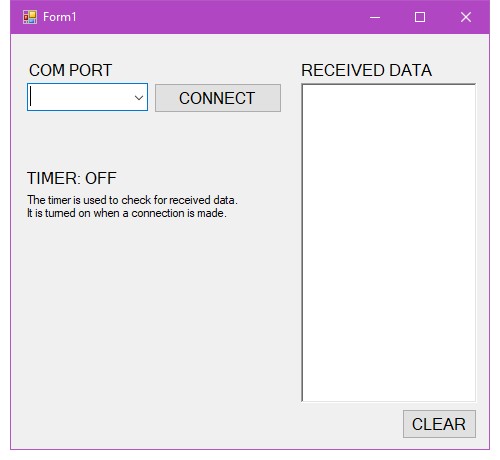
This example uses a very simply form that only has 5 active elements
- COM PORT drop down list
- CONNECT button
- RECEIVED DATA text box
- CLEAR button
- TIMER label
COM PORT drop down list
This is a comboBox, dropDownStyle is drop down list.
When the app first starts, the COM PORT list is populated with all the available COM ports.
CONNECT button
This is a regular button
After selecting a COM PORT, when the CONNECT button is clicked the app tries to open a serial port using the COM port selected in the drop down list.
RECEIVED DATA text box
This is a RichTextBox
The data received via the serial channel is copied to the text box.
CLEAR button
Regular button, used to clear the text box.
TIMER label
A label used to show the status of the timer, The timer is used to trigger a check to see if any new data has been received. Normally you would not need to show the status. What ever the app receives from the Arduino (ASCII) it adds to the text box.
Added via the designer, there is also a SerialPort and Timer.

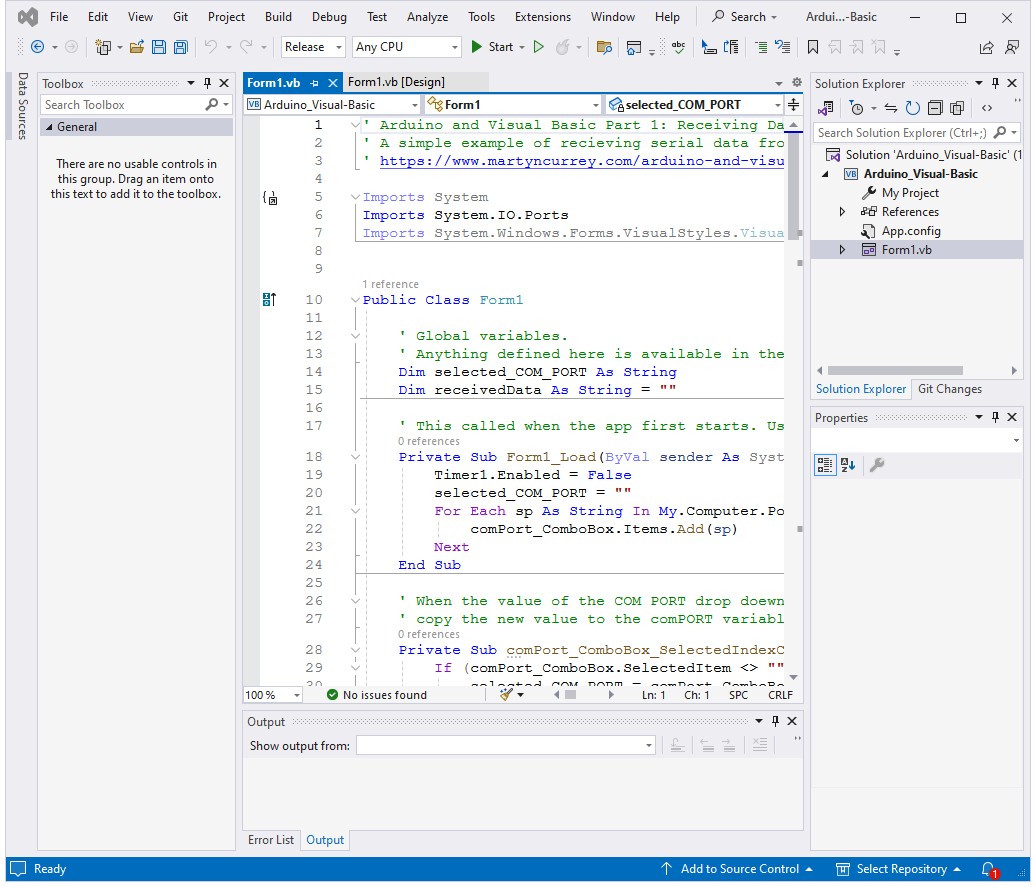
To see the code, right click Form1.vb again and select View Code, or, press F7 (or simply double click anywhere inside the Form1 form).
Try The Visual Basic App
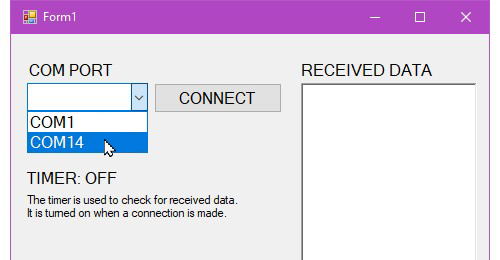
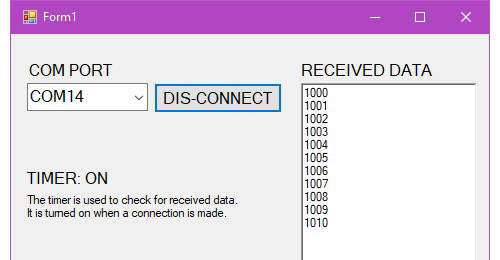
Let’s see if the app works. Connect the Arduino to the PC and confirm what COM port the Arduino has connected to. Mine is COM14, yours is likely not.
In Visual Studio click the Start button at the top of the screen

The code will compile and the app will run. You should see the main form. All good so far.
Select the COM port the Arduino is connected to and hit CONNECT.
If there are no issues, the app will connect to the Arduino and the count will start to appear in the text box.
The CONNECT button changes to DIS-CONNECT, and , you will never guess but, if you click the DIS-CONNECT button the serial channel is closed.
The Visual Basic Program
Here is the code
' Arduino and Visual Basic Part 1: Receiving Data From An Arduino
' A simple example of recieving serial data from an Arduino and displaying it in a text box
' https://www.martyncurrey.com/arduino-and-visual-basic-part-1-receiving-data-from-the-arduino/
'

Imports System
Imports System.IO.Ports
Imports System.Windows.Forms.VisualStyles.VisualStyleElement


Public Class Form1

    ' Global variables.
    ' Anything defined here is available in the whole app
    Dim selected_COM_PORT As String
    Dim receivedData As String = ""

    ' This called when the app first starts. Used to initial what ever needs initialising.
    Private Sub Form1_Load(ByVal sender As System.Object, ByVal e As System.EventArgs) Handles MyBase.Load
        Timer1.Enabled = False
        selected_COM_PORT = ""
        For Each sp As String In My.Computer.Ports.SerialPortNames
            comPort_ComboBox.Items.Add(sp)
        Next
    End Sub

    ' When the value of the COM PORT drop doewn list changes,
    ' copy the new value to the comPORT variable.
    Private Sub comPort_ComboBox_SelectedIndexChanged(sender As Object, e As EventArgs) Handles comPort_ComboBox.SelectedIndexChanged
        If (comPort_ComboBox.SelectedItem <> "") Then
            selected_COM_PORT = comPort_ComboBox.SelectedItem
        End If
    End Sub

    ' Try to open the com port or close the port if already open
    ' Note: There is no error catching. If the connection attampt fails the app will crash!
    Private Sub connect_BTN_Click(sender As Object, e As EventArgs) Handles connect_BTN.Click
        If (connect_BTN.Text = "CONNECT") Then
            If (selected_COM_PORT <> "") Then

                ' Try allows me to trap an errors such as the COM port not being available
                ' Without it the app crashes.
                Try
                    SerialPort1.PortName = selected_COM_PORT
                    SerialPort1.BaudRate = 9600
                    SerialPort1.DataBits = 8
                    SerialPort1.Parity = Parity.None
                    SerialPort1.StopBits = StopBits.One
                    SerialPort1.DtrEnable = True
                    SerialPort1.RtsEnable = True
                    SerialPort1.Handshake = Handshake.None
                    SerialPort1.Encoding = System.Text.Encoding.Default 'very important!
                    SerialPort1.ReadTimeout = 10000

                    SerialPort1.Open()

                Catch ex As Exception
                    MessageBox.Show(ex.Message + vbCrLf + "Looks like something else is using it.", "Error openning the serial port", MessageBoxButtons.OK, MessageBoxIcon.Error)
                End Try

            Else
                MsgBox("No COM port selected!")
            End If
        Else
            Try
                SerialPort1.Close()
            Catch ex As Exception
                MessageBox.Show("Serial Port is already closed!")
            End Try
        End If

        ' A bit wastful of space but seperating openning the post and setting the variables like this makes the
        ' code a liitle more clear.
        If (SerialPort1.IsOpen) = True Then
            connect_BTN.Text = "DIS-CONNECT"
            Timer1.Enabled = True
            timer_LBL.Text = "TIMER: ON"
        Else
            connect_BTN.Text = "CONNECT"
            Timer1.Enabled = False
            timer_LBL.Text = "TIMER: OFF"
        End If

    End Sub

    ' Process received data. Append the data to the text box
    Private Sub Timer1_Tick(sender As Object, e As EventArgs) Handles Timer1.Tick
        receivedData = ReceiveSerialData()
        recData_RichTextBox.AppendText(receivedData)
    End Sub

    ' Check for new data
    Function ReceiveSerialData() As String
        Dim Incoming As String
        Try
            Incoming = SerialPort1.ReadExisting()
            If Incoming IsNot Nothing Then
                Return Incoming
            End If
        Catch ex As TimeoutException
            Return "Error: Serial Port read timed out."
        End Try

    End Function

    ' Clear the text box
    Private Sub clear_BTN_Click(sender As Object, e As EventArgs) Handles clear_BTN.Click
        recData_RichTextBox.Text = ""
    End Sub

End Class
The program in Detail
I am using two global variables; selected_COM_PORT and receivedData.
selected_COM_PORT is the COM port selected by the user in the drop down list.
receivedData is the data received via the COM port / serial channel.
   ' Global variables.
   ' Anything defined here is available in the whole app
   Dim selected_COM_PORT As String
   Dim receivedData As String = ""
When the program is first run, the Form1_Load() subroutine is run automatically and is an ideal place to perform any required initialization, such as, populating the COM port combo box / drop down list with the available COM ports.
Not really required but the timer is made inactive. This is a comfort blanket statement.
    Private Sub Form1_Load(ByVal sender As System.Object, ByVal e As System.EventArgs) Handles MyBase.Load
        Timer1.Enabled = False
        selected_COM_PORT = ""
        For Each sp As String In My.Computer.Ports.SerialPortNames
            comPort_ComboBox.Items.Add(sp)
        Next
    End Sub
After this, the program sits and waits for the user to do something.
When the user finally gets round to selecting a COM port in the drop down list, the selected value is copied to the variable selected_COM_PORT . This is not really necessary as the selected value can be read directly from the combo box at any time but I like to keep this kind of data in easy to use variables.
Private Sub comPort_ComboBox_SelectedIndexChanged(sender As Object, e As EventArgs) Handles comPort_ComboBox.SelectedIndexChanged
        If (comPort_ComboBox.SelectedItem <> "") Then
            selected_COM_PORT = comPort_ComboBox.SelectedItem
        End If
    End Sub
When the CONNECT button is clicked the Sub connect_BTN_Click() function is called.
The first thing the routine does is determine if the user is connecting or dis-connecting. The same button is used for both.
If connecting and selected_COM_PORT is not empty the serial port properties are set, the serial port is opened and the timer is started. If selected_COM_PORT is empty a message is displayed sating no COM port is selected.
If dis-connecting, the serial port is closed..
Private Sub connect_BTN_Click(sender As Object, e As EventArgs) Handles connect_BTN.Click
    If (connect_BTN.Text = "CONNECT") Then
        If (selected_COM_PORT <> "") Then

            ' Try allows me to trap an errors such as the COM port not being available
            ' Without it the app crashes.
            Try
                SerialPort1.PortName = selected_COM_PORT
                SerialPort1.BaudRate = 9600
                SerialPort1.DataBits = 8
                SerialPort1.Parity = Parity.None
                SerialPort1.StopBits = StopBits.One
                SerialPort1.DtrEnable = True
                SerialPort1.RtsEnable = True
                SerialPort1.Handshake = Handshake.None
                SerialPort1.Encoding = System.Text.Encoding.Default 'very important!
                SerialPort1.ReadTimeout = 10000

                SerialPort1.Open()

            Catch ex As Exception
                MessageBox.Show(ex.Message + vbCrLf + "Looks like something else is using it.", "Error opening the serial port", MessageBoxButtons.OK, MessageBoxIcon.Error)
            End Try

        Else
            MsgBox("No COM port selected!")
        End If
    Else
        Try
            SerialPort1.Close()
        Catch ex As Exception
            MessageBox.Show("Serial Port is already closed!")
        End Try
    End If
The Try / Catch ex As Exception statements are there to catch an errors, for example, if you try to open a COM port that something else is using VB throws a tantrum.
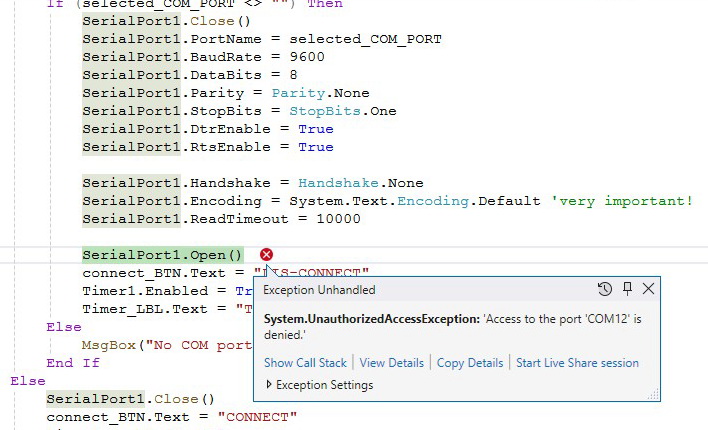
Instead of crashing the app, the Try / Catch ex As Exception let’s use deal with the problem. In this case by displaying an error message.
After the serial port is either opened or closed the elements associated with the serial port are updated.
If the serial port is open, the timer is started and the CONNECT button text is changed to DIS-CONNECT.
If the serial port is closed, the timer is stopped and the button text is set to CONNECT.
        If (SerialPort1.IsOpen) = True Then
            connect_BTN.Text = "DIS-CONNECT"
            Timer1.Enabled = True
            timer_LBL.Text = "TIMER: ON"
        Else
            connect_BTN.Text = "CONNECT"
            Timer1.Enabled = False
            timer_LBL.Text = "TIMER: OFF"
        End If
The timer_LBL is there purely for debugging.
The timer is used to check for incoming data. The timer is set to trigger every 100ms, or tenth of a second, and when triggered it calls the Timer1_Tick() routine. For this example 500ms is fast enough. For more complex tasks the timing may need to be adjusted.
If data has been received it is appended to the text box.
    Private Sub Timer1_Tick(sender As Object, e As EventArgs) Handles Timer1.Tick
        receivedData = ReceiveSerialData()
        If (receivedData <> "") Then
            recData_RichTextBox.AppendText(receivedData)
        End If
Timer1_Tick() calls a second subroutine that does the actual checking. If there is any serial data the data is returned to the calling function.
    Function ReceiveSerialData() As String
        Dim Incoming As String = ""
        Try
            Incoming = SerialPort1.ReadExisting()
            If Incoming IsNot Nothing Then
                Return Incoming
            End If
        Catch ex As TimeoutException
            Return "Error: Serial Port read timed out."
        End Try
    End Function
The final bit is the function that deals with the CLEAR button. Here the text box contents are simple reset to nul.
    Private Sub clear_BTN_Click(sender As Object, e As EventArgs) Handles clear_BTN.Click
        recData_RichTextBox.Text = ""
    End Sub
Serial Port
The main part of the code is opening the serial port.
Because the example uses Net Framework with .NET4.8, the serial port object can be added to the app in the designer. This means the serial port properties are available in the designer.
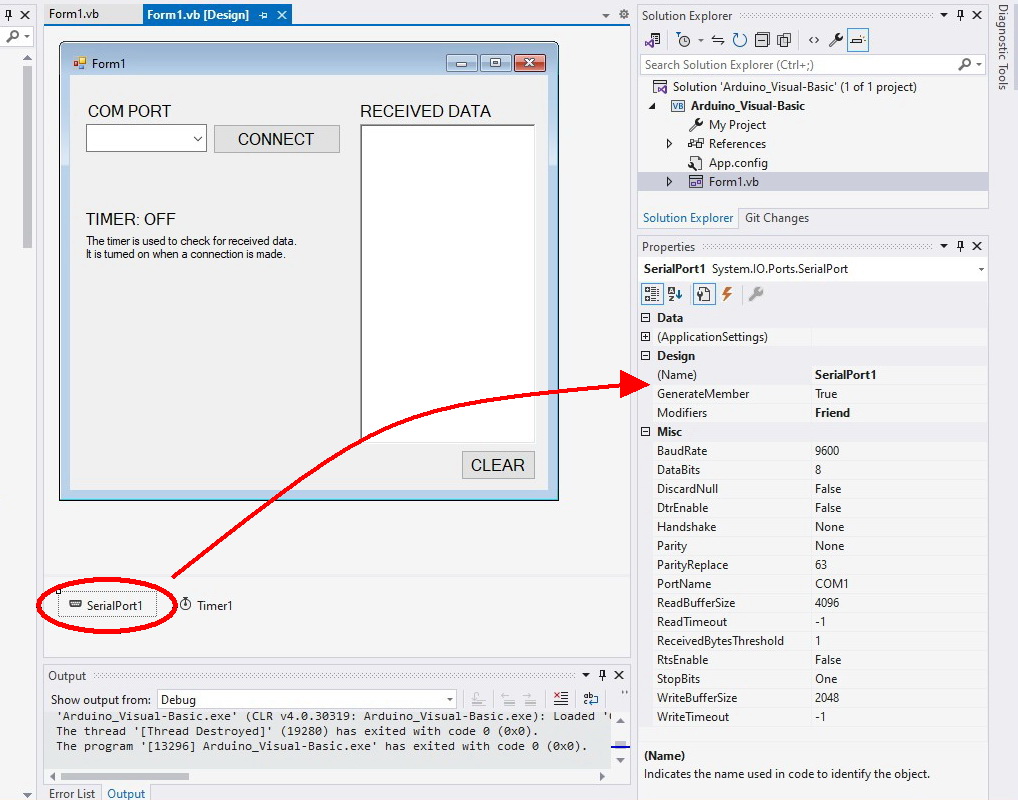
Although I included the4 serialPort in the designer, I am setting the properties in code. I prefer this way so that in the future, should I want to allow the user to edit the values it can be done a little quicker. In the example though, only the COM port is being selected by the user.
                SerialPort1.PortName = selected_COM_PORT
                SerialPort1.BaudRate = 9600
                SerialPort1.DataBits = 8
                SerialPort1.Parity = Parity.None
                SerialPort1.StopBits = StopBits.One
                SerialPort1.DtrEnable = True
                SerialPort1.RtsEnable = True
                SerialPort1.Handshake = Handshake.None
                SerialPort1.Encoding = System.Text.Encoding.Default 'very important!
                SerialPort1.ReadTimeout = 10000

                SerialPort1.Open()
Baud Rate
The baud rate is set to 9600 for bothe the Visual Basic app and the Arduino sketch.
Data, Partity, And Stop Bits
SerialPort1.DataBits = 8
SerialPort1.Parity = Parity.None
SerialPort1.StopBits = StopBits.One
These define the serial port configuration settings this set of values is often refered to 8N1
– 8 data bits
– No parity
– 1 stop bit.8N1 is a fairly common setting and used as the default for many devices.
DTR
SerialPort1.DtrEnable = True
DTR (Data Terminal Ready) is a control signal sent to the connected device (in this case the Arduino) to let it know the Visual Basic app is ready to communicate.
RTS
SerialPort1.RtsEnable = True
RTS (Request To Send) is another control signal used to let the connected device know the app has data to send. RTS has a companion setting called CTS which is not used in the Visual Basic app.
Arduino serial (hardware and software) does not use RTS and DTS for flow control. DTR is used as a reset signal though. DTR is connected to Arduino reset so when a DTR signal is received the Arduino will automatically reset itself.
Handshake
SerialPort1.Handshake = Handshake.None
The Arduino doesn’t perform any handshaking when establishing a serial connection so we set Handshake to none.
Trouble Shooting
This is a very simple example that shows the basics about making a serial connection between the Arduino and a computer. As such the code can be improved
- The COM port is left open all the time and for more complex applications it may be better to open and close the port as required.
- The application simply displays what data is received. The data is not checked and could be anything, even non-prinatble characters.
Download
Download the Arduino sketch
Download the Visual Basic project You will need to have Visual Studio installed to use the VB project files.
Next Steps
In part 2 we take this further and in part 3 we start to control an Arduino
More On Using Serial Data
If you want to know more about using serial data with the Arduino, have a look at the Arduino Serial Guides.
Great help. :D
I’m a newbie at this and I keep receiving this one error in VB..
Error 1 ‘comPort_ComboBox’ is not declared. It may be inaccessible due to its protection level.
I copied the entire code exactly as it is and I’m using visual basic express 2010.
Any idea on what I must be doing wrong?
Try deleting the combo box and recreating it. Remember to give the new combo box the same name “comPort_ComboBox”
Hi I’m having a problem that I cant figure out. I would appreciate if you can help.
When I try to read serial data from Arduino to Visual Basic I get nothing in the text field. It works fine with Arduino’s own serial monitor, but VB program sees nothin. I even copied your code exactly and it still doesn’t work. Other examples I found on internet don’t work either. I’m on VB 2013 Ultimate btw.
Thanks
Hi Igor
I’m too face this issue , I use VB 2013 and Arduino Leonardo board ,when I replace the board with Mega ADK …there is no problem…
It works very good ..
Thanks Martyn for this helpful great topic
Since the program uses basic serial communication it should work with all versions of the Arduino and other microprocessors.
If the Arduino serial monitor is working then there is no reason the VB program should not work. There are a few things worth remembering:
– You cannot have two connections to the same Arduino. If the serial monitor is open then VB cannot use the COM port.
– Double check the baud rates.
– If you have changed any of the serial properties (data bits, parity, encoding, etc) change them back to the defaults.
Hi, i had this problem so long and didnt know how to fix it. But now i found the solution. Klick on the Serialport in the Form1, then you have to set “DtrEnable = true” and “RtsEnable = true”. Now it should work.
I know my english inst that good, but i hope u can understand what i wanted to say :D
Hi Banause,
Thanks for the tip.
I had the same issue with Arduino Leonardo. Problem solved after following your tip.
If the serial monitor is working then you should be able to connect through VB. Use the downloaded programs rather than copy paste from the website. Does the VB program compile OK?
A couple of basic things to check (sorry if they seem patronising),
– confirm you are using the correct COM port.
– check that the baud rate is correct. The above program uses 9600
Can you connect (are you getting an error message)?
Does the timer change to ON when you connect?
Only one connection to a COM port can be made at a time. If you open the serial monitor then you block VB and vice a versa.
You can also try using a different serial terminal such as putty.
helo
I’m new to VB and I’m trying developing a VBA application to send and receive data to an RFID reader and put the result into Microsoft Access.
pless help me?
I can’t help directly but I would suggest you break the project down in to smaller parts. Get the Arduino + RFID working, get the MS Access side working and then put them together. My examples can help with the communication between Arduino and VB.
If not already a member, join the Arduino forum at http://forum.arduino.cc/ you will get help there. Also, search for Arduino and RFID. There are many guides online.
hello sir. may i know how to read multiple sensors reading and show in different textbox for each reading? please sir
thanks
See https://www.martyncurrey.com/arduino-and-visual-basic-part-2-receiving-data-from-the-arduino-part-2/
thanks sir
i dont understand this line ” If (comPORT “”) Then ” form code what does it mean?
If (comPORT <> “”) Then ….
If comPORT is not empty then try to make a connection.
<> means not equal to
I tried this code to get really fast into listening to the arduino, while submitting the values from AnalogIn (A0). But reading the whole values is sometimes to much data. Remember, you read the whole buffer once without disposing the buffer.
So I have altered the code
from
[code]
Incoming = SerialPort1.ReadExisting()
[/code]
to
[code]
Incoming = SerialPort1.ReadLine()
SerialPort1.DiscardInBuffer()
[/code]
Now it runs pretty good and replies actual data.
(Hope this blog reads the code tags right. If not, just ignore the tags.)
Very nice and interesting article. Thank you
Question1?- when is part 2 due?-
Question 2?- will this program work with windows XP?
Part 2 – https://www.martyncurrey.com/arduino-and-visual-basic-part-2-receiving-data-from-the-arduino-part-2/
Part 3 – https://www.martyncurrey.com/arduino-and-visual-basic-part-3-controlling-an-arduino/
for XP you need to select .NET version 4 or lower. Project => Properties => Application.
If XP is 32 bit, also select any CPU.
Great, Thank you.. work well
I am trying to receive a signal if a limit switch is enabled. All I need is to know how to make a Boolean true in VB.NET. If the switch is closed send a signal either through USB or serial to the computer. I am pretty good at VB. I am not really sure what Adruino board to buy or how to talk to the board. Any suggestions would be greatly appreciated.
Thanks,
Chuck
If using just one switch then any Arduino would be suitable.
Start by looking at the main boards; Uno, Mega, Nano. The Uno and Nano are very similar (mainly a different size). The Mega adds extra hardware (additional hardware serial ports) and functions but is bigger and more expensive.
When making permanent projects I tend to use Nanos. They are small and easy to work with.
Excellent post, friend.
You helped me a lot.
Thank you so much.
very nice tutorial with detail explanation, Thank you and keep update..!
hello my english is not very well…..thx for this post it helps me to understand more visual basic because im a beginner. i have a projekt with an arduino uno and an xbee shield with an xbee module on the pc side i have also an xbee now i woul like to receive the data on the pc i get the commands from the print function from the arduino but the problem is that they are only for a short time displayed on the textbox can you help me please that the data is stored in the textbox
Not really sure I understand. Is the textbox being cleared or is the data scrolling up too fast?
It may be worth while having a look at part 2 and part 3. These show how to use different commands.
Hello Martyn,
First of all, thank you very much for your tutorial which is one of the few and complete on the internet. You are also one of the few people who answer questions. I can not integrate a Bluetooth connection with your example that will allow me to have a wireless connection to manage a relay card. Could you advise me to connect a relay with bluetooth and vb.net?
Thank you very much for your help and continue to make tuto that is great
Take a look at the next 2 posts. Part 3 is the most helpful but go through part 2 first.
To control a set of relays you can adapt the example in part 3. Simply use the same number of buttons as you have relays.
Thank you! You helped me so much. I’ve understand it and have modified it. So then.
i try to be use the rfid tag as password .. but i get not found when i write same code it worked !
If (TextBox1.Text = ” 212 79 21 219″) Then
Form3.Show()
Else
MsgBox(“not found”)
End If
so oddly I had one board (pro micro) that didn’t read, and another (uno) that did, so no idea why your hint with setting the serialport.rtsenable and serialport.dtrenable to true worked,, but i had been struggling with that for a long time. Thanks for that tip.
Hello,
When i run my program I get error : AAccess denied to the port ‘COM3’. What can iI do?
Solution, you can’t have open serial port monitor while you use VB program
Hi Martyn,
Great site and very good explanations. Thank you for sharing.
Please continue your great work.
/Henrik
Hey Guys!
I hope someone can help.
I did stopwatch in my visual studio program, but i cant start my stopwatch with “command”.
For example
Private Sub TextBox1_TextChanged(ByVal sender As System.Object, ByVal e As System.EventArgs) Handles RichTextBox1.TextChanged
If TextBox1.Text = “Motion detected!” Then
Timer2.Start()
Stopwatch.Start()
End If
End Sub
….
Someone know how can i solve this problem ? What private sub i need to use?
Thank you for your article, which is exactly what i am looking for!
Question: is there any way to avoiding COM select? if the Form only work with Arduino, Can i make it automatically connect with Arduino Board?
You can hard code the COM port if will only ever use the same Arduino and you never reset the assigned USB port.
The form will work with anything that uses usb for serial communication. This can be another microprocessor or something else.
First I would like to thank you for this helpful tutorial, I would like to inquire or rather consult my experience while studying this program, I have followed all the stages that have been described, the program can be run well without error warning appears, all COM Can be detected on combobox, but when I have selected one COM in Combobox, the program is not running properly, it always appears msgBox that I have to choose Comport first, but I have chosen one of them, is it because I use VB2010 so there is little difference of setting , I hope you can give me help, thank you :)
The message is generated when comPORT is empty:
If (comPORT <> “”) Then
SerialPort1.Close()
SerialPort1.PortName = comPORT
SerialPort1.BaudRate = 9600
SerialPort1.DataBits = 8
SerialPort1.Parity = Parity.None
SerialPort1.StopBits = StopBits.One
SerialPort1.Handshake = Handshake.None
SerialPort1.Encoding = System.Text.Encoding.Default
SerialPort1.ReadTimeout = 10000
SerialPort1.Open()
connect_BTN.Text = “Dis-connect”
Timer1.Enabled = True
Timer_LBL.Text = “Timer: ON”
Else
MsgBox(“Select a COM port first”)
End If
If this is not working test the value of comPORT after you click the connect button. See what value it has.
You can use the textbox to display the value of comPORT or any other messages:
RichTextBox1.Text &= “my message” & vbCrLf
great work..
please make any projects using arduino rfid and visual basic
Why this will not work ??
If receivedData = “1111” Then
lb_status.Text = “OK!”
Else
lb_status.Text = “nOK!”
End If
It’s always a nOK and when 1111 comes out of the serial??
Hi there,
Completely new to visual basic; when i use this code my visual basic wants me to declare “serialport1” as it cannot be found (for the connect_BTN_Click sub)
Any help would be appreciated.
Anthony
Are you using the files from the download or are you copy/pasting?
If copy/paste download the example files.
Are you using Visual Studio 2013 Community?
This is the only IDE I have tried. I cannot guarantee the code will work in other versions (although it should).
So simple yet very helpful. Many thanks sir. :)
Hi Martyn,
when I try to compile the VB program I get 2 mistakes-
1) BC30506 Handles clause requires a WithEvents variable defined in the containing type or one of its base types. Relates to this line -Private Sub ComPort_ComboBox_SelectedIndexChanged(sender As Object, e As EventArgs) Handles comPort_ComboBox.SelectedIndexChanged
2) BC30451 ‘comPort_ComboBox’ is not declared. It may be inaccessible due to its protection level. Relates to all lines with comPort_ComboBox
I am using Microsoft Visual Studio 2017. Can u help with these mistakes please?!
Hi,k
unfortunately I cannot help with this. I only have VS 2013 and the code compiles fine with this version.
I’ve caught all issues, thanks any way :)
do u now how to convert 2 bytes in richtexbox to the ASCII?
Awesome detailed project and great share
I have same article which guide to make communication serial between Arduino and Visual C++. Any reader interested, please visit our blogspot:
http://engineer2you.blogspot.com/2016/12/arduino-serial-communication-visual.html
Dear Martyn,
First I want to say Thank you very much for your sharing. Now I having problem only output data.
For Example ,
my message
31/01/18,14:39:28,0067.1
31/01/18,14:39:28,0067.1
31/01/18,14:39:28,0067.1
my message
31/01/18,14:39:28,0067.1
31/01/18,14:39:29,0067.1
my message
31/01/18,14:39:29,0067.1
31/01/18,14:39:29,0067.1
31/01/18my message <<<<<< so weird , It takes about 2-4 sec to appear one.
,14:39:29,0067.1
31/01/18,14:39:29,0067.1
31/01/18,14:39:30,0067.1
Please help me , Thank you.
Opart
I want to display data in bar chart. Arduino will send data and it will be displayed on bar chart. Like spectrum of frequency.
Request you to help
I can’t help at this time but google visualbasic bar chart for lots of guides.
Thank you very much for the article. Especially for the troubleshooting comment about RTS and DTR, Would never be able to figure out myself why with the same sketch UNO R3 is responding and Pro Micro is not. While the serial monitor shows no problem for both. Now by setting them Enable, the Pro Micro works fine, and VB stopped reading from UNO R3 …
Hi,
I am working on Azure IoT project using MXchip AZ3166 board. I installed visual basic studio and Arduino. I installed Azure IoT workbench Dev kit in visual basic. I configured Aurdino path in it. When I compiled a sample projects from Azure IoT workbench I am encountering a error stating that install Arduino or add Arduino path and another error unable to find Aurdino path.
Kindly anyone suggest me some solutions to solve this error. Thank you.
Sri Krishna
Where is SerialPort1 declared in VB code?
I don’t see it in the code sections of the article nor the downloaded VB code.
The serial port does not need to be declared. It is declared in the designer when you add it to the form.
Thank you for your guide and releasing the source code. It worked perfectly with my Arduino Nano and was a big help getting started.
I now get a pop up on my computer when my door bell is pushed or laser trip wire is broken.
Look forward to reading your other guides.
Glad it was helpful.
Thank you for this article, it helped me a lot. Very nicely explained and detailed. Great job!
i need a code in vb6 for receive data from rfid device via tcp/ip. thanks.
Great Code..Can i use the same principle with receiving real time data from campbell CR10 data logger
If the CR10 outputs standard serial data then the above will display it. You may need to change the baud rate.
Hello Martyn your tutorial is very good. Thank you for that.
Can you also connect more Arduinos to Visual Basic? When yes how?
yes, however, each connected Arduino would have its own COM port.
Thank you for your quick reply :)
I think it will be possible to connect several Arduino with a bus system (maybe the RS485) and display it in a single com-port.Or what do you say about this?
It can be take then the code from your tutorial 3 (see if the Arduino is there) with the connecting_timer and instead of write , it can be write the different adresses from the Arduino.
I think I try this with some Arduino Uno and temperatur sensor.
I’m not that familiar with RS485 so had to google a refresher.
While it is possible to link Arduinos together (there are lots of examples online) there doesn’t appear to be an easy way to have a link to a computer.
You could possibly create a network of Arduinos using RS485 and then have one that acts as a master device and connect this to a computer. The network management would then be on the Arduino rather than in VB.
My solution, if using not too many Arduinos, would be to connect them all to the computer via USB and manger the COM ports through VB. However, in my recent projects I have moved away from USB (and Bluetooth) and have started using ESP8266s and ESP32s with wifi. The ESP32s especially are proving to be very good for mini networks/meshes.
Merci beaucoup pour ton aide. Est-ce que vous avez un document sur ce dont vous avez travaillé (communication entre arduino et visual basic) ?