It’s been a while since my last post on using the ESP8266 with the Arduino IDE. Life became busy and what free time I had I spent updating the dropController. Eventually guilt got the better of me though.
In previous posts we looked at various different things; using the ESP8266 to serve a webpage, using Wifi Manager to create a connect portal, creating a self updating page, using websockets, and more. Now we finally start putting everything together.
In part 8 we set up a self refreshing webpage that displayed the temperature and humidity from a DHT11. In part 9 we took a first look at websockets. In part 10 we combine the two and add a few embellishments.
Websockets can be fast, very fast, and since the webpage will not be updating very often this is not one of the best examples of websockets, it does continue the gentle introduction started last time though.
For a while now I have been wanting to create IOT/web widgets such as graphs and gauges. I wanted widgets similar to the things Blynk offers but I didn’t want the back end server. I wanted every thing self contained on the ESP8266. This project is the start of that.
 The goal of this guide is to create a environment monitor station that has a LCD display and also a webpage using an ESP8266, a DHT11, a LDR, javascript, and websockets.
As always I will do this is steps so that each part is clear.
The Plan
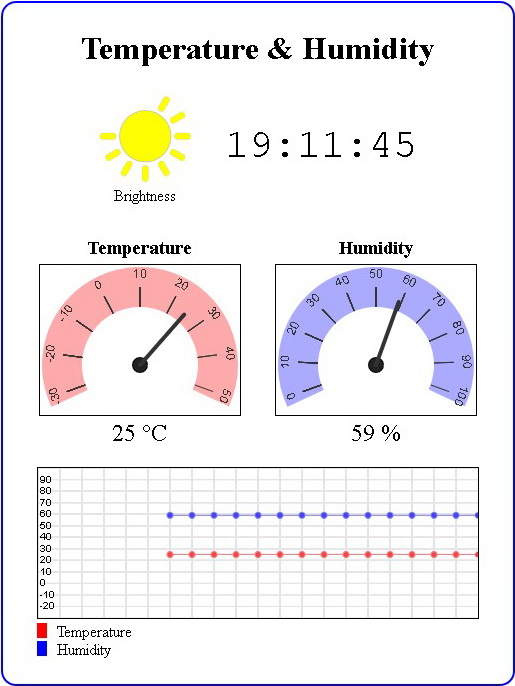
The plan is to build a small temperature, Humidity, and light monitor station that displays the time, humidity, temperature, and brightness on a LCD and also a website created by an ESP8266. The website will have dials and a graph displaying the data.
The project will be built in stages so that we can get parts working before moving to the next bit.
1. Test the sensors with a basic sketch
2. Create a basic website using websockets to show the sensor data.
3. Enhance the website, add dials and a graph.
4. Add a LCD
5. Add Wifi Manager.
6. Maybe add time to the LCD version using a NTP server.
7. Put the project in to a stand
This post covers parts 1 and 2.
Part 10b covers enhancing the website,
Part 10c will cover adding a LCD
Part 10d will add Wifi Manager.
If I get this far, part 10e will add time to the LCD using a NTP server and 10f I hope to put the project in to a stand.
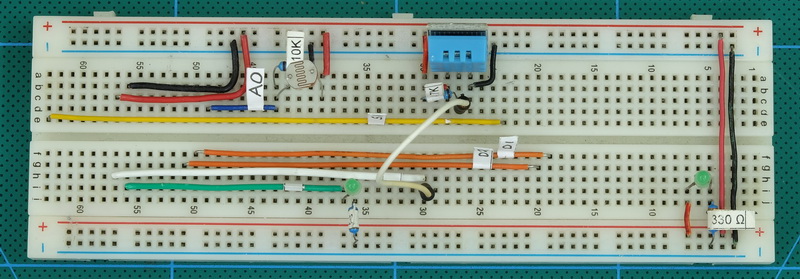
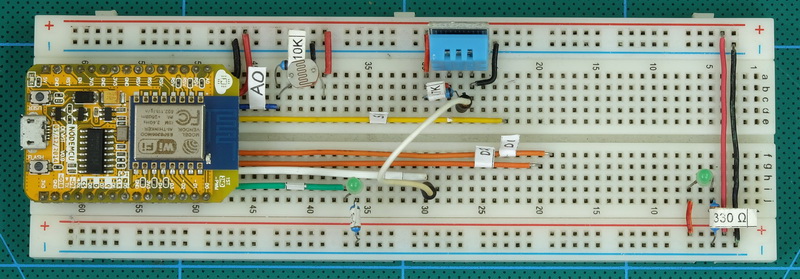
Circuit
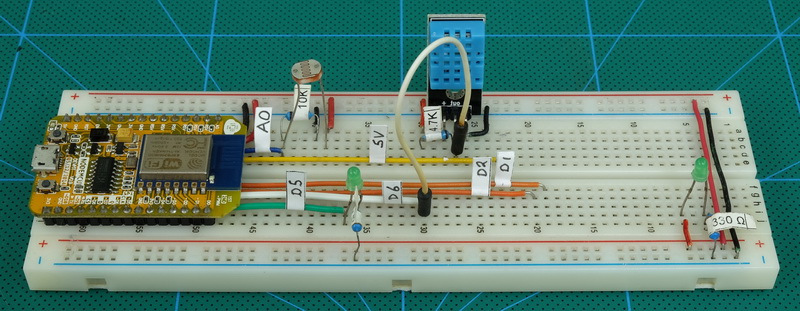
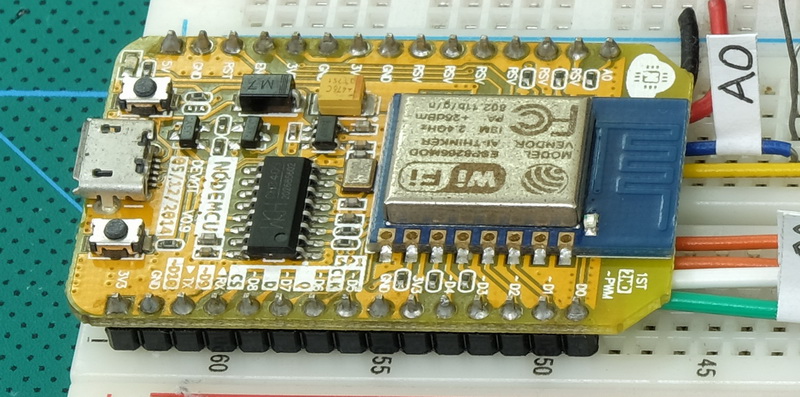 For this project I am still using the NodeMCU V0.9. This module has a 5V out pin that I will use later to drive a LCD.
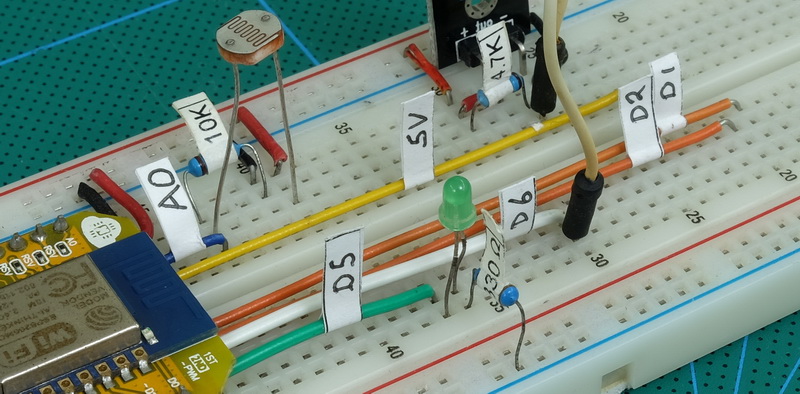
The NodeMCU board fits a breadboard exactly. This means there is no space for jumper wires. There are several ways to get around this:
1 – hang the board off one side of the breadboard.
2 – use 2 breadboards and have the ESP8266 module straddle both breadboards (see part 8).
3 – if you do not have many connections, run the jumper wires under the ESP8266 module. This is what I am doing here.
Connections
Pin A0 – LDR
Pin D5 – Status LED (the function will change later)
Pin D6 – DHT11
Pin D2 – SDA – will be used for the LCD
Pin D1 – SDL – will be used for the LCD
There is also a power led.
Circuit Diagram

Sensor Test Sketch
Let’s start by using a basic sketch to test the circuit and the sensors. The sketch reads the sensors and outputs the readings to the serial monitor.
Sketch: ESP8266-10_sketch01_Circuit_Test
// // ESP8266 and the Arduino IDE Part 10: Environment monitor station // ESP8266-10_sketch01_Circuit_Test // #include "DHT.h" #define DHTPIN D6 #define DHTTYPE DHT11 DHT dht(DHTPIN, DHTTYPE); byte const pin_LDR = A0; byte const pin_LED = D5; float humidity = 0; float tempC = 0; float tempF = 0; int brightness = 0; boolean DHTvaluesOK = false; void setup() { pinMode(pin_LED, OUTPUT); digitalWrite(pin_LED, LOW); dht.begin(); Serial.begin(9600); while (!Serial) {;} Serial.println(""); Serial.println("STARTED"); } void loop() { Serial.println(" "); brightness = analogRead(pin_LDR); Serial.print("Brightness = "); Serial.print(brightness); Serial.print("\t"); humidity = dht.readHumidity(); tempC = dht.readTemperature(); // Read temperature as Celsius (the default) tempF = dht.readTemperature(true); // Read temperature as Fahrenheit (isFahrenheit = true) // Check if any reads failed if (isnan(humidity) || isnan(tempC) || isnan(tempF)) { DHTvaluesOK = false; } else { DHTvaluesOK = true; } if (DHTvaluesOK) { Serial.print("Humidity: "); Serial.print(humidity); Serial.print(" %\t"); Serial.print("Temperature: "); Serial.print(tempC); Serial.print ("°C "); Serial.print(tempF); Serial.println("°F"); } else { Serial.println("DHT11 ERROR"); } // blink the LED to show the readings have been received. digitalWrite(pin_LED, HIGH); delay(100); digitalWrite(pin_LED, LOW); delay(3000); } |
The sketch uses the Adafruit DHT library which can be found on Github or installed through the IDE Library Manager.
The sensor values are read
brightness = analogRead(pin_LDR); humidity = dht.readHumidity(); tempC = dht.readTemperature(); // Read temperature as Celsius (the default) tempF = dht.readTemperature(true); // Read temperature as Fahrenheit (isFahrenheit = true) |
and if the readings from the DHT11 are OK all the values are sent to the serial monitor.
if (DHTvaluesOK) { Serial.println(" "); Serial.print("Brightness = "); Serial.print(brightness); Serial.print("\t"); Serial.print("Humidity: "); Serial.print(humidity); Serial.print(" %\t"); Serial.print("Temperature: "); Serial.print(tempC); Serial.print ("°C "); Serial.print(tempF); Serial.println("°F"); } |
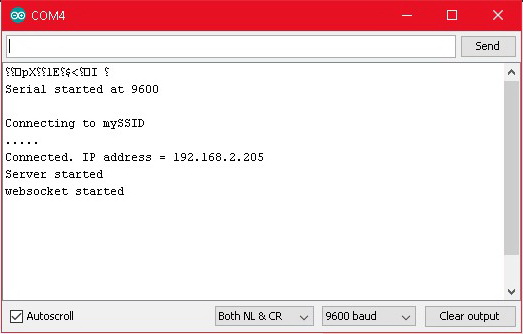
If you create the circuit and upload the sketch you should have something like this is the serial monitor.
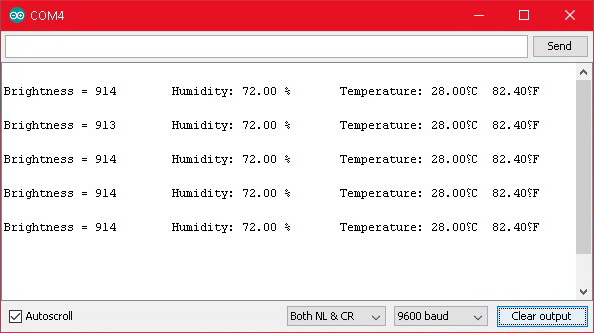
You should also notice the LED flash as new data is displayed in the serial monitor.
The serial monitor doesn’t appear to like the degree symbol.
Build a website
Now we know the sensors are working the next step is to build a basic website to display the data. At this point the actual design of the webpage is not important. I just want to get something working. I will use a websocket to send the data from teh ESP8266 to the webpage and I am starting with the sketch from part 9. I have removed all the code dealing with the switches and LEDS and this then gives me a template to adapt or build from.
If you are not familiar with websockets it might be a good idea to review the previous guide.
Sketch: ESP8266-10_sketch02_Websocket_Template
// // ESP8266 and the Arduino IDE Part 10: Environment monitor station // ESP8266-10_sketch_02_WebSocket_Template // String header = "HTTP/1.1 200 OK\r\nContent-Type: text/html\r\n\r\n"; String html_1 = R"=====( <!DOCTYPE html> <html> <head> <meta name='viewport' content='width=device-width, initial-scale=1.0'/> <meta charset='utf-8'> <style> body { font-size:100%;} #main { display: table; width: 300px; margin: auto; padding: 10px 10px 10px 10px; border: 3px solid blue; border-radius: 10px; text-align:center;} p { font-size: 100%; } </style> <title>Websockets</title> </head> <body> <div id='main'> <h3>Websockets</h3> <div id='content'> </div> </div> </body> <script> var Socket; function init() { Socket = new WebSocket('ws://' + window.location.hostname + ':81/'); Socket.onmessage = function(event) { processReceivedCommand(event); }; } function processReceivedCommand(evt) { document.getElementById('rd').innerHTML = evt.data; consol.log(evt.data); } function sendText(data) { Socket.send(data); } window.onload = function(e) { init(); } </script> </html> )====="; #include <ESP8266WiFi.h> #include <WebSocketsServer.h> WiFiServer server(80); WebSocketsServer webSocket = WebSocketsServer(81); char ssid[] = "ssid"; char pass[]= "password"; void setup() { Serial.begin(9600); Serial.println(); Serial.println("Serial started at 9600"); Serial.println(); // Connect to a WiFi network Serial.print("Connecting to "); Serial.println("ssid"); WiFi.begin(ssid,pass); // connection with timeout int count = 0; while ( (WiFi.status() != WL_CONNECTED) && count < 17) { Serial.print("."); delay(500); count++; } Serial.println(""); if (WiFi.status() != WL_CONNECTED) { Serial.print("Failed to connect to "); Serial.println(ssid); while(1); } Serial.print("Connected to "); Serial.println(WiFi.localIP()); // start a server server.begin(); Serial.println("Server started"); // start the websocket webSocket.begin(); webSocket.onEvent(webSocketEvent); } void loop() { webSocket.loop(); WiFiClient client = server.available(); // Check if a client has connected if (client) { client.flush(); client.print( header ); client.print( html_1 ); Serial.println("New page served"); } } void webSocketEvent(byte num, WStype_t type, uint8_t * payload, size_t length) { Serial.println(); Serial.print("WStype = "); Serial.println(type); Serial.print("WS payload = "); for(int i = 0; i < length; i++) { Serial.print((char) payload[i]); } Serial.println(); } |
The sketch works but does not do much.
Since I am putting a few things together in to a single project it is worth thinking about what is required.
The Problem Broken Down
What are the parts we need to accomplish to make a working (basic) website showing the sensor data?
1 – the code/HTML for a webpage. One that can have the relevant parts easily updated.
2 – a webserver to serve the html/webpage.
3 – read the sensors and get current values.
4 – send the sensor values to the webpage
5 – decide what format the data will be in.
Webpage Template
The main aim of this section is to get a simple webpage working, to get the update function working, and not spend time on making the page look nice. That will come later. I do want a way to target the parts of the page that need updating though. There are many ways to do this, I am using HTML spans with unique ids.
The HTML for the website
<!DOCTYPE html>
<html>
<head>
<meta name='viewport' content='width=device-width, initial-scale=1.0'/>
<meta charset='utf-8'>
<style>
body { font-size:100%;}
#main { display: table; width: 300px; margin: 20px auto; padding: 10px 10px 10px 10px; border: 1px solid blue; border-radius: 10px; text-align:center;}
p { font-size: 120%; }
</style>
<title>ESP8266 Part 10</title>
</head>
<body>
<div id='main'>
<h1>ESP8266 monitor</h1>
<div id='content'>
<p>Humidity = <span id='humidity'>00</span>%</p>
<p>Temperature = <span id='tempC'>00</span>°C</p>
<p>Temperature = <span id='tempF'>00</span>°F</p>
<p>Brightness = <span id='brightness'>00</span></p>
<p>Data = <span id='recData'>00</span></p>
</div>
<br />
</div>
</body> |
Note the single quotes. In the HTML I am using single quotes rather than double quotes so when the code is copied to the sketch it doesn’t screw the sketch up and confuse the hell out of the Arduino complier.
° is the html code for the degree symbol.
The important bits are the spans that contain the sensor values:
<span id='humidity'>00</span> <span id='tempC'>00</span> <span id='tempF'>00</span> <span id='brightness'>00</span> <span id='recData'>00</span> |
The spans with unique ids allow each one to be individually targeted. This means I can use javascript to replace the contents. For example:
document.getElementById('humidity').innerHTML = 'new humidity value'; |
The test website is very basic and just displays the values. I created the HTML and tested it as a separate exercise. Later copied it to the ESP8266 sketch.
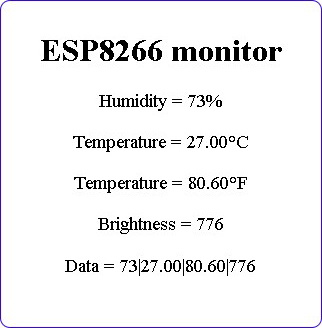
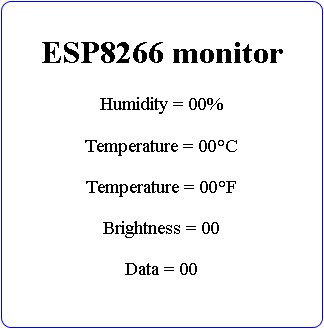 Here is what the webpage looks like.
I added an extra field called Data for debugging. While developing the project I will use this field to display the received data. After everything is working it can be removed.
Webserver to serve the html/webpage
This is a single page website (so nothing fancy required) and I will use the same code and techniques from part 9.
Read the sensors
I am using the Adafruit DHT library and code from part 8 to look after the DHT11. I just need to add some new code to read the value from the LDR.
The LDR creates a different resistance depending on how much light hits it. This means it will have a varying voltage and I can use the Arduino’s analogRead() function to convert the varying voltage to a number from 0 to 1023.
Decide what format the data will be in
I have 4 values;
– humidity
– temperature in Celsius
– temperature in Fahrenheit
– brightness
Something to note when deciding on a data format, when using websockets, every webSocket.broadcastTXT(data) command is treated as a separate event at the receiving end. This means if I send the data using 4 different commands such as:
webSocket.broadcastTXT(humidity); webSocket.broadcastTXT(temperatureC); webSocket.broadcastTXT(temperatureF); webSocket.broadcastTXT(brightness); |
there will be 4 events, one for each value, and the webpage would need a way to identify which value is which so the correct value could be displayed in the correct place.
There are many ways of to identify the values such as using labels (H=60, tempC=28.5, tempF=82.00, B=700), json data pairs (the ESP8266 has a nice json library I could use), or my favourite method, start and end markers with labels ([H=60], [tempC=28.5], [tempF=82.00], [B=700]). however, I want to keep things simple so I am going to put all the values together in to one String and use bar separated values in the form humidity|tempC|tempF|brightness. This means I can use the bar character with the JavaScript split method to split the data in to an array. Since I am putting the data together myself I know what order the values will be and so I do not need labels.
When we put all that together we get:
Sketch: ESP8266-10_sketch03_Basic_Website
// // ESP8266 and the Arduino IDE Part 10: Environment monitor station // ESP8266-10_sketch03_Basic_Website // String header = "HTTP/1.1 200 OK\r\nContent-Type: text/html\r\n\r\n"; String html_1 = R"=====( <!DOCTYPE html> <html> <head> <meta name='viewport' content='width=device-width, initial-scale=1.0'/> <meta charset='utf-8'> <style> body { font-size:100%;} #main { display: table; width: 300px; margin: 20px auto; padding: 10px 10px 10px 10px; border: 1px solid blue; border-radius: 10px; text-align:center;} p { font-size: 120%; } </style> <title>ESP8266 Part 10</title> </head> <body> <div id='main'> <h1>ESP8266 monitor</h1> <div id='content'> <p>Humidity = <span id='humidity'>00</span>%</p> <p>Temperature = <span id='tempC'>00</span>°C</p> <p>Temperature = <span id='tempF'>00</span>°F</p> <p>Brightness = <span id='brightness'>00</span></p> <p>Data = <span id='recData'>00</span></p> </div> <br /> </div> </body> <script> var Socket; function init() { Socket = new WebSocket('ws://' + window.location.hostname + ':81/'); Socket.onmessage = function(event) { processReceivedCommand(event); }; } function processReceivedCommand(evt) { var data = evt.data; document.getElementById('recData').innerHTML = data; var tmp = data.split('|'); document.getElementById('humidity').innerHTML = tmp[0]; document.getElementById('tempC').innerHTML = tmp[1]; document.getElementById('tempF').innerHTML = tmp[2]; document.getElementById('brightness').innerHTML = tmp[3]; } function sendText(data) { Socket.send(data); } window.onload = function(e) { init(); } </script> </html> )====="; #include <ESP8266WiFi.h> #include <WebSocketsServer.h> WiFiServer server(80); WebSocketsServer webSocket = WebSocketsServer(81); char ssid[] = "mySSID"; // replace with your credentials char pass[]= "myPassword"; #include "DHT.h" #define DHTPIN D6 #define DHTTYPE DHT11 DHT dht(DHTPIN, DHTTYPE); byte const pinLED = D5; byte const pinLDR = A0; int brightness = 0; float humidity = 0; float tempC = 0; float tempF = 0; boolean DHTreadingsOK = false; boolean updateWebpage = false; long sensorUpdateFrequency = 5000; long timeNow = 0; long timePrev = 0; void setup() { pinMode(pinLED, OUTPUT); digitalWrite(pinLED, LOW); dht.begin(); Serial.begin(9600); while (!Serial) {;} Serial.println(); Serial.println("Serial started at 9600"); Serial.println(); // Connect to a WiFi network Serial.print("Connecting to "); Serial.println(ssid); // try to connect to the network WiFi.begin(ssid,pass); // connection with timeout int count = 0; digitalWrite(pinLED, HIGH); while ( (WiFi.status() != WL_CONNECTED) && count < 17) { Serial.print("."); count++; delay(500); } digitalWrite(pinLED, LOW); if (WiFi.status() != WL_CONNECTED) { Serial.println(""); Serial.print("Failed to connect to "); Serial.println(ssid); while(1); } Serial.println(""); Serial.print("Connected. IP address = "); Serial.println(WiFi.localIP()); // start the server server.begin(); Serial.println("Server started"); // start the websocket webSocket.begin(); Serial.println("websocket started"); Serial.println(""); Serial.println(""); // webSocketEvent is the function to call when there is a websocket event webSocket.onEvent(webSocketEvent); } void loop() { // check the websocket status. webSocket.loop(); // Check if a client has connected WiFiClient client = server.available(); // if a client has connected send the webpage if (client) { client.flush(); client.print( header ); client.print( html_1 ); Serial.println("New page served"); Serial.println(""); } // see if it is time to update the sensor values on the website timeNow = millis(); if (timeNow - timePrev >= sensorUpdateFrequency) { timePrev = timeNow; // if it is time, call the updateSensors() function updateSensors(); } } // void loop() void updateSensors() { //brightness = map(analogRead(pinLDR), 0, 1023, 0, 12); brightness = analogRead(pinLDR); humidity = dht.readHumidity(); tempC = dht.readTemperature(); // Read temperature as Celsius tempF = dht.readTemperature(true); // Read temperature as Fahrenheit (isFahrenheit = true) //if any value is isnan (not a number) then there is an error if (isnan(humidity) || isnan(tempC) || isnan(tempF)) { Serial.println("Error reading from the DHT11."); } else { String data = ""; data = String(data + byte(humidity) ); data = String(data + "|"); data = String(data + tempC); data = String(data + "|"); data = String(data + tempF); data = String(data + "|"); data = String(data + brightness); webSocket.broadcastTXT(data); // send the data Serial.println(data); // display the data in the serial monitor // blink the status LED to show data has been sent digitalWrite(pinLED, HIGH); delay(50); digitalWrite(pinLED, LOW); } } // void updateSensors() // webSocketEvent is called when there is a websocket event void webSocketEvent(byte num, WStype_t type, uint8_t * payload, size_t length) { Serial.println(""); Serial.print("WStype = "); Serial.println(type); Serial.print("WS payload = "); for(int i = 0; i < length; i++) { Serial.print((char) payload[i]); } Serial.println(); } |
Upload the sketch and give it a go. Copy and paste in to the IDE and remember to edit the network credentials.
 In your web browser of choice go to the ip address shown in the serial monitor and if the universe is spinning the right way you should see the webpage
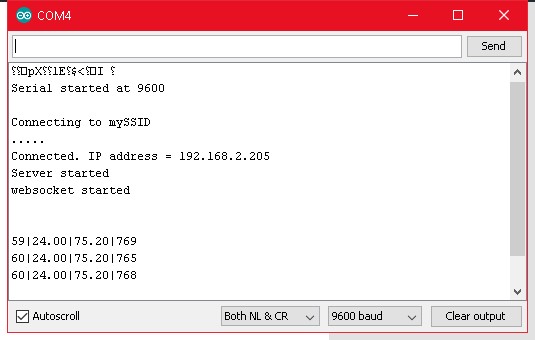 and in the serial monitor you should see the sensor data start to appear.
The sketch in detail
The sketch uses the standard ESP wifi library and the same web socket library as used in part 9
#include <ESP8266WiFi.h> #include <WebSocketsServer.h> WiFiServer server(80); WebSocketsServer webSocket = WebSocketsServer(81); |
we also have the DHT library from part 8. The DHT11 is connected to pin D6.
#include "DHT.h" #define DHTPIN D6 #define DHTTYPE DHT11 DHT dht(DHTPIN, DHTTYPE); |
Try to connect to the network
Serial.print("Connecting to "); Serial.println(ssid); // try to connect to the network WiFi.begin(ssid,pass); |
digitalWrite(pinLED, HIGH); while ( (WiFi.status() != WL_CONNECTED) && count < 17) { Serial.print("."); count++; delay(500); } |
and if the connection is successful the ip address is displayed in the serial monitor
Serial.print("Connected. IP address = "); Serial.println(WiFi.localIP()); |
The web server and the web socket are started
// start a server server.begin(); Serial.println("Server started"); // start the websocket webSocket.begin(); Serial.println("websocket started"); |
// webSocketEvent is the function to call when there is a websocket event webSocket.onEvent(webSocketEvent); |
webSocketEvent is the function called when there is a websocket event. In this example there is no data received event so this is not really required.
In previous examples the sketch served a webpage and nothing else. This meant a fairly simple technique was employed. If there was no client request we simply returned from the loop() function.
if (!client) { return; } |
This time we have other things we need to do as well as serve the webpage and the same technique cannot be used. Instead we check to see if there is a client request, if there is, we serve the page and then continue on. If there isn’t a reuqest we skip ahead, the sketch continues even when there is no page request. This is one of the main differences between a standard webserver and an AJAX/websocket driven webpage. Using websockets, once the initial webspage has been served all other updates can be through the websocket and there may not be any need to serve another page.
// Check if a client has connected WiFiClient client = server.available(); // if a client has connected send the webpage if (client) { client.flush(); client.print( header ); client.print( html_1 ); Serial.println("New page served"); Serial.println(""); } |
A timer using millis() is used rather than delay() to say when readings are to be taken from the sensors.
// see if it is time to update the sensor values on the website timeNow = millis(); if (timeNow - timePrev >= sensorUpdateFrequency) { timePrev = timeNow; // if it is time, call the updateSensors() function updateSensors(); } |
Notice that delay() is not used. delay() blocks the Arduino (the sketch sits and waits until it has finished) where as using millis() means we check to see if it is time for an update and if not move on. The frequency of the update is set using the sensorUpdateFrequency variable which is set to 5000ms (5 seconds).
If it is time to update the sensor values the updateSensors() function is called.
updateSensors(); |
updateSensors() reads the sensors. and if the values are OK, creates the data String and sends it to the webpage using the websocket.
brightness = analogRead(pinLDR); humidity = dht.readHumidity(); tempC = dht.readTemperature(); // Read temperature as Celsius tempF = dht.readTemperature(true); // Read temperature as Fahrenheit (isFahrenheit = true) |
String data = ""; data = String(data + byte(humidity) ); data = String(data + "|"); data = String(data + tempC); data = String(data + "|"); data = String(data + tempF); data = String(data + "|"); data = String(data + brightness); webSocket.broadcastTXT(data); // send the data Serial.println(data); // display the data in the serial monitor // blink the status LED to show data has been sent digitalWrite(pinLED, HIGH); delay(50); digitalWrite(pinLED, LOW); |
I am using a String (with a capital S). Strings are normally bad. They eat memory and can cause all sorts of issues, however, on the ESP8266 there is a lot of memory (relatively speaking) so we might as well make life a little easier. The same thing can be achieved with chars but it would take more code.
Inside the website javascript code, when there is a websocket event (data has been received) the processReceivedCommand() function is called. This function explodes the received data in to an array called tmp and then the individual array elements are copied to the respective parts of the website.
Remember the data is in the form humidity|tempC|tempF|brightness and the var tmp = data.split(‘|’) statement splits the string in to an array seperated by the bar charater.
tmp[0] = humidity
tmp[1] = tempC
tmp[2] = tempF
tmp[3] = brightness
function processReceivedCommand(evt) { var data = evt.data; document.getElementById('recData').innerHTML = data; var tmp = data.split('|'); document.getElementById('humidity').innerHTML = tmp[0]; document.getElementById('tempC').innerHTML = tmp[1]; document.getElementById('tempF').innerHTML = tmp[2]; document.getElementById('brightness').innerHTML = tmp[3]; } |
And thats it for this post. Next we add dials and a graph.
hello martyn,
In this project we are displaying sensor data on local host webpage which is the IP address we get after connection.
If i want to send data to global server I mean to send data to my own website how do I do it.
please share some knowledge on this.
thank you,good article,it can help me
In this project we are displaying sensor data on local host webpage which is the IP address we get after connection.
If i want to send data to global server I mean to send data to my own website how do I do it.
Have a look at websockets.
Thank you, the article is good and very helpful for learning in our school.
Thank you, this article is very helpful for learning websocket.