 If you have followed the previous posts you will have a working, fairly robust, LED control. If you haven’t gone through the previous posts you can find links just below.
The webpage works well but the whole page reloads to update the button and controlling a single LED is not ground breaking. In this post I address the page reload by adding AJAX/JavaScript and in the next post I will add more controls.
Previous posts:
Part 1: The ESP8266 and setting up the Arduino IDE
Part 2: Control an LED from a web page using Access Point Mode (AP)
Part 3: Control an LED from a web page using Station Mode (ST)
Part 4: mDNS
Part 5: adding wifiManager
Since this post is all about Javscript and AJAX I have removed wifiManager and mDNS and am using the ESP8266 in station mode. This is where it connects to my local wifi. This makes it quicker for development but not suggested for a final project.
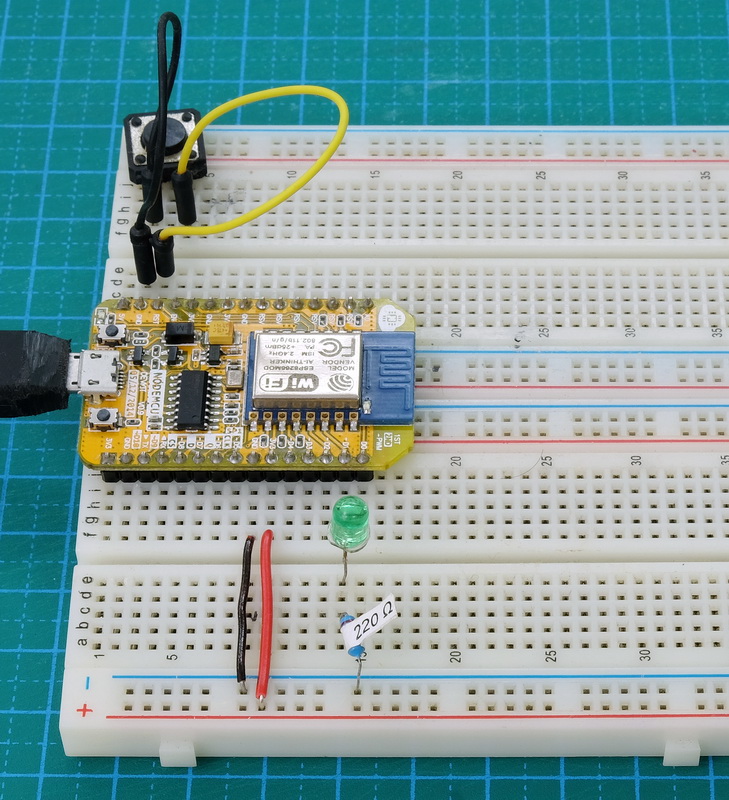
Circuit
Same circuit as before, a LED on pin D1, but now with a reset switch.
I reverted to sketch ESP8266_LED_Control_02C from part 2 but made some changes. I moved the HTML to the top of the sketch then I have reformatted it. It is now easier to read and easier to edit but there is a caveat, the compiler now tries to parse the special characters in the separate lines, things like the quotes and line end characters, and screws it up. To get around this I have enclosed the HTML in an R tag; ‘R”=====(‘ and ‘)=====” ’. This tells the compiler to treat the data as a raw string literal and not to change it. I also changed the colour of the button. This was saved as ESP8266_LED_CONTROL_AJAX_01.ino
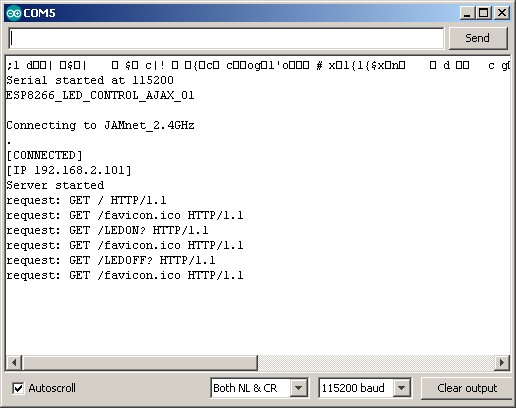
/* * Sketch: ESP8266_LED_CONTROL_AJAX_01 * Intended to be run on an ESP8266 */ String header = "HTTP/1.1 200 OK\r\nContent-Type: text/html\r\n\r\n"; String html_1 = R"=====( <!DOCTYPE html> <html> <head> <meta name='viewport' content='width=device-width, initial-scale=1.0'/> <meta charset='utf-8'> <style> body {font-size:140%;} #main {display: table; margin: auto; padding: 0 10px 0 10px; } h2 {text-align:center; } .button { padding:10px 10px 10px 10px; width:100%; background-color: #50FF50; font-size: 120%;} </style> <title>LED Control</title> </head> <body> <div id='main'> <h2>LED Control</h2> )====="; String html_2 = ""; String html_4 = R"=====( </div> </body> </html> )====="; #include <ESP8266WiFi.h> // change these values to match your network char ssid[] = "NetworkName"; // your network SSID (name) char pass[] = "password"; // your network password WiFiServer server(80); String request = ""; int LED_Pin = D1; void setup() { pinMode(LED_Pin, OUTPUT); Serial.begin(115200); Serial.println(); Serial.println("Serial started at 115200"); Serial.println("ESP8266_LED_CONTROL_AJAX_01"); Serial.println(); // Connecting to a WiFi network Serial.print(F("Connecting to ")); Serial.println(ssid); WiFi.begin(ssid, pass); while (WiFi.status() != WL_CONNECTED) { Serial.print("."); delay(500); } Serial.println(""); Serial.println(F("[CONNECTED]")); Serial.print("[IP "); Serial.print(WiFi.localIP()); Serial.println("]"); // start a server server.begin(); Serial.println("Server started"); } // void setup() void loop() { // Check if a client has connected WiFiClient client = server.available(); if (!client) { return; } // Read the first line of the request request = client.readStringUntil('\r'); Serial.print("request: "); Serial.println(request); if ( request.indexOf("LEDON") > 0 ) { digitalWrite(LED_Pin, HIGH); } else if ( request.indexOf("LEDOFF") > 0 ) { digitalWrite(LED_Pin, LOW); } // Get the LED pin status and create the LED status message if (digitalRead(LED_Pin) == HIGH) { // the LED is on so the button needs to say turn it off html_2 = " <form id='F1' action='LEDOFF'><input class='button' type='submit' value='Turn of the LED' ></form><br>\r\n"; } else { // the LED is off so the button needs to say turn it on html_2 = " <form id='F1' action='LEDON'><input class='button' type='submit' value='Turn on the LED' ></form><br>\r\n"; } client.flush(); client.print( header ); client.print( html_1 ); client.print( html_2 ); client.print( html_4); delay(5); // The client will actually be disconnected when the function returns and 'client' object is detroyed } // void loop() |
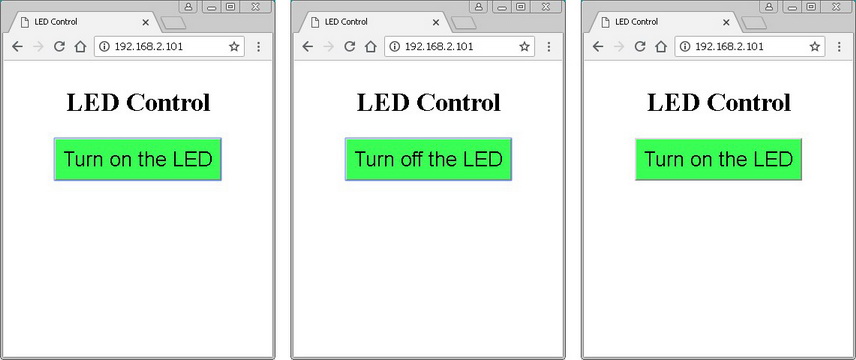
If you upload this and give it a try you find it does exactly the same as before.
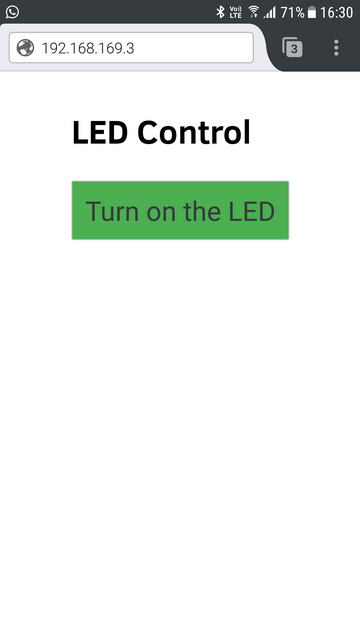
And here is the HTML
<!DOCTYPE html>
<html>
 <head>
 <meta name='viewport' content='width=device-width, initial-scale=1.0'/>
 <meta charset='utf-8'>
 <style>
  body {font-size:140%;}
  #main {display: table; margin: auto;  padding: 0 10px 0 10px; }
  h2 {text-align:center; }
  .button { padding:10px 10px 10px 10px; width:100%;  background-color: #50FF50; font-size: 120%;}
 </style>

 <title>LED Control</title>
</head>
<body>
 <div id='main'>
  <h2>LED Control</h2>
  <form id='F1' action='LEDON'><input class='button' type='submit' value='Turn on the LED' ></form><br>

  </div>
 </body>
</html> |
AJAX
AJAX uses JavaScript and is a way for websites to get data without loading a whole page. Using AJAX we can receive and send packets of data behind the scenes either automatically or when an event, like a button click, take places. This is what I will do here, when the button is clicked, instead of loading a whole new page the page will send just the data required to switch the LED.
I do not go in to the details of AJAX and if you want to know more about it start with the AJAX introduction at W3Schools and What is AJAX? by tutorialspoint.
JavaScript
JacaScript is a scripting language that runs in web browsers (it is used in a lot of other places to). It is object orientated and similar to other programming languages. I don’t go in to detail about JavaScript. All I do here is give you enough to control the LED. If you want to learn more there are plenty of very good guides and tutorials online. W3Schools is a good place to start.
Firefox Android Browser
When trying the sketches I noticed that Firefox would repeat the AJAX request several times, up to 10 times per request. This does not happen with other browsers such as Chrome, Opera or the default Android browser. I therefore suggest not using Firefox.
I originally had a long and complicated post that went through every step of adding the JavaScript and AJAX. Just as I was about to publish it I changed my mind and decided to simplify it and have the final solution first and then explain the parts. Then, just as I was about to publish again I changed my mind again and decided to simplify it even further. And, just as I was about to publish the latest version I decided to add a bonus second part.
Simple AJAX Switch
To implement an AJAX version of the website there are a few things I need to add or change.
1. Add a button click event that calls a function
2. When the function is called, check the button status and then
3. Send the appropriate AJAX command to switch the LED either on or off.
4. Update the button text.
Let’s start with the button click. JavaScript has a function called onClick. This can be attached to elements to capture the click event (mouse click). Add this to the button.
<input type="button" id = "LED_button" onclick="switchLED()" value="Turn on the LED" /> |
When the button is clicked the onClick() function is called which in turn calls another function called switchLED(). We now need the switchLED() function.
switchLED() does a couple of things. It changes the button text (on to off or off to on) and also sends the LED control code to the function called ajaxLoad().
function switchLED() { var button_text = document.getElementById("LED_button").value; if (button_text=="Turn on the LED") { document.getElementById("LED_button").value = "Turn off the LED"; ajaxLoad('LEDON'); } else { document.getElementById("LED_button").value = "Turn on the LED"; ajaxLoad('LEDOFF'); } } |
The ajaxLoad() function is where the AJAX action takes place. It is here the request is made to the ESP8266 server.
function ajaxLoad(ajaxURL) { if(!ajaxRequest){ alert("AJAX is not supported."); return; } ajaxRequest.open("GET",ajaxURL,true); ajaxRequest.onreadystatechange = function() { if(ajaxRequest.readyState == 4 && ajaxRequest.status==200) { var ajaxResult = ajaxRequest.responseText; } } ajaxRequest.send(); } |
ajaxRequest.open
ajaxRequest.open("GET",ajaxURL,true); |
Opens the request channel using GET (the other option is PUT).
ajaxURL is the URL or at least the bit to be added to the url. In this case it is the LED control code.
The last value “true” means use an asynchronous request. “false” would mean use a synchronous request. Synchronous requests block the browser (they stop everything until they get a reply). Asynchronous requests don’t block, they allow the browser to do other things while waiting for a the reply.
When a reply is received, the onreadystatechange flag is set which triggers the following.
ajaxRequest.onreadystatechange = function() { if(ajaxRequest.readyState == 4 && ajaxRequest.status==200) { var ajaxResult = ajaxRequest.responseText; } } |
Here the reply is checked. A readyState of 4 means the request has finished and a response is ready.
A status of 200 means the request was OK. This is the standard status code.
For more on the readyState values see here and for more on the status see here.
var ajaxResult = ajaxRequest.responseText; |
The response from the server is assigned to the ajaxResult variable. This isn’t used yet.
We cannot do any of the above without creating the ajax object. This is created with the following.
var ajaxRequest = null; if (window.XMLHttpRequest) { ajaxRequest =new XMLHttpRequest(); } else { ajaxRequest =new ActiveXObject("Microsoft.XMLHTTP"); } |
First the code tries to create a regular ajax object. If this is not successful it tries to create an IE5/6 activeX one. It is done this way in case the user is still using IE 5 or IE 6 which does not use regular AJAX.
The code in the main loop() function as changed to cater for the AJAX requests. Now, when we get a “LEDON” or a “LEDOFF” request we simple want to turn the LED on or off. We no longer want to serve the whole webpage.
If we get a root request (no “LEDON” or “LEDOFF” we still need to check the LED pin and set the correct text for the button. Here I am using string.replace rather than copying the text to html_2.
if ( request.indexOf("LEDON") > 0 ) { digitalWrite(LED_Pin, HIGH); } else if ( request.indexOf("LEDOFF") > 0 ) { digitalWrite(LED_Pin, LOW); } else { boolean pinStatus = digitalRead(LED_Pin); if (pinStatus==HIGH) { html_2.replace("Turn on the LED","Turn off the LED"); } else { html_2.replace("Turn off the LED","Turn on the LED"); } client.flush(); client.print( header ); client.print( html_1 ); client.print( html_2 ); client.print( html_4 ); delay(5); } |
If the request contains “LEDON” the LED is turned on and nothing else is done.
If the request contains “LEDOFF” the LED is turned off and nothing else is done.
When the request does not contain “LEDON” or “LEDOFF” (it is just “/”) control drops through to the else part of the if table and serves the whole page.
You may have noticed that the button has a new id which means the css needs updating as well.
<input type="button" id = "LED_button" |
#LED_button { padding:10px 10px 10px 10px; width:100%; background-color: #50FF50; font-size: 120%;} |
Here is the new sketch: ESP8266_LED_CONTROL_AJAX_02
/* * Sketch: ESP8266_LED_CONTROL_AJAX_02 * Intended to be run on an ESP8266 */ String header = "HTTP/1.1 200 OK\r\nContent-Type: text/html\r\n\r\n"; String html_1 = R"=====( <!DOCTYPE html> <html> <head> <meta name='viewport' content='width=device-width, initial-scale=1.0'/> <meta charset='utf-8'> <style> body {font-size:140%;} #main {display: table; margin: auto; padding: 0 10px 0 10px; } h2 {text-align:center; } #LED_button { padding:10px 10px 10px 10px; width:100%; background-color: #50FF50; font-size: 120%;} </style> <script> function switchLED() { var button_text = document.getElementById("LED_button").value; if (button_text=="Turn on the LED") { document.getElementById("LED_button").value = "Turn off the LED"; ajaxLoad('LEDON'); } else { document.getElementById("LED_button").value = "Turn on the LED"; ajaxLoad('LEDOFF'); } } var ajaxRequest = null; if (window.XMLHttpRequest) { ajaxRequest =new XMLHttpRequest(); } else { ajaxRequest =new ActiveXObject("Microsoft.XMLHTTP"); } function ajaxLoad(ajaxURL) { if(!ajaxRequest){ alert("AJAX is not supported."); return; } ajaxRequest.open("GET",ajaxURL,true); ajaxRequest.onreadystatechange = function() { if(ajaxRequest.readyState == 4 && ajaxRequest.status==200) { var ajaxResult = ajaxRequest.responseText; } } ajaxRequest.send(); } </script> <title>LED Control</title> </head> <body> <div id='main'> <h2>LED Control</h2> )====="; String html_2 = R"=====( <input type="button" id = "LED_button" onclick="switchLED()" value="Turn on the LED" /> )====="; String html_4 = R"=====( </div> </body> </html> )====="; #include <ESP8266WiFi.h> // change these values to match your network char ssid[] = "NetworkName"; // your network SSID (name) char pass[] = "password"; // your network password WiFiServer server(80); String request = ""; int LED_Pin = D1; void setup() { pinMode(LED_Pin, OUTPUT); Serial.begin(115200); Serial.println(); Serial.println("Serial started at 115200"); Serial.println("ESP8266_LED_CONTROL_AJAX_02"); Serial.println(); // Connect to a WiFi network Serial.print(F("Connecting to ")); Serial.println(ssid); WiFi.begin(ssid, pass); while (WiFi.status() != WL_CONNECTED) { Serial.print("."); delay(500); } Serial.println(""); Serial.println(F("[CONNECTED]")); Serial.print("[IP "); Serial.print(WiFi.localIP()); Serial.println("]"); // start a server server.begin(); Serial.println("Server started"); } // void setup() void loop() { // Check if a client has connected WiFiClient client = server.available(); if (!client) { return; } // Read the first line of the request request = client.readStringUntil('\r'); Serial.print("request: "); Serial.println(request); if ( request.indexOf("LEDON") > 0 ) { digitalWrite(LED_Pin, HIGH); } else if ( request.indexOf("LEDOFF") > 0 ) { digitalWrite(LED_Pin, LOW); } else { boolean pinStatus = digitalRead(LED_Pin); if (pinStatus==HIGH) { html_2.replace("Turn on the LED","Turn off the LED"); } else { html_2.replace("Turn off the LED","Turn on the LED"); } client.flush(); client.print( header ); client.print( html_1 ); client.print( html_2 ); client.print( html_4 ); delay(5); } // The client will actually be disconnected when the function returns and 'client' object is detroyed } // void loop() |
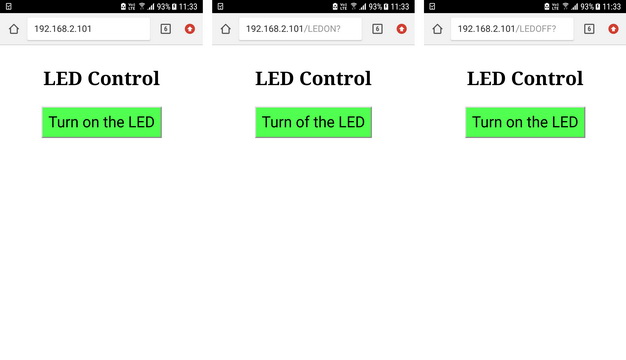
Upload the new code and give it a try. Here I am using chrome on a desktop PC.
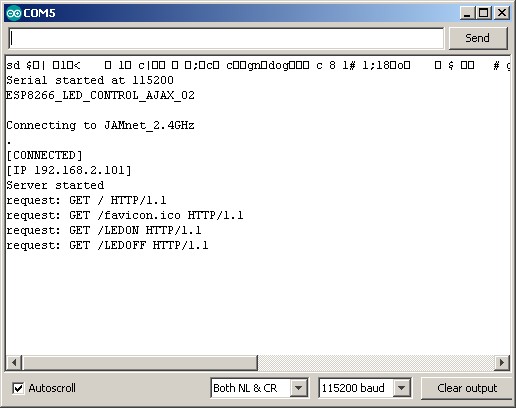
You should see the button text change as the LED is turned on and off, exactly as before. You should notice though that the whole page does not refresh and it works a lot smoother than before.
Mini Bonus
Although the new AJAX version is slicker and smoother it is not quite as robust as the basic HTML version and does not know the status of the LED. It simply sends the LED control code and assumes the LED will is switched when the readystate is set. As a mini bonus I want to show how to add an acknowledgement so the browser knows the LED has changed. Off course, this technique can be used for other things.
AJAX With Acknowledgement
In this part I want to add an acknowledgement so that the browser knows the LED has been switched. I also want add an intermediary stage where the page is waiting for the acknowledgement. I can do this using ajaxRequest.responseText.
As a note. In most cases the intermediary stage should happen too quickly to see it.
The process will be:
1 – when the button is clicked change the button text to “turning on/off the LED”
2 – send the request; either “LEDON” and “LEDOFF”
3 – the ESP8266 gets the request and switches the LED
4 – the ESP8266 sends back the acknowledgement (either “LED is on” or “LED is off”
5 – when the browser gets the acknowledgement the button text is changed to either “Turn the LED on” or “Turn the LED off”
In the last example the button text was changed to reflect the assumed new LED status. Here it is changed to say the LED is either “Turning on the LED” or “Turning off the LED”. You could use something like “Please wait”. Once the acknowledgement is received and we know the LED status the button text is updated again to show “Turn on the LED” or “Turn off the LED”
Inside the switchLED() function change the button text.
if (button_text=="Turn on the LED") { document.getElementById("LED_button").value = "Turning on the LED"; ajaxLoad('LEDON'); } else { document.getElementById("LED_button").value = "Turning off the LED"; ajaxLoad('LEDOFF'); } |
Where the sketch turns the LED on or off add the code that sends the acknowledgement
if ( request.indexOf("LEDON") > 0 ) { digitalWrite(LED_Pin, HIGH); client.print( header ); client.print( "LED is on" ); } else if ( request.indexOf("LEDOFF") > 0 ) { digitalWrite(LED_Pin, LOW); client.print( header ); client.print( "LED is off" ); } |
All we need to do now is check to see if we get an acknowledgement by expanding the part that gets the responseText. If the response is either “LED is on” or “LED is off” we know the LED has been switched so the button text is updated.
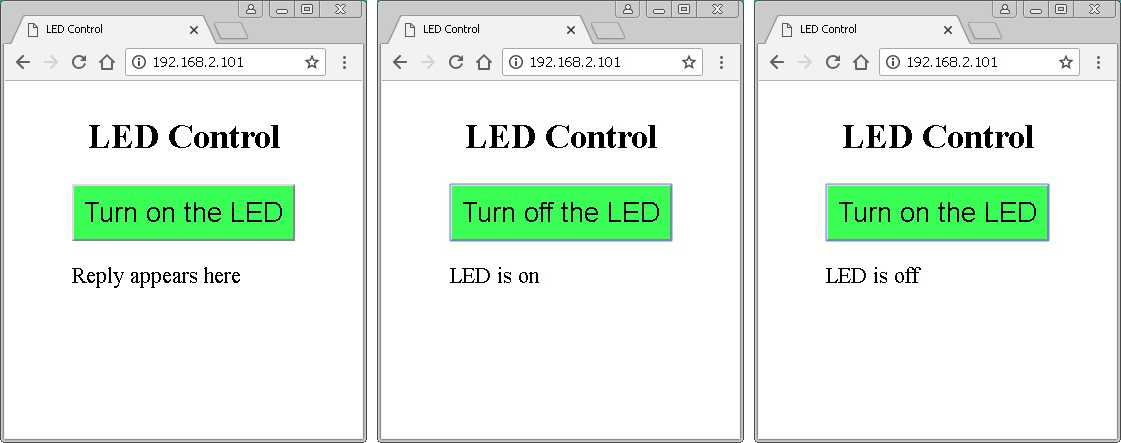
Because this normally happens too quickly to see I added a new HTML paragraph where the response is displayed.
if(ajaxRequest.readyState == 4 && ajaxRequest.status==200) { var ajaxResult = ajaxRequest.responseText; if ( ajaxResult == "LED is on" ) { document.getElementById("LED_button").value = "Turn off the LED"; } else if ( ajaxResult == "LED is off" ) { document.getElementById("LED_button").value = "Turn on the LED"; } document.getElementById("reply").innerHTML = ajaxResult; } |
<div id='main'> <h2>LED Control</h2> <input type="button" id = "LED_button" onclick="switchLED()" value="Turn on the LED" /> <p id = "reply">Reply appears here</p> </div> |
Here it is in action.

Here is the full code. Sketch: ESP8266_LED_CONTROL_AJAX_03
/* * Sketch: ESP8266_LED_CONTROL_AJAX_03 * Intended to be run on an ESP8266 * * Uses Station Mode on the ESP8266 */ String header = "HTTP/1.1 200 OK\r\nContent-Type: text/html\r\n\r\n"; String html_1 = R"=====( <!DOCTYPE html> <html> <head> <meta name='viewport' content='width=device-width, initial-scale=1.0'/> <meta charset='utf-8'> <style> body {font-size:140%;} #main {display: table; margin: auto; padding: 0 10px 0 10px; } h2 {text-align:center; } #LED_button { padding:10px 10px 10px 10px; width:100%; background-color: #50FF50; font-size: 120%;} </style> <script> function switchLED() { var button_text = document.getElementById("LED_button").value; if (button_text=="Turn on the LED") { document.getElementById("LED_button").value = "Turning on the LED"; ajaxLoad('LEDON'); } else { document.getElementById("LED_button").value = "Turning off the LED"; ajaxLoad('LEDOFF'); } } var ajaxRequest = null; if (window.XMLHttpRequest) { ajaxRequest =new XMLHttpRequest(); } else { ajaxRequest =new ActiveXObject("Microsoft.XMLHTTP"); } function ajaxLoad(ajaxURL) { if(!ajaxRequest){ alert("AJAX is not supported."); return; } ajaxRequest.open("GET",ajaxURL,true); ajaxRequest.onreadystatechange = function() { if(ajaxRequest.readyState == 4 && ajaxRequest.status==200) { var ajaxResult = ajaxRequest.responseText; if ( ajaxResult == "LED is on" ) { document.getElementById("LED_button").value = "Turn off the LED"; } else if ( ajaxResult == "LED is off" ) { document.getElementById("LED_button").value = "Turn on the LED"; } document.getElementById("reply").innerHTML = ajaxResult; } } ajaxRequest.send(); } </script> <title>LED Control</title> </head> <body> <div id='main'> <h2>LED Control</h2> <input type="button" id = "LED_button" onclick="switchLED()" value="Turn on the LED" /> <p id = "reply">Reply appears here</p> </div> </body> </html> )====="; #include <ESP8266WiFi.h> // change these values to match your network char ssid[] = "NetworkName"; // your network SSID (name) char pass[] = "password"; // your network password WiFiServer server(80); String request = ""; int LED_Pin = D1; void setup() { pinMode(LED_Pin, OUTPUT); Serial.begin(115200); Serial.println(); Serial.println("Serial started at 115200"); Serial.println("ESP8266_LED_CONTROL_AJAX_03"); Serial.println(); // Connect to a WiFi network Serial.print(F("Connecting to ")); Serial.println(ssid); WiFi.begin(ssid, pass); while (WiFi.status() != WL_CONNECTED) { Serial.print("."); delay(500); } Serial.println(""); Serial.println(F("[CONNECTED]")); Serial.print("[IP "); Serial.print(WiFi.localIP()); Serial.println("]"); // start a server server.begin(); Serial.println("Server started"); } // void setup() void loop() { // Check if a client has connected WiFiClient client = server.available(); if (!client) { return; } // Read the first line of the request request = client.readStringUntil('\r'); Serial.print("request: "); Serial.println(request); if ( request.indexOf("LEDON") > 0 ) { digitalWrite(LED_Pin, HIGH); client.print( header ); client.print( "LED is on" ); } else if ( request.indexOf("LEDOFF") > 0 ) { digitalWrite(LED_Pin, LOW); client.print( header ); client.print( "LED is off" ); } else { client.flush(); client.print( header ); client.print( html_1 ); delay(5); } // The client will actually be disconnected when the function returns and 'client' object is detroyed } // void loop() |
This is not even scratching the surface of what you can do with JavaScript and AJAX and if you are not familar with them it is well worth doing some online reading or even buying a book or two.
In the next part I add more controls.
Hi, I have discovered your website and was following this great tutorial on Ajax. I’m in the process of converting a BOX AC controlled I put together with an Arduino nano over to a Wemos D1 Mini with the aim to control the device from my phone. Anyhow, as I read this particular tutorial I was confused about this line “When the button is clicked the onClock() function is called which in turn calls another function called switchLED().” I couldn’t find or understand the reference to the onClock() function then realized you must have meant onClick(). So I thought I’d let you know about the typo.
Have enjoyed your Tutorial and look forward to future ones.
Happy New Year,
Rick Jara
Thanks for the heads up. I have corrected it.
Hi, How could I control or monitoring temperature and LEDs at the same time with JS and AJAX using nodemCU ESP8266? Thanks for this article.
Thank you so much for this I really loved it. Helped me a lot
hello sir, good tutorial sir, i would like to add button on webpage without refresh for the 4 state from which i can do
1st state- ON
2nd state- OFF
3rd state- 50% analogWrite(512)
4th state- sliderValue()
here is my code for slider:
which i am using to control brightness of LED via this code kindly edit for the single button with 4 state of changes:
Code: for slider and HTTP page AJAX interface:
client.println(“HTTP/1.1 200 OK”);
client.println(“Content-type:text/html”);
client.println(“Connection: close”);
client.println();
// Display the HTML web page
client.println(“”);
client.println(“”);
client.println(“”);
//slider code HTML
client.println(“body { text-align: center; font-family: \”Trebuchet MS\”, Arial; margin-left:auto; margin-right:auto;}”);
client.println(“.slider { width: 300px; }”);
client.println(“”);
// Web Page
client.println(“LED brightness control”);
client.println(“LEDwhite: “);
client.println(“”);
client.println(“var slider = document.getElementById(\”brightLEDW\”);”);
client.println(“var brightLW = document.getElementById(\”brightLvl\”); brightLW.innerHTML = slider.value;”);
client.println(“slider.oninput = function() { slider.value = this.value; brightLW.innerHTML = this.value; }”);
client.println(“$.ajaxSetup({timeout:1000}); function LED1(pos1) { “);
client.println(“$.get(\”/?value=\” + pos1 + \”&\”); {Connection: close};}”);
client.println(“”);
client.println(“”);
if(header.indexOf(“GET /?value=”)>=0) {
lvl1 = header.indexOf(‘=’);
lvl2 = header.indexOf(‘&’);
valueString = header.substring(lvl1+1, lvl2);
//PWM to the LED white brightness
analogWrite(LED1pin,valueString.toInt());
Serial.println(valueString);
}
So here i have not used any HTTP, JAVAscript, via arduino before for the webpage but now i have understand the code and i have just modified slider as per my need kindly help me to add single button with 4 state of configuration
lets just say my “LEDpin1” should do 4 state of functions. so kindly help me out with this and if needed kindly add code just like in this format and not via “server.on()” configuration.
thank you sir,
Regards,
Rojer Bhatt
Hello,
Great tutorial it helped me a lot.
I was wondering how could I tweak your code to make the LED turn on as long as I am holding the button and turn of when I release.
Is this even possible?
Have a look at https://www.martyncurrey.com/switching-things-on-and-off-with-an-arduino/
Thank you very much for your reply, but I meant a web page button not a physical button.
I am aware of physical button operation and I want to step it up and control staff over the web.
So my question was about web page button.
Thank you very much
I understand now.
It is possible but beyond the scope of this guide. To implement, I would use Javascripts onmousedown and onmouseup events.
When onmousedown triggers you know the button is pressed and remains pressed until the onmouseup event fires.
Thanks very much this helped a lot
And keep up with these awesome guides!
Hello Sir, good tutorial, I have been able to turn on 1pcs leds, try the second led but it always fails, can you help me for the second led. for Sketch: ESP8266_LED_CONTROL_AJAX_03. thank you
Hello Sir, great tutorial !!! All worked fine!!!
Bellissimo Tutorial ! Grazie
I really liked the tutorial, mainly about the R tag information that makes coding scripts that will be transferred to the browser a lot easier.
Congratulations
Hi, great tutorials!
BTW I’d be interested in sending values from text fields from the browser to the ESP using AJAX to change variables. How can this be done?
While this can be done using AJAX a better solution is websockets. Have a look at part 9 and then look at the final sketch to see how they are used to send and receive data.
Thank you Sir
It was exactly what I needed to make my project of a web-controlled robot on a nodeMCU base.
It is clear and easy to test and adapt for me.
Nice job !
Olivier