In the previous post I looked at how webpages could be made to auto reload and auto update and by using Javascript how specific parts could be updated without the need to load the whole page.
Although the Javascript makes the webpage appear slicker the website still uses the client request method as before (the webpage still had to request new data). The Javascript just made the experience nicer. This post starts to look at true asynchronous or two-way communication where either side can send data without being asked for it. This is achieved by using websockets.
Websockets
Websockets are a way for a server and client (server and webpage) to talk to each other freely and either side can send data at any time (asynchronous) without being asked for it. They do this by keeping open a connection unlike HTML and AJAX which makes a new connection every time they want something. Websockets are part of HTML 5, have a Javascript api, and work in all modern browsers.
Websocket is a protocol just like HTTP and just like HTTP it sits on top of TCP*. Trying to implement Websockets yourself can be messy but thanks to the work of Markus Sattler AKA Links2004 there is a library just for the occasion. The library is called arduinoWebSockets and is available from Github: arduinoWebSockets or through the Arduino library manager.

*Websockets uses HTTP to make the initial request, once the request hase been answered websockets switches to TCP to transfer the data.
Using the Websocket Library
As with most libraries you need to let the compiler know you want to use it with an include statement. The library has to be installed first otherwise you will get a “we don’t know what you want” error (or something).
#include <WebSocketsServer.h> |
Then you need to create an instance/initialize it. Here we are using a websocket server on port 81 (there is also a websocket client, this is different).
WebSocketsServer webSocket = WebSocketsServer(81); |
Within the setup() function start the websocket server
webSocket.begin(); webSocket.onEvent(webSocketEvent); |
and we also set up the onEvent function.
webSocket.onEvent(webSocketEvent); |
webSocket.onEvent() fires any time anything happens with the websocket server. The event can be one of many things such as; a connection, disconnection, an error, or data is received (there are a few more). In the below examples onEvent calls another function called webSocketEvent (you can use any function name you wish). of course you also need the webSocketEvent() function.
void webSocketEvent(byte num, WStype_t type, uint8_t * payload, size_t length) { if(type == WStype_TEXT) { if (payload[0] == '0') { digitalWrite(pin_led, LOW); Serial.println("LED=off"); } else if (payload[0] == '1') { digitalWrite(pin_led, HIGH); Serial.println("LED=on"); } } else // event is not TEXT. Display the details in the serial monitor { Serial.print("WStype = "); Serial.println(type); Serial.print("WS payload = "); // since payload is a pointer we need to type cast to char for(int i = 0; i < length; i++) { Serial.print((char) payload[i]); } Serial.println(); } } |
In the examples below I am using ascii as control codes; “1” for on and “0” for off. This means we are using text and TEXT is one of the event types. If “type == WStype_TEXT” then we know we have received some text data. There is a brief explaination of WStype_t below. When there is any data it can be found in payload. Caveat: payload in not a char array. It is a pointer to the data.
If the event is not TEXT then I display the details in the serial monitor. This is not really required but lets you see what else is happening (such as connection or disconnection event).
num
num is the current client/connection number/ID. The arduinoWebsocket library allows a maximum of 5 at any one time.
type
type is the response type:
0 – WStype_ERROR
1 – WStype_DISCONNECTED
2 – WStype_CONNECTED
3 – WStype_TEXT
4 – WStype_BIN
5 – WStype_FRAGMENT_TEXT_START
6 – WStype_FRAGMENT_BIN_START
7 – WStype_FRAGMENT
8 – WStype_FRAGMENT_FIN
9 – WStype_PING
10- WStype_PONG
You can see that there is also a BIN data type.
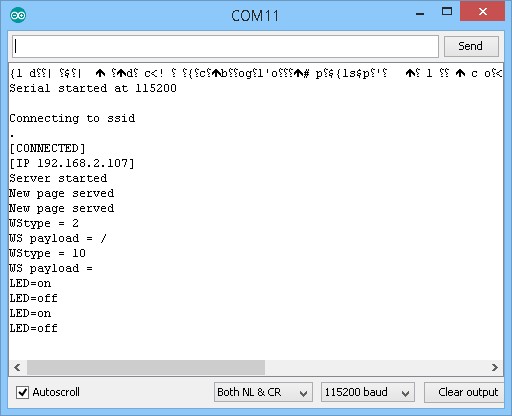
If you look at the picture of the serial monitor below you can see:
WStype = 2 – this is the connection event
WStype = 10 – PONG, the reply from a PING
and not displayed would be WStype = 3 for TEXT. Since we are using ascii characters as control codes we are using TEXT.
payload
payload is the received data (when there is received data). This is a pointer not a char or char array.
length
length is the size of the data.
Inside the main loop() function we need to call webSocket.loop();
webSocket.loop(); |
Example 1 only has communication from the webpage to the server (ESP8266). This means it only needs to process the control codes on the ESP8266. In example 2 we add local control (a switch on the EPS8266) which requires 2-way communication and means the webpage (client) has to receive and process Websocket data. This is done in Javascript behind the scenes.
In example 2, using the Javascript websocket api, in the Javascript init() function the onmessage event is set up to call the processReceivedCommand() function. The onmessage event fires whenever there is any data received.
function init() { Socket = new WebSocket('ws://' + window.location.hostname + ':81/'); Socket.onmessage = function(event) { processReceivedCommand(event); }; } |
event and evt are javascript objects (evt is a copy of event) that, among other things, contains the received data. The data is retrieved using evt.data (oop). When data is received we know the button switch on the ESP8266 has been used (see example 2) and so the labels and button text in the webpage are updated to reflect the new LED status.
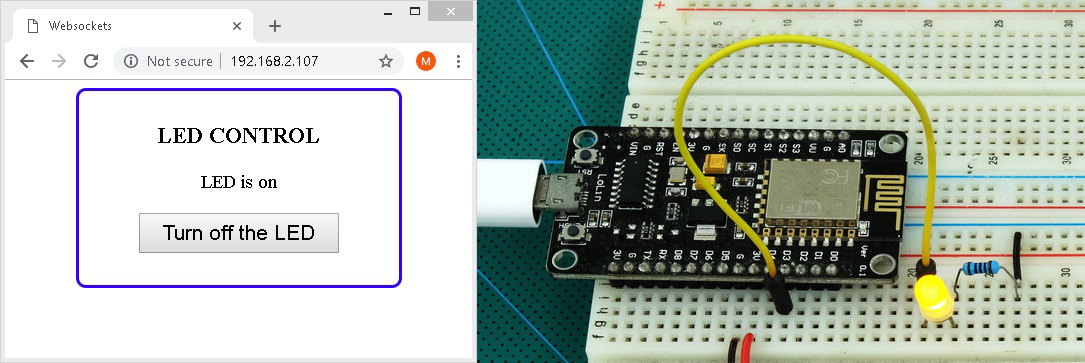
function processReceivedCommand(evt) { document.getElementById('rd').innerHTML = evt.data; if (evt.data ==='0') { document.getElementById('BTN_LED').innerHTML = 'Turn on the LED'; document.getElementById('LED_status').innerHTML = 'LED is off'; } if (evt.data ==='1') { document.getElementById('BTN_LED').innerHTML = 'Turn off the LED'; document.getElementById('LED_status').innerHTML = 'LED is on'; } } |
If “0” is received it means the LED has been turned off. A “1” means the LED has been turned on.
To recap. To use websockets on the ESP8266 you to need to
– include the libraries
– initialize the websocket
– start the server
– – send data
– – wait for some kind of event and then process the event. The event can be due to new data being received.
You need to do basically the same in the webpage but using the Javascript websockets api.
– create a new websocket object
– attach a listener function to the websocket message event so you can do something about received data
– – send data
More information on the Javascript api:
MDN Web Doc: Websocket
Tutorialspoint: HTML5 – WebSockets
linode: Introduction to WebSockets
More details about the arduinoWebSockets library can be found on github.
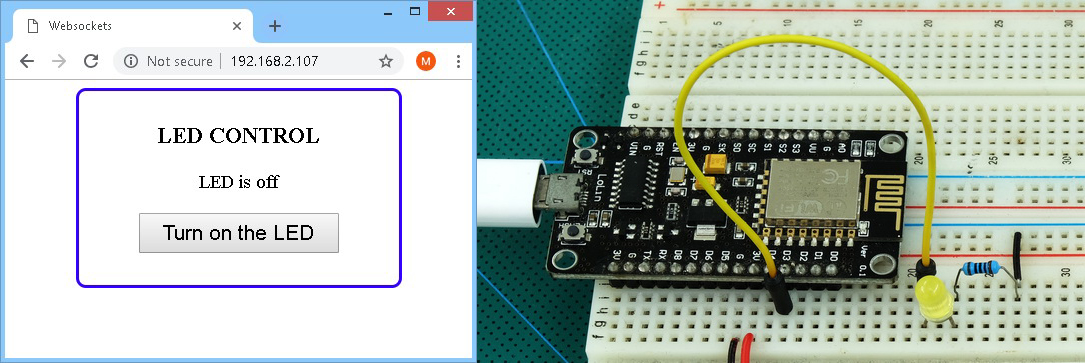
Example 1: LED Control Basic
The first example revisits LED Control and uses a fairly simple implementation of websockets. We have a single LED and a simple web interface to turn it on and off. This is almost the same as when we started many posts ago. The difference now of course is we are controlling the LED using websockets.
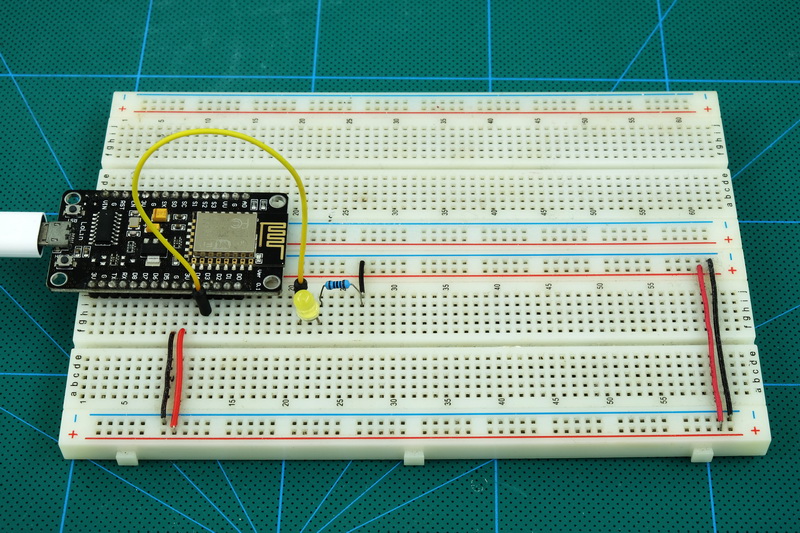
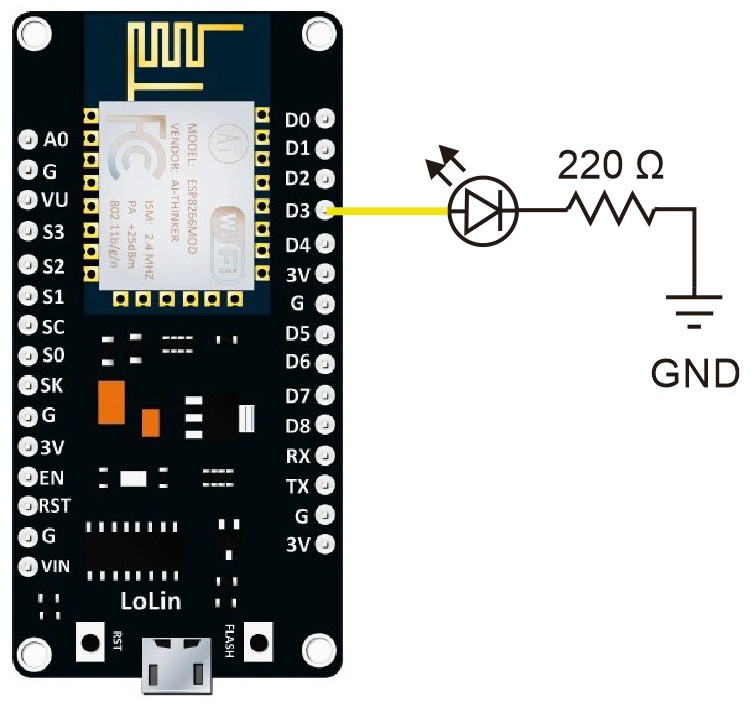
For this exercise I am using a Lolin NodeMcu V3 board but any ESP8266 board should work the same.

Circuit
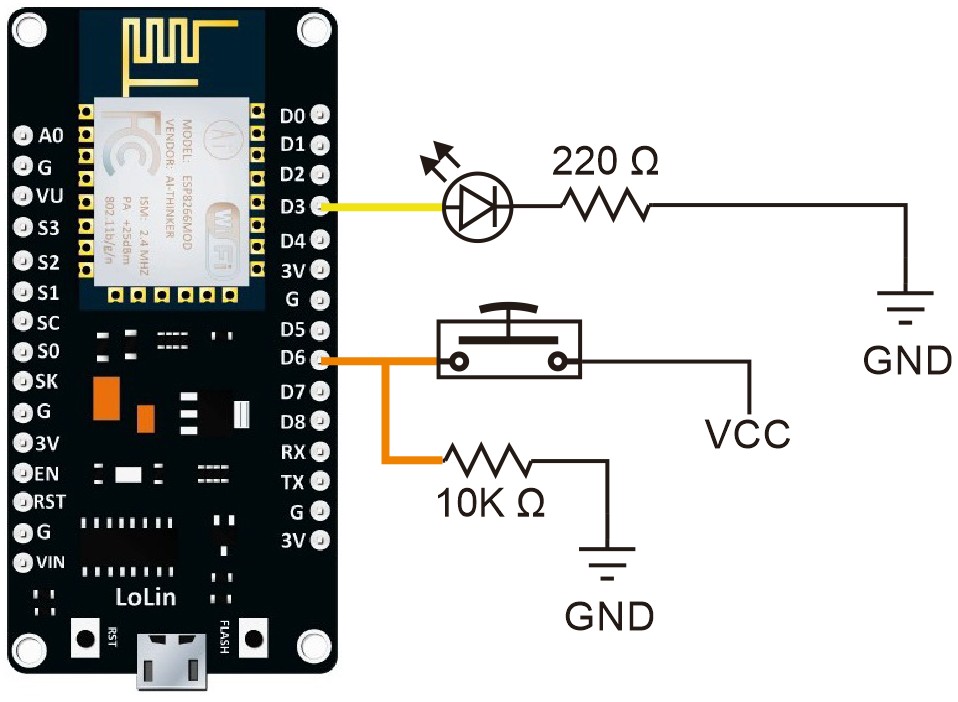
Very simply circuit. An LED and resistor connected to pin D3 (not pin 3).
Sketch
/* * Sketch: ESP8266_Part9_01_Websocket_LED * Intended to be run on an ESP8266 */ String header = "HTTP/1.1 200 OK\r\nContent-Type: text/html\r\n\r\n"; String html_1 = R"=====( <!DOCTYPE html> <html> <head> <meta name='viewport' content='width=device-width, initial-scale=1.0'/> <meta charset='utf-8'> <style> body { font-size:120%;} #main { display: table; width: 300px; margin: auto; padding: 10px 10px 10px 10px; border: 3px solid blue; border-radius: 10px; text-align:center;} .button { width:200px; height:40px; font-size: 110%; } </style> <title>Websockets</title> </head> <body> <div id='main'> <h3>LED CONTROL</h3> <div id='content'> <p id='LED_status'>LED is off</p> <button id='BTN_LED'class="button">Turn on the LED</button> </div> <br /> </div> </body> <script> var Socket; function init() { Socket = new WebSocket('ws://' + window.location.hostname + ':81/'); } document.getElementById('BTN_LED').addEventListener('click', buttonClicked); function buttonClicked() { var btn = document.getElementById('BTN_LED') var btnText = btn.textContent || btn.innerText; if (btnText ==='Turn on the LED') { btn.innerHTML = "Turn off the LED"; document.getElementById('LED_status').innerHTML = 'LED is on'; sendText('1'); } else { btn.innerHTML = "Turn on the LED"; document.getElementById('LED_status').innerHTML = 'LED is off'; sendText('0'); } } function sendText(data) { Socket.send(data); } window.onload = function(e) { init(); } </script> </html> )====="; #include <ESP8266WiFi.h> #include <WebSocketsServer.h> WiFiServer server(80); WebSocketsServer webSocket = WebSocketsServer(81); byte pin_led = D3; char ssid[] = "ssid"; // use your own network ssid and password char pass[] = "pass"; void setup() { pinMode(pin_led, OUTPUT); digitalWrite(pin_led,LOW); Serial.begin(115200); Serial.println(); Serial.println("Serial started at 115200"); Serial.println(); // Connect to a WiFi network Serial.print(F("Connecting to ")); Serial.println(ssid); WiFi.begin(ssid,pass); // connection with timeout int count = 0; while ( (WiFi.status() != WL_CONNECTED) && count < 17) { Serial.print("."); delay(500); count++; } if (WiFi.status() != WL_CONNECTED) { Serial.println(""); Serial.print("Failed to connect to "); Serial.println(ssid); while(1); } Serial.println(""); Serial.println(F("[CONNECTED]")); Serial.print("[IP "); Serial.print(WiFi.localIP()); Serial.println("]"); // start a server server.begin(); Serial.println("Server started"); webSocket.begin(); webSocket.onEvent(webSocketEvent); } void loop() { webSocket.loop(); WiFiClient client = server.available(); // Check if a client has connected if (!client) { return; } client.flush(); client.print( header ); client.print( html_1 ); Serial.println("New page served"); delay(5); } void webSocketEvent(byte num, WStype_t type, uint8_t * payload, size_t length) { if(type == WStype_TEXT) { if (payload[0] == '0') { digitalWrite(pin_led, LOW); Serial.println("LED=off"); } else if (payload[0] == '1') { digitalWrite(pin_led, HIGH); Serial.println("LED=on"); } } else { Serial.print("WStype = "); Serial.println(type); Serial.print("WS payload = "); for(int i = 0; i < length; i++) { Serial.print((char) payload[i]); } Serial.println(); } } |
A look at the sketch
As with the previous examples all the code for the webpage is contained in the String variable “html_1”.
This and the header codes are sent to the web browser when a request is received. I like to have the HTML at the top of the sketch so that it is seperate to the main ESP8266 code.
client.print( header ); client.print( html_1 ); Serial.println("New page served"); |
include the libraries and initiate instances.
#include <ESP8266WiFi.h> #include <WebSocketsServer.h> WiFiServer server(80); WebSocketsServer webSocket = WebSocketsServer(81); |
Try to connect to the local network. If you have followed along with the other guides you may nothice extra code. Here I have added a timeout. If a connection cannot be established in around 8 seconds (16 * 500ms) the sketch gives up. If the connection attempt is successful a connected message is printed in the serial monitor alond with the ESP8266’s ip address.
// connection with timeout int count = 0; while ( (WiFi.status() != WL_CONNECTED) && count < 17) { Serial.print("."); delay(500); count++; } if (WiFi.status() != WL_CONNECTED) { Serial.println(""); Serial.print("Failed to connect to "); Serial.println(ssid); while(1); } Serial.println(""); Serial.println(F("[CONNECTED]")); Serial.print("[IP "); Serial.print(WiFi.localIP()); Serial.println("]"); |
After the connection is made the servers are started.
// start a server server.begin(); Serial.println("Server started"); webSocket.begin(); webSocket.onEvent(webSocketEvent); |
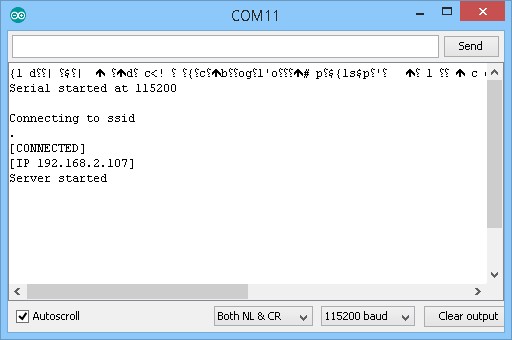
At this point the ESP8266 is connected to the network and the server is running waiting for somebody to visit. So on your web browser of choice (I am using Chrome) go to the ip address shown in the serial monitor. For me that is 192.168.2.107.
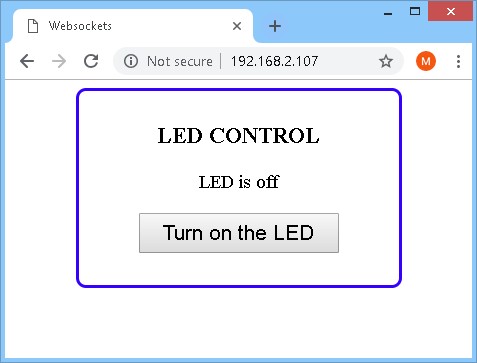
We are now able to magically control the LED with a simple click of a finger. Not quite Thanos level but close enough.
And that’s the first part done.
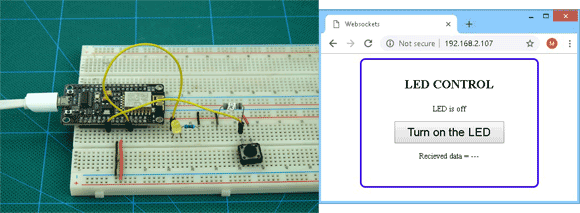
Example 2: LED Control Two-way
The first example works well but is no different to the one we did many guides ago. So what’s so special? The next bit is. Next we introduce two-way communication using Websockets.
In this example we add a button switch to the ESP8266 to allow local control of the LED. This means we will be able to control the LED from either a hardware switch or a soft switch in the web page. So why are Websockets required for this? Websockets are used to allow the ESP8266 to send data to the webpage telling it the LED status has changed. The webpage can then update the label and button text to reflect the new LED status.
Circuit
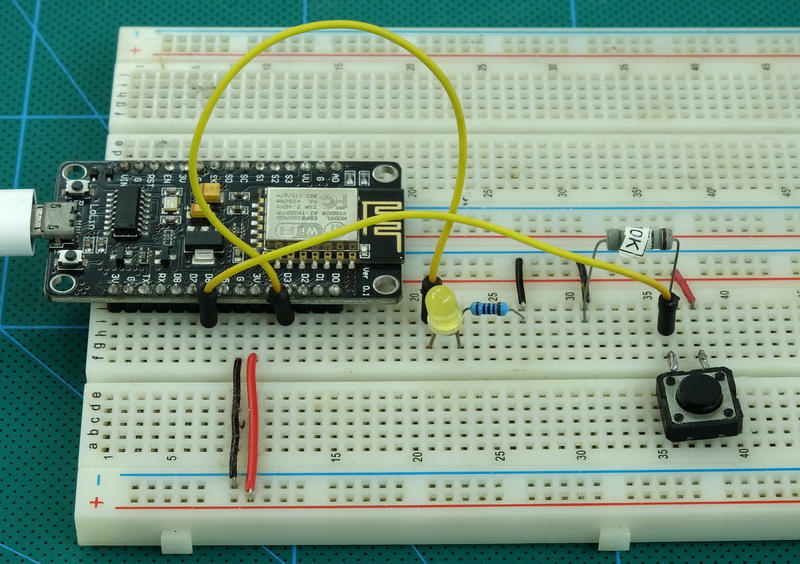
The GNDs and VCCs are connected. You just can’t see the wires!
Sketch
/* * Sketch: ESP8266_Part9_02_Websocket_LED_2Way * Intended to be run on an ESP8266 */ String header = "HTTP/1.1 200 OK\r\nContent-Type: text/html\r\n\r\n"; String html_1 = R"=====( <!DOCTYPE html> <html> <head> <meta name='viewport' content='width=device-width, initial-scale=1.0'/> <meta charset='utf-8'> <style> body { font-size:120%;} #main { display: table; width: 300px; margin: auto; padding: 10px 10px 10px 10px; border: 3px solid blue; border-radius: 10px; text-align:center;} #BTN_LED { width:200px; height:40px; font-size: 110%; } p { font-size: 75%; } </style> <title>Websockets</title> </head> <body> <div id='main'> <h3>LED CONTROL</h3> <div id='content'> <p id='LED_status'>LED is off</p> <button id='BTN_LED'class="button">Turn on the LED</button> </div> <p>Recieved data = <span id='rd'>---</span> </p> <br /> </div> </body> <script> var Socket; function init() { Socket = new WebSocket('ws://' + window.location.hostname + ':81/'); Socket.onmessage = function(event) { processReceivedCommand(event); }; } function processReceivedCommand(evt) { document.getElementById('rd').innerHTML = evt.data; if (evt.data ==='0') { document.getElementById('BTN_LED').innerHTML = 'Turn on the LED'; document.getElementById('LED_status').innerHTML = 'LED is off'; } if (evt.data ==='1') { document.getElementById('BTN_LED').innerHTML = 'Turn off the LED'; document.getElementById('LED_status').innerHTML = 'LED is on'; } } document.getElementById('BTN_LED').addEventListener('click', buttonClicked); function buttonClicked() { var btn = document.getElementById('BTN_LED') var btnText = btn.textContent || btn.innerText; if (btnText ==='Turn on the LED') { btn.innerHTML = 'Turn off the LED'; document.getElementById('LED_status').innerHTML = 'LED is on'; sendText('1'); } else { btn.innerHTML = 'Turn on the LED'; document.getElementById('LED_status').innerHTML = 'LED is off'; sendText('0'); } } function sendText(data) { Socket.send(data); } window.onload = function(e) { init(); } </script> </html> )====="; #include <ESP8266WiFi.h> #include <WebSocketsServer.h> WiFiServer server(80); WebSocketsServer webSocket = WebSocketsServer(81); byte pin_led = D3; byte pin_switch = D6; boolean LEDstatus = LOW; boolean oldSwitchState = LOW; boolean newSwitchState1 = LOW; boolean newSwitchState2 = LOW; boolean newSwitchState3 = LOW; char ssid[] = "ssid"; char pass[]= "password"; void setup() { pinMode(pin_led, OUTPUT); digitalWrite(pin_led,LEDstatus); pinMode(pin_switch, INPUT); Serial.begin(115200); Serial.println(); Serial.println("Serial started at 115200"); Serial.println(); // Connect to a WiFi network Serial.print(F("Connecting to ")); Serial.println("ssid"); WiFi.begin(ssid,pass); // connection with timeout int count = 0; while ( (WiFi.status() != WL_CONNECTED) && count < 17) { Serial.print("."); delay(500); count++; } if (WiFi.status() != WL_CONNECTED) { Serial.println(""); Serial.print("Failed to connect to "); Serial.println(ssid); while(1); } Serial.println(""); Serial.println(F("[CONNECTED]")); Serial.print("[IP "); Serial.print(WiFi.localIP()); Serial.println("]"); // start a server server.begin(); Serial.println("Server started"); webSocket.begin(); webSocket.onEvent(webSocketEvent); } void loop() { checkSwitch(); webSocket.loop(); WiFiClient client = server.available(); // Check if a client has connected if (!client) { return; } client.flush(); client.print( header ); client.print( html_1 ); Serial.println("New page served"); delay(5); } void webSocketEvent(byte num, WStype_t type, uint8_t * payload, size_t length) { if(type == WStype_TEXT) { if (payload[0] == '0') { digitalWrite(pin_led, LOW); LEDstatus = LOW; Serial.println("LED=off"); } else if (payload[0] == '1') { digitalWrite(pin_led, HIGH); LEDstatus = HIGH; Serial.println("LED=on"); } } else { Serial.print("WStype = "); Serial.println(type); Serial.print("WS payload = "); for(int i = 0; i < length; i++) { Serial.print((char) payload[i]); } Serial.println(); } } void checkSwitch() { newSwitchState1 = digitalRead(pin_switch); delay(1); newSwitchState2 = digitalRead(pin_switch); delay(1); newSwitchState3 = digitalRead(pin_switch); // if all 3 values are the same we can continue if ( (newSwitchState1==newSwitchState2) && (newSwitchState1==newSwitchState3) ) { if ( newSwitchState1 != oldSwitchState ) { // toggle the LED when the button switch is pressed rather than released if ( newSwitchState1 == HIGH ) { LEDstatus = ! LEDstatus; if ( LEDstatus == HIGH ) { digitalWrite(pin_led, HIGH); webSocket.broadcastTXT("1"); Serial.println("LED is ON"); } else { digitalWrite(pin_led, LOW); webSocket.broadcastTXT("0"); Serial.println("LED is OFF"); } } oldSwitchState = newSwitchState1; } } } |
What’s New? First off I have added an extra paragraph in the HTML. This is used to show the received data. This is for debugging purposes only.
<p>Recieved data = <span id='rd'>---</span> </p> |
the “—” is a holder and is replaced with any data that is received over the Websocket.
There is additional Javascript as well. Since we are now receiving data we need to … receive it. For this we use the “Socket.onmessage”. When the Javascript is initialised we tell the received data event to call a function called “processReceivedCommand()”. event is a Javascript object that contains all the event attributes including the data.
function init() { Socket = new WebSocket('ws://' + window.location.hostname + ':81/'); Socket.onmessage = function(event) { processReceivedCommand(event); }; } |
This is where we process the incoming data and in this case it is the controls codes to turn the LED on or off. “0” for off and “1” for on.
function processReceivedCommand(evt) { document.getElementById('rd').innerHTML = evt.data; if (evt.data ==='0') { document.getElementById('BTN_LED').innerHTML = 'Turn on the LED'; document.getElementById('LED_status').innerHTML = 'LED is off'; } if (evt.data ==='1') { document.getElementById('BTN_LED').innerHTML = 'Turn off the LED'; document.getElementById('LED_status').innerHTML = 'LED is on'; } } |
“document.getElementById(‘rd’).innerHTML = evt.data;” simply copies the received data to the new paragraph.
If we have a “0” we know the LED has been turned off and if we have a “1” we know the LED has been turned on so we set the label and button text to match.
You may notice that we now have duplicate code; here in processReceivedCommand() function and also in the buttonClicked() function. A couple of extra functions (such as LEDon() and LEDoff() could be used to make things a little tidier. I leave that for you to implement.
Because we added a button switch we need to tell the ESP8266 where it is. It’s on D6. Additional variables have been added to look after the switch.
byte pin_switch = D6; boolean LEDstatus = LOW; boolean oldSwitchState = LOW; boolean newSwitchState1 = LOW; boolean newSwitchState2 = LOW; boolean newSwitchState3 = LOW; |
We also have a function that checks the button switch
void checkSwitch() { newSwitchState1 = digitalRead(pin_switch); delay(1); newSwitchState2 = digitalRead(pin_switch); delay(1); newSwitchState3 = digitalRead(pin_switch); // if all 3 values are the same we can continue if ( (newSwitchState1==newSwitchState2) && (newSwitchState1==newSwitchState3) ) { if ( newSwitchState1 != oldSwitchState ) { // toggle the LED when the button switch is pressed rather than released // When the switch is closed the pin goes LOW to HIGH if ( newSwitchState1 == HIGH ) { LEDstatus = ! LEDstatus; if ( LEDstatus == HIGH ) { digitalWrite(pin_led, HIGH); webSocket.broadcastTXT("1"); Serial.println("LED is ON"); } else { digitalWrite(pin_led, LOW); webSocket.broadcastTXT("0"); Serial.println("LED is OFF"); } } oldSwitchState = newSwitchState1; } } } |
I don’t go in to details about how the switch code works here. If you want to know more see Switching Things On And Off With An Arduino. Check out example 3 and 3a.
Now that we can control the LED at either end we need to keep track of it and we do that by using the variable LEDstatus. LED status is LOW when the LED is off and HIGH when it is on.
Now when there is a control code from the web page, as well as controlling the LED LEDstatus is updated as well.
if(type == WStype_TEXT) { if (payload[0] == '0') { digitalWrite(pin_led, LOW); LEDstatus = LOW; Serial.println("LED=off"); } else if (payload[0] == '1') { digitalWrite(pin_led, HIGH); LEDstatus = HIGH; Serial.println("LED=on"); } } |
And that’s it. We now have two-way control using Websockets.
Dear sir,
Can we lock NodeMcu , after programming?
If yes , how can we?
Thanks ,
Hi, nice article, I’m try to find also some info about the WStype_ERROR handling, do you have some suggest, documentation about what type of event occour with this type?
Thank!
All I can suggest is Google it.
My next guide is not ready yet and may not be published for a while; busy with work. However, it should not be too hard to implement error handling. In the above example I am only interested when type is text and ignore other types. To check for an error just add a check to see if type is WStype_ERROR
To modify the above code, add an else if:
void webSocketEvent(byte num, WStype_t type, uint8_t * payload, size_t length)
{
if(type == WStype_TEXT)
{
// have text – do something
}
else if ( type ==WStype_ERROR )
{
// there is an error – do something about it
}
else
{
// not text and not an error
}
If you want to handle all types than you can use a list of if / else if statements or a case statement.
it is very useful :D
thank you …
Hi,
This is a really useful tutorial, and has inspired me to try something similar.
IE: Control several ESP8266’s form a single webpage hosted on win 10 iis. Both are on the LAN network.
However after setting up my experiment I cannot get any communication. I understand this is because I basically have two servers; the ESP and IIS.
What I would like to achieve is the ESP communicates with the IIS server via Websocket,
Firstly is this possible? (I don’t see why not)
Do I need to do more than update the ESP program to read the localhost address?
https://drive.google.com/open?id=1qk8n-uitHQnIFdP-yfuv7bVPkilWcoOw
.I edited that code to support 10 lights check out the link
Can you please write a tutorial or guide me how to monitor a simple sensor value or the value of A0 on a webpage using websockets ?? It will be really really helpful.
I too would like to see an example of WebSocket code that accomplishes this… seems like a relatively simple thing to do, I simply have such a primitive understanding of how to go about it. Theres got to be a way to send a “payload” of any kind that could then be used to communicate a range of various input/output data types within the same program?
I want to use to more led and push button switches, then how it should be coded.
I came here while searching for Websockets with ESP8266. And I very happy I came.
Being a reasonably advanced user of the ESPs I was looking for this websocket stuff. The exact thing that you have written and explained !
Starting to read and cannot wait for my first websocket to work.
Just a generic question : Do you have a Index of all the projects you have done as this …. I searched but could not find.
Thanks
Not an index but there is a list of the main articles at https://www.martyncurrey.com/quick-links/
Great stuff!
I think, it might be a good idea to mention, that you have to wait for the open event (Website) or the WStype_CONNECTED event (Server side) to pass, before sending messages from the relevant side. Otherwise you will see no communication and the server socket might disconnect itself, as in my case.
Regards
Rene
This is a good point and something I cover in the part I am writing at the moment. I will try to add an update to this part when I get time as well.
I built a weatherstation a while back, it just has temps, presures, light & rainfall, I’d like to add an anemometer, but need an update faster than jquery/ajax can manage.
So I cut this code down as a test, and sent incremental values to a browser, and it works.
Thanks for the useful webpage.
I was looking for a web interface for a traffic light whose logic runs on an ESP. I found this page and the example ran right away! So I can adapt it to my ESP sketch.
To better understand the library, I tried to find the logic behind the two #defines “NODEBUG_WEBSOCKETS” and “DEBUG_WEBSOCKETS”, I don’t understand it. The reason: I wanted to see the debug output of the library.
Its really nice and good, but I want to use it two way control in AP mode without internet or router use. Is it possible?
yes it is possible. Websockets work between the webpage and the server and it doesn’t matter if the webpage was served using AP or STA mode.
If you look at the final project, this can be used in either mode:
https://www.martyncurrey.com/esp8266-and-the-arduino-ide-part-10d-iot-monitor-final-project/
BEST REGARDS!… I TRY TO USE A SAMPLE OF WEBSOCKETS FOR ESP8266 NODEMU IN LAN….IS OK ………..BUT WHEN TRY TO USE IN WAN, WEB PAGE IS HANG, MY ROUTER WAS FIX TO MAKE A STATIC IP AND FORWARDING THE FIX ADDRES …… THERE IS SOME WAY TO DRIVE ESP_SOCKET IN WAN?
Did you port forward the websocket port? In all my examples I use port 81. You will need to set up port forwarding for both port 80 (webpage) and port 81 (websocket).
Websockets work over a different / separate port to the main webpage. The main webpage uses port 80 and I normally use port 81 for the websocket. The websocket port is not fixed and can be anything though.
Thank you Martyn for explaning websockets in an easy way. All is function well – only one think is not working:
When you have 2 clients connected they get the right startpage and can activate the output – but the state of the output is not send out to all connected clients – only the one that activated it – the other clients can not see that there has been a change of state.
according to do some tests yesterday then when websocket client close android app then esp8266 websocket server detect that client closed connection :
response type as : 1 – WStype_DISCONNECTED
but if the wifi connection is turned off by client side then esp8266 not detect that the connection is lost
how to solve that problem?
For the ESp8266 (and ESP32), the only reliable way I have so far discovered is too use a periodic test command. I normally AYT and YIA.
Every couple of seconds or so (can be longer) one side sends a [AYT] (Are You There) command and the other side, when it gets the message, replies with [YIA} (Yes I Am). Of course you can simpler codes.
After sending a [AYT], if there is no replay after 1 second or so you can assume the connection has been lost.
I’ve been playing with this for a while now and managed to add a 3rd dial and a 3rd graph line just ‘because’ and i thought about changing the update rate, so I tried adding ‘radio’ buttons (I added them just at the bottom, central under the graph would be better but i’m taking baby steps and html confuses me) to change the graph update rate with 3 speeds, I can do this in the code etc thats fine and the graph does update at my choosen speed, but I cant seem to find a way to get the status of the radio buttons back
I tried to add ‘normal’ buttons to send something back via the url but that doesnt work for me either…
I’ve used
Select graph
speed1
speed2
speed3
This shows the buttons on the webpage, clicking them changes them, but i cant find a way to read them to set the speed
Oops it seems my post has been treat as inline html, didnt know it would show that way, this post needs deleting i have updated my post with the html edited to show as text.
I’ve been playing with this for a while now and managed to add a 3rd dial and a 3rd graph line just ‘because’ and i thought about changing the update rate, so I tried adding ‘radio’ buttons (I added them just at the bottom, central under the graph would be better but i’m taking baby steps and html confuses me) to change the graph update rate with 3 speeds, I can do this in the code etc thats fine and the graph does update at my choosen speed, but I cant seem to find a way to get the status of the radio buttons back
I tried to add ‘normal’ buttons to send something back via the url but that doesnt work for me either…
I’ve used
(p)Select graph(/p)
(div)
(input type = ‘radio’ id=’graph_speed1′
name=’operation_mode’)
(label for = ‘graph_speed1’)speed1(/label)
(div)
(p)Select graph(/p)
(div)
(input type = ‘radio’ id=’graph_speed2′
name=’operation_mode’)
(label for = ‘graph_speed2’)speed2(/label)
(div)
(p)Select graph(/p)
(div)
(input type = ‘radio’ id=’graph_speed3′
name=’operation_mode’)
(label for = ‘graph_speed3’)speed3(/label)
(div)
This shows the buttons on the webpage, clicking them changes them, but i cant find a way to read them to set the speed