We have seen how to control one LED, here we add two more.
Hopefully the previous post was a gentle introduction to AJAX and how it can be used to send data to the server without the need to refresh the entire page. The next step is to add more LEDs.
Before adding more LEDs I want to change certain parts of the code. This will make adding more LEDs easier.
The changes:
1. Change how the button is used to show the LED status. Will now say “ON” or “OFF”.
2. Change the button colour. Red for OFF and green for ON.
3. Simplify the control codes. Will now use “L11” for LED 1 ON and “L10” for LED 1 OFF.
4. No AJAX acknowledgement.
5. Change the layout of the page. Now use a table
6. Add a little bit more css
This will give us a layout we can easily add more controls to.
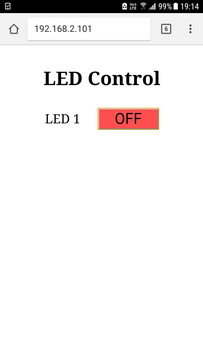
Button text is now “ON” or “OFF”.
<input type='button' id = 'LED_button' onclick='switchLED()' value='OFF' /> |
When the button text is changed the background colour is also change and the control codes are simpler.
if (button_text=="OFF") { document.getElementById("LED_button").value = "ON"; document.getElementById("LED_button").style.background = "#50FF50"; ajaxLoad('L11'); } else { document.getElementById("LED_button").value = "OFF"; document.getElementById("LED_button").style.background = "#FF5050"; ajaxLoad('L10'); } |
Now using a table layout. Here is the HTML.
<table id = "controls"> <tr> <td width="70%">LED 1</td> <td> <input type='button' id = 'LED_button' onclick='switchLED()' value='ON' /> </td> </tr> </table> |
Updated css
#LED_button { width: 4em; background-color: #FF5050; font-size: 120%; } table {width: 100%; } |
Here is the sketch. ESP8266_LED_CONTROL_AJAX_06
/* * Sketch: ESP8266_LED_CONTROL_AJAX_06 * Intended to be run on an ESP8266 * * Uses Station Mode on the ESP8266 */ String header = "HTTP/1.1 200 OK\r\nContent-Type: text/html\r\n\r\n"; String html_1 = R"=====( <!DOCTYPE html> <html> <head> <meta name='viewport' content='width=device-width, initial-scale=1.0'/> <meta charset='utf-8'> <style> body {font-size:140%; } #main {display: table; margin: auto; padding: 0 5px 0 5px; } h2 {text-align:center; } #LED_button { width: 4em; background-color: #FF5050; font-size: 120%; } table {width: 100%; } </style> <script> function switchLED() { var button_text = document.getElementById("LED_button").value; if (button_text=="OFF") { document.getElementById("LED_button").value = "ON"; document.getElementById("LED_button").style.background = "#50FF50"; ajaxLoad('L11'); } else { document.getElementById("LED_button").value = "OFF"; document.getElementById("LED_button").style.background = "#FF5050"; ajaxLoad('L10'); } } var ajaxRequest = null; if (window.XMLHttpRequest) { ajaxRequest =new XMLHttpRequest(); } else { ajaxRequest =new ActiveXObject("Microsoft.XMLHTTP"); } function ajaxLoad(ajaxURL) { if(!ajaxRequest){ alert("AJAX is not supported."); return; } ajaxRequest.open("GET",ajaxURL,true); ajaxRequest.onreadystatechange = function() { if(ajaxRequest.readyState == 4 && ajaxRequest.status==200) { var ajaxResult = ajaxRequest.responseText; } } ajaxRequest.send(); } </script> <title>LED Control</title> </head> <body> <div id='main'> <h2>LED Control</h2> <table id = "controls"> <tr> <td width="70%">LED 1</td> )====="; String html_2 = R"=====( <td> <input type='button' id = 'LED_button' onclick='switchLED()' value='OFF' /> </td> )====="; String html_4 = R"=====( </tr> </table> </div> </body> </html> )====="; #include <ESP8266WiFi.h> // change these values to match your network char ssid[] = "NetworkName"; // your network SSID (name) char pass[] = "password"; // your network password WiFiServer server(80); String request = ""; int LED_Pin = D1; void setup() { pinMode(LED_Pin, OUTPUT); Serial.begin(115200); Serial.println(); Serial.println("Serial started at 115200"); Serial.println("ESP8266_LED_CONTROL_AJAX_06"); Serial.println(); // Connect to a WiFi network Serial.print(F("Connecting to ")); Serial.println(ssid); WiFi.begin(ssid, pass); while (WiFi.status() != WL_CONNECTED) { Serial.print("."); delay(500); } Serial.println(""); Serial.println(F("[CONNECTED]")); Serial.print("[IP "); Serial.print(WiFi.localIP()); Serial.println("]"); // start a server server.begin(); Serial.println("Server started"); } // void setup() void loop() { // Check if a client has connected WiFiClient client = server.available(); if (!client) { return; } // Read the first line of the request request = client.readStringUntil('\r'); Serial.print("request: "); Serial.println(request); if ( request.indexOf("L11") > 0 ) { digitalWrite(LED_Pin, HIGH); } else if ( request.indexOf("L10") > 0 ) { digitalWrite(LED_Pin, LOW); } else { boolean pinStatus = digitalRead(LED_Pin); if (pinStatus==HIGH) { html_2.replace( "value='OFF'" , "value='ON'" ); html_1.replace( "background-color: #FF5050;" , "background-color: #50FF50;" ); } else { html_2.replace( "value='ON'" , "value='OFF'" ); html_1.replace( "background-color: #50FF50;" , "background-color: #FF5050;" ); } client.flush(); client.print( header ); client.print( html_1 ); client.print( html_2 ); client.print( html_4 ); delay(5); // this is not really required... } // The client will actually be disconnected when the function returns and 'client' object is detroyed } // void loop() |
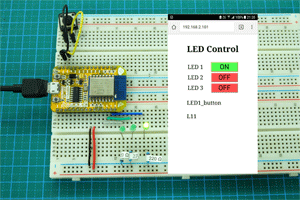
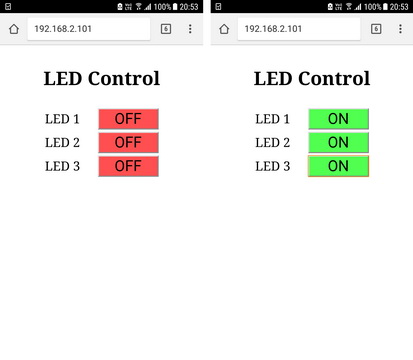
Adding More LEDS
Let’s add 2 more LEDs
Circuit
The circuit now has 3 LEDs. One each connected to D1, D2, and D3.
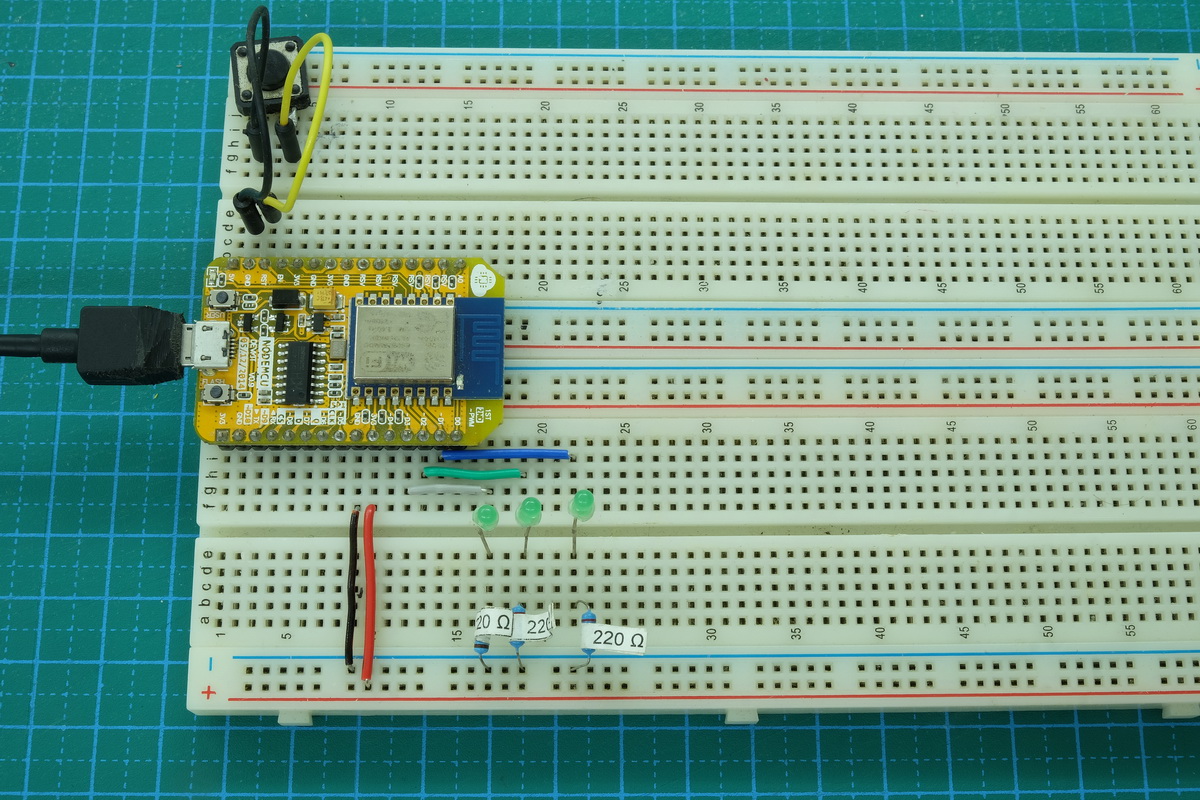
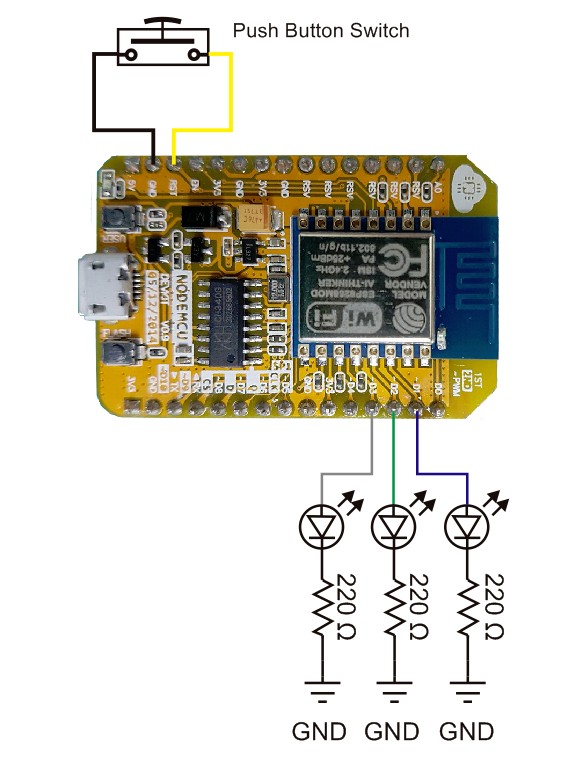
The reset button isn’t really required.
HTML
In the last example, when the webpage is refreshed and the LED status is checked, you can see that I am replacing the background colour of the button in the css. This is fine when you only have one button but gets messy when you have more than one. A better solution is to use css classes.
In the css I have removed the background-colour property from the button and created 2 new classes; “red” and “green”. These can then be applied to the buttons.
  input[type="button"] { width: 4em; font-size: 120%; }
  .green { background-color: #50FF50;  }
.red { background-color: #FF5050; } |
I have added 2 more buttons to the table in the HTML. To each button I have added the css colour class. Since this is the default all buttons are set to red.
  <table id = "controls">
   <tr>
    <td width="70%">LED 1</td>
    <td> <input type='button' id='LED1_button' value='OFF' class='red' onclick='switchLED1()' />  </td>
   </tr>
   <tr>
    <td width="70%">LED 2</td>
    <td> <input type='button' id='LED2_button' value='OFF' class='red' onclick='switchLED2()' />  </td>
   </tr>
   <tr>
    <td width="70%">LED 3</td>
    <td> <input type='button' id='LED3_button' value='OFF' class='red' onclick='switchLED3()' />  </td>
   </tr>
</table> |
Sketch
We start with a simply sketch. I have simply copied the code and functions that deal with the button click and simply changed the IDs and references. This means we now have new switchLED() functions to look after the new buttons.
The new functions have been added to the JavaScript and the references and control codes have been updated so that switchLED2() looks after button number 2 and switchLED3() looks after button number 3.
 function switchLED1()
  {
     var button_text = document.getElementById("LED1_button").value;
     if (button_text=="OFF")
     {
       document.getElementById("LED1_button").value = "ON";
       document.getElementById("LED1_button").style.background = "#50FF50";
       ajaxLoad('L11');
     }
     else
     {
       document.getElementById("LED1_button").value = "OFF";
       document.getElementById("LED1_button").style.background = "#FF5050";
       ajaxLoad('L10');
     }
  }

  function switchLED2()
  {
     var button_text = document.getElementById("LED2_button").value;
     if (button_text=="OFF")
     {
       document.getElementById("LED2_button").value = "ON";
       document.getElementById("LED2_button").style.background = "#50FF50";
       ajaxLoad('L21');
     }
     else
     {
       document.getElementById("LED2_button").value = "OFF";
       document.getElementById("LED2_button").style.background = "#FF5050";
       ajaxLoad('L20');
     }
  }

  function switchLED3()
  {
     var button_text = document.getElementById("LED3_button").value;
     if (button_text=="OFF")
     {
       document.getElementById("LED3_button").value = "ON";
       document.getElementById("LED3_button").style.background = "#50FF50";
       ajaxLoad('L31');
     }
     else
     {
       document.getElementById("LED3_button").value = "OFF";
       document.getElementById("LED3_button").style.background = "#FF5050";
       ajaxLoad('L30');
     }
} |
We now need to take care of the new requests and turn the LEDs on and off
if ( request.indexOf("L11") > 0 ) { digitalWrite(LED1_Pin, HIGH); } else if ( request.indexOf("L10") > 0 ) { digitalWrite(LED1_Pin, LOW); } if ( request.indexOf("L21") > 0 ) { digitalWrite(LED2_Pin, HIGH); } else if ( request.indexOf("L20") > 0 ) { digitalWrite(LED2_Pin, LOW); } if ( request.indexOf("L31") > 0 ) { digitalWrite(LED3_Pin, HIGH); } else if ( request.indexOf("L30") > 0 ) { digitalWrite(LED3_Pin, LOW); } |
and finally we need to deal with a page refresh or a root/blank request. Here we check the LED status. If it is ON we show the ON button and if the LED is OFF we show the OFF button.
else { if (digitalRead(LED1_Pin)==HIGH) { html_2 = " <td> <input type='button' id='LED1_button' value='ON' class='green' onclick='switchLED1()' /> </td>"; } else { html_2 = " <td> <input type='button' id='LED1_button' value='OFF' class='red' onclick='switchLED1()' /> </td>"; } if (digitalRead(LED2_Pin)==HIGH) { html_4 = " <td> <input type='button' id='LED2_button' value='ON' class='green' onclick='switchLED2()' /> </td>"; } else { html_4 = " <td> <input type='button' id='LED2_button' value='OFF' class='red' onclick='switchLED2()' /> </td>"; } if (digitalRead(LED3_Pin)==HIGH) { html_6 = " <td> <input type='button' id='LED3_button' value='ON' class='green' onclick='switchLED3()' /> </td>"; } else { html_6 = " <td> <input type='button' id='LED3_button' value='OFF' class='red' onclick='switchLED3()' /> </td>"; } client.flush(); client.print( header ); client.print( html_1 ); client.print( html_2 ); client.print( html_3 ); client.print( html_4 ); client.print( html_5 ); client.print( html_6 ); client.print( html_7 ); delay(5); } |
To make changing the HTML a little easier I have separated it in to 7 parts. We now have HTML_1 to HTML_7.
The full sketch. ESP8266_LED_CONTROL_AJAX_07
/* * Sketch: ESP8266_LED_CONTROL_AJAX_07 * Intended to be run on an ESP8266 */ String header = "HTTP/1.1 200 OK\r\nContent-Type: text/html\r\n\r\n"; String html_1 = R"=====( <!DOCTYPE html> <html> <head> <meta name='viewport' content='width=device-width, initial-scale=1.0'/> <meta charset='utf-8'> <style> body {font-size:140%; } #main {display: table; margin: auto; padding: 0 5px 0 5px; } h2 {text-align:center; } input[type="button"] { width: 4em; font-size: 120%; } .green { background-color: #50FF50; } .red { background-color: #FF5050; } table {width: 100%; } </style> <script> function switchLED1() { var button_text = document.getElementById("LED1_button").value; if (button_text=="OFF") { document.getElementById("LED1_button").value = "ON"; document.getElementById("LED1_button").style.background = "#50FF50"; ajaxLoad('L11'); } else { document.getElementById("LED1_button").value = "OFF"; document.getElementById("LED1_button").style.background = "#FF5050"; ajaxLoad('L10'); } } function switchLED2() { var button_text = document.getElementById("LED2_button").value; if (button_text=="OFF") { document.getElementById("LED2_button").value = "ON"; document.getElementById("LED2_button").style.background = "#50FF50"; ajaxLoad('L21'); } else { document.getElementById("LED2_button").value = "OFF"; document.getElementById("LED2_button").style.background = "#FF5050"; ajaxLoad('L20'); } } function switchLED3() { var button_text = document.getElementById("LED3_button").value; if (button_text=="OFF") { document.getElementById("LED3_button").value = "ON"; document.getElementById("LED3_button").style.background = "#50FF50"; ajaxLoad('L31'); } else { document.getElementById("LED3_button").value = "OFF"; document.getElementById("LED3_button").style.background = "#FF5050"; ajaxLoad('L30'); } } var ajaxRequest = null; if (window.XMLHttpRequest) { ajaxRequest =new XMLHttpRequest(); } else { ajaxRequest =new ActiveXObject("Microsoft.XMLHTTP"); } function ajaxLoad(ajaxURL) { if(!ajaxRequest){ alert("AJAX is not supported."); return; } ajaxRequest.open("GET",ajaxURL,true); ajaxRequest.onreadystatechange = function() { if(ajaxRequest.readyState == 4 && ajaxRequest.status==200) { var ajaxResult = ajaxRequest.responseText; } } ajaxRequest.send(); } </script> <title>LED Control</title> </head> <body> <div id='main'> <h2>LED Control</h2> <table id = "controls"> <tr> <td width="70%">LED 1</td> )====="; String html_2 = " <td> <input type='button' id='LED1_button' value='OFF' class='red' onclick='switchLED1()' /> </td>"; String html_3 = R"=====( </tr> <tr> <td width="70%">LED 2</td> )====="; String html_4 = " <td> <input type='button' id='LED2_button' value='OFF' class='red' onclick='switchLED2()' /> </td>"; String html_5 = R"=====( </tr> <tr> <td width="70%">LED 3</td> )====="; String html_6 = " <td> <input type='button' id='LED3_button' value='OFF' class='red' onclick='switchLED3()' /> </td>"; String html_7 = R"=====( </tr> </table> </div> </body> </html> )====="; #include <ESP8266WiFi.h> // change these values to match your network char ssid[] = "NetworkName"; // your network SSID (name) char pass[] = "password"; // your network password WiFiServer server(80); String request = ""; int LED1_Pin = D1; int LED2_Pin = D2; int LED3_Pin = D3; void setup() { pinMode(LED1_Pin, OUTPUT); pinMode(LED2_Pin, OUTPUT); pinMode(LED3_Pin, OUTPUT); Serial.begin(115200); Serial.println(); Serial.println("Serial started at 115200"); Serial.println("ESP8266_LED_CONTROL_AJAX_07"); Serial.println(); // Connect to a WiFi network Serial.print(F("Connecting to ")); Serial.println(ssid); WiFi.begin(ssid, pass); while (WiFi.status() != WL_CONNECTED) { Serial.print("."); delay(500); } Serial.println(""); Serial.println(F("[CONNECTED]")); Serial.print("[IP "); Serial.print(WiFi.localIP()); Serial.println("]"); // start a server server.begin(); Serial.println("Server started"); } // void setup() void loop() { // Check if a client has connected WiFiClient client = server.available(); if (!client) { return; } // Read the first line of the request request = client.readStringUntil('\r'); Serial.print("request: "); Serial.println(request); if ( request.indexOf("L11") > 0 ) { digitalWrite(LED1_Pin, HIGH); } else if ( request.indexOf("L10") > 0 ) { digitalWrite(LED1_Pin, LOW); } if ( request.indexOf("L21") > 0 ) { digitalWrite(LED2_Pin, HIGH); } else if ( request.indexOf("L20") > 0 ) { digitalWrite(LED2_Pin, LOW); } if ( request.indexOf("L31") > 0 ) { digitalWrite(LED3_Pin, HIGH); } else if ( request.indexOf("L30") > 0 ) { digitalWrite(LED3_Pin, LOW); } else { if (digitalRead(LED1_Pin)==HIGH) { html_2 = " <td> <input type='button' id='LED1_button' value='ON' class='green' onclick='switchLED1()' /> </td>"; } else { html_2 = " <td> <input type='button' id='LED1_button' value='OFF' class='red' onclick='switchLED1()' /> </td>"; } if (digitalRead(LED2_Pin)==HIGH) { html_4 = " <td> <input type='button' id='LED2_button' value='ON' class='green' onclick='switchLED2()' /> </td>"; } else { html_4 = " <td> <input type='button' id='LED2_button' value='OFF' class='red' onclick='switchLED2()' /> </td>"; } if (digitalRead(LED3_Pin)==HIGH) { html_6 = " <td> <input type='button' id='LED3_button' value='ON' class='green' onclick='switchLED3()' /> </td>"; } else { html_6 = " <td> <input type='button' id='LED3_button' value='OFF' class='red' onclick='switchLED3()' /> </td>"; } client.flush(); client.print( header ); client.print( html_1 ); client.print( html_2 ); client.print( html_3 ); client.print( html_4 ); client.print( html_5 ); client.print( html_6 ); client.print( html_7 ); delay(5); } // The client will actually be disconnected when the function returns and 'client' object is detroyed } // void loop() |
Upload the new sketch and give it a go.
Does it work? Yes.
Is it long with lots of duplicated code? Yes.
Can we streamline the code? Maybe, lets try.
Streamlining the Code
Rather than have 3 separate functions to handle the button clicks we can use just one function and pass the ID of the clicked button to it. We can get the ID of the button by using JavaScripts “this”. When the button is clicked “this” becomes a copy of the button and we can use it as if it were the button. For example this.value = “ON” changes the button text of the clicked button.
Using “this” the button HTML becomes
  <table id = "controls">
   <tr>
    <td width="70%">LED 1</td>
    <td> <input type='button' id='LED1_button' value='ON' class='green' onclick='switchLED(this.id,1)' />  </td>
   </tr>
   <tr>
    <td width="70%">LED 2</td>
    <td> <input type='button' id='LED2_button' value='ON' class='green' onclick='switchLED(this.id,2)' />  </td>
   </tr>
   <tr>
    <td width="70%">LED 3</td>
    <td> <input type='button' id='LED3_button' value='ON' class='green' onclick='switchLED(this.id,3)' />  </td>
   </tr>
</table> |
The second parameter is the LED number. This is used when creating the control code.
We now only have one switchLED() function which receives the button ID and the LED number. It uses the button ID to determine which button to change and then uses the LED number to create the control code.
function switchLED(buttonID,LED) { var button_text = document.getElementById(buttonID).value; if (button_text=="OFF") { document.getElementById(buttonID).value = "ON"; document.getElementById(buttonID).style.background = "#50FF50"; ajaxLoad('L' + LED + '1'); document.getElementById("p2").innerHTML = 'L' + LED + '1'; } else { document.getElementById(buttonID).value = "OFF"; document.getElementById(buttonID).style.background = "#FF5050"; ajaxLoad('L' + LED + '0'); document.getElementById("p2").innerHTML = 'L' + LED + '0'; } document.getElementById("p1").innerHTML = buttonID; } |
So we can see what is happening I have added two paragraph elements, p1 and p2. These are used to display the button ID and the control codes as the buttons are clicked.
<p id="p1">Button ID</p> <p id="p2">LED number</p> |
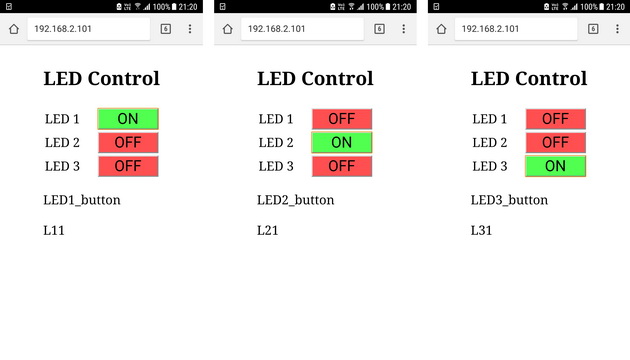
And there we have it. Control for 3 LEDs.
I have kept the string handling as simple as possible but it does mean certain bits are very wasteful. For example the following which has 2 large strings that are almost identical. The only bits that are changing are ON/OFF and red/green and the memory usage could be greatly reduced. We could use char arrays rather than Strings.
if (digitalRead(LED1_Pin)==HIGH) { html_2 = " <td> <input type='button' id='LED1_button' value='ON' class='green' onclick='switchLED(this.id,1)' /> </td>"; } else { html_2 = " <td> <input type='button' id='LED1_button' value='OFF' class='red' onclick='switchLED(this.id,1)' /> </td>"; } |
Here is the final sketch: ESP8266_LED_CONTROL_AJAX_08
/* * Sketch: ESP8266_LED_CONTROL_AJAX_08 * Intended to be run on an ESP8266 */ String header = "HTTP/1.1 200 OK\r\nContent-Type: text/html\r\n\r\n"; String html_1 = R"=====( <!DOCTYPE html> <html> <head> <meta name='viewport' content='width=device-width, initial-scale=1.0'/> <meta charset='utf-8'> <style> body {font-size:140%; } #main {display: table; margin: auto; padding: 0 5px 0 5px; } h2 {text-align:center; } input[type="button"] { width: 4em; font-size: 120%; } .green { background-color: #50FF50; } .red { background-color: #FF5050; } table {width: 100%; } </style> <script> function switchLED(buttonID,LED) { var button_text = document.getElementById(buttonID).value; if (button_text=="OFF") { document.getElementById(buttonID).value = "ON"; document.getElementById(buttonID).style.background = "#50FF50"; ajaxLoad('L' + LED + '1'); document.getElementById("p2").innerHTML = 'L' + LED + '1'; } else { document.getElementById(buttonID).value = "OFF"; document.getElementById(buttonID).style.background = "#FF5050"; ajaxLoad('L' + LED + '0'); document.getElementById("p2").innerHTML = 'L' + LED + '0'; } document.getElementById("p1").innerHTML = buttonID; } var ajaxRequest = null; if (window.XMLHttpRequest) { ajaxRequest =new XMLHttpRequest(); } else { ajaxRequest =new ActiveXObject("Microsoft.XMLHTTP"); } function ajaxLoad(ajaxURL) { if(!ajaxRequest){ alert("AJAX is not supported."); return; } ajaxRequest.open("GET",ajaxURL,true); ajaxRequest.onreadystatechange = function() { if(ajaxRequest.readyState == 4 && ajaxRequest.status==200) { var ajaxResult = ajaxRequest.responseText; } } ajaxRequest.send(); } </script> <title>LED Control</title> </head> <body> <div id='main'> <h2>LED Control</h2> <table id = "controls"> <tr> <td width="70%">LED 1</td> )====="; String html_2 = " <td> <input type='button' id='LED1_button' value='OFF' class='red' onclick='switchLED(this.id,1)' /> </td>"; String html_3 = R"=====( </tr> <tr> <td width="70%">LED 2</td> )====="; String html_4 = " <td> <input type='button' id='LED2_button' value='OFF' class='red' onclick='switchLED(this.id,2)' /> </td>"; String html_5 = R"=====( </tr> <tr> <td width="70%">LED 3</td> )====="; String html_6 = " <td> <input type='button' id='LED3_button' value='OFF' class='red' onclick='switchLED(this.id,3)' /> </td>"; String html_7 = R"=====( </tr> </table> <p id="p1">Button ID</p> <p id="p2">LED number</p> </div> </body> </html> )====="; #include <ESP8266WiFi.h> // change these values to match your network char ssid[] = "NetworkName"; // your network SSID (name) char pass[] = "password"; // your network password WiFiServer server(80); String request = ""; int LED1_Pin = D1; int LED2_Pin = D2; int LED3_Pin = D3; void setup() { pinMode(LED1_Pin, OUTPUT); pinMode(LED2_Pin, OUTPUT); pinMode(LED3_Pin, OUTPUT); Serial.begin(115200); Serial.println(); Serial.println(F("Serial started at 115200")); Serial.println(F("ESP8266_LED_CONTROL_AJAX_07")); Serial.println(); // Connect to a WiFi network Serial.print(F("Connecting to ")); Serial.println(ssid); WiFi.begin(ssid, pass); while (WiFi.status() != WL_CONNECTED) { Serial.print("."); delay(500); } Serial.println(""); Serial.println(F("[CONNECTED]")); Serial.print("[IP "); Serial.print(WiFi.localIP()); Serial.println("]"); // start a server server.begin(); Serial.println("Server started"); } // void setup() void loop() { // Check if a client has connected WiFiClient client = server.available(); if (!client) { return; } // Read the first line of the request request = client.readStringUntil('\r'); Serial.print("request: "); Serial.println(request); if ( request.indexOf("L11") > 0 ) { digitalWrite(LED1_Pin, HIGH); } else if ( request.indexOf("L10") > 0 ) { digitalWrite(LED1_Pin, LOW); } if ( request.indexOf("L21") > 0 ) { digitalWrite(LED2_Pin, HIGH); } else if ( request.indexOf("L20") > 0 ) { digitalWrite(LED2_Pin, LOW); } if ( request.indexOf("L31") > 0 ) { digitalWrite(LED3_Pin, HIGH); } else if ( request.indexOf("L30") > 0 ) { digitalWrite(LED3_Pin, LOW); } else { if (digitalRead(LED1_Pin)==HIGH) { html_2 = " <td> <input type='button' id='LED1_button' value='ON' class='green' onclick='switchLED(this.id,1)' /> </td>"; } else { html_2 = " <td> <input type='button' id='LED1_button' value='OFF' class='red' onclick='switchLED(this.id,1)' /> </td>"; } if (digitalRead(LED2_Pin)==HIGH) { html_4 = " <td> <input type='button' id='LED2_button' value='ON' class='green' onclick='switchLED(this.id,2)' /> </td>"; } else { html_4 = " <td> <input type='button' id='LED2_button' value='OFF' class='red' onclick='switchLED(this.id,2)' /> </td>"; } if (digitalRead(LED3_Pin)==HIGH) { html_6 = " <td> <input type='button' id='LED3_button' value='ON' class='green' onclick='switchLED(this.id,3)' /> </td>"; } else { html_6 = " <td> <input type='button' id='LED3_button' value='OFF' class='red' onclick='switchLED(this.id,3)' /> </td>"; } client.flush(); client.print( header ); client.print( html_1 ); client.print( html_2 ); client.print( html_3 ); client.print( html_4 ); client.print( html_5 ); client.print( html_6 ); client.print( html_7 ); delay(5); } // The client will actually be disconnected when the function returns and 'client' object is detroyed } // void loop() |
Very good.
I am 72 years old retired Telecom Engineer and my hobby is home automation. I am fascinated by your exhaustive collection of publishing on various automation projects and tutorials.
Hats for your service attitude.
With Great Regards,
Ragothaman R.
Hats off to everybody!
Thanks Martyn for the awesome code and cheers Ragothaman :)
Hi, Good morning dude!
nice work!
i am wondering if possible using Arduino Ethernet Shield and MIT App Inventor instead of bluetooth, HTML/ESP8266?
Thank you…hoping for your future projects.
It is and the methods are are similar to using the ESP8266 (Arduino IDE) + AI2. I don’t have anything to post but google will get you started. You can also check the AI2 forums.
Awesome tutorials, thanks! I’m wanting to do this but over the web, with a portable IoT device being connected via a mobile phone hotspot. Any tips or useful links would be greatly appreciated.
Hi Martyn, Thanks for providing such a good tutorial regarding this ESP8266 web-based control. May I know, is that possible to demonstrate some related example like “Two-way control” or “Slidebar” control the LED using AJAX. If you have available time to add this kind of example :).
I like your website so much. This is my first day to read your website and impressive your hard work, I will keep learning more from your tutorial pages :).
This is planned (and half written) but life keeps getting in the way. Rather than waiting for my lazy ass start searching online and I would suggest looking in to websockets.
hye martyn can i add more than 3 LED ? like 25. thank you
yes and there are many different ways.
In my opinion 25 is too many LEDs to make seperate control codes practical and I would use bits as control codes. 0 for off 1 for on. 8 bits in a byte so one byte holds the control codes for 8 LEDS. 3 bytes gives 24 control codes. 4 bytes gets you 32.
On the hardware side, if all you need is simple on and off have a look at shift registers, especial the 74HC595. Start at https://www.arduino.cc/en/Tutorial/ShiftOut
I want when LED 1 lights up and when I turn on LED 2 automatically LED 1 turns off. and then when I turn on LED 3, LED 2 automatically turns off. How is the code?
Have a look at the Switching Things On And Off With An Arduino post: https://www.martyncurrey.com/switching-things-on-and-off-with-an-arduino/, example number 4.
Thanks, thanks, but i need 3 buttons to control 3 leds, not one button.
nice webpage well explained I learned a lot about this with arduino to the webpage. look forward to operating gauges via web temperature and humidity. very nicely done looking forward to what follows.
thanks for doing these tutorials
I’m looking for a simple serial to wifi bridge that will take text from the serial port on a nodemcu and automatically update and display that text a local web page
Its basically going to display run times from a uno
thanks Bob
Have a look at part 9 https://www.martyncurrey.com/esp8266-and-the-arduino-ide-part-9-websockets/
Although the example is using switches the communication is done with websockets and this would work well for your project.
I am sure I am missing something but I get the below error when trying to compile the script as is:
exit status 1
‘D1’ was not declared in this scope
I had the wrong board! It compiled once I switched to the correct ESP8266 model.
Glad I am not the only one who does this!
Thank you for your work!!
it really works very well.
greetings and thanks from uruguay !!