In the previous guides we connected the ESP8266 to a local network using hard coded credentials. It is fine for messing around with examples and when developing sketches but not very convenient or practicle for final projects.
What happens if you want to move the ESP8266 to another network or if you buy a new router? You need to change the sketch and re-upload. It would be better if we could pick the network to use at run time. This is exactly what WifiManager allows.
Previous posts:
Part 1: The Esp8266 and setting up the Arduino IDE
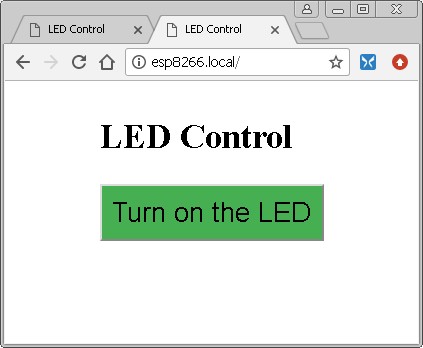
Part 2: Control an LED from a web page using Access Point Mode (AP)
Part 3: Control an LED from a web page using Access Station Mode (ST)
Part 4: mDNS
What is WifiManager?
WifiManager is a library that adds a connection page or connection portal to the ESP8266 sketch. This allows the ESP8266 to connect to any local network without the need to hard code the network credentials in to the sketch.
On first use, when using the library, the ESP8266 will start in AP mode and display a small connection/admin page that allows the user to select and connect to a local network. After the user has made a selection the ESP8266 will start Station Mode and try to connect to the selected network. If successful it will show the local network IP address. If the connection fails an error message is displayed. This means once you have connected to a network, you do not need to keep entering the details unless the network changes.
When a successful connection is made, the ESP8266 remembers the credentials and tries to connect to the same network next time. If it cannot connect, it uses AP mode to display the connection page again.
WifiManager uses both Access Point mode and Station Mode together. It uses AP mode for the connection page which is available under the ESP8266’s own network and at a known IP address (192.168.4.1) and then uses STA mode to connect to the local network.
The WifiManager library was originally released by Tzapu and while this is very good it does have a couple of short comings. It does not confirm when a connection has been made and it does not give you the new IP address the ESP8266 is using on the local network and of course, we need the IP address if we want to connect to it. Luckily Ken Taylor forked the WifiManager library and addressed these issues and this is the library I am using below.
Tzapu’s WifiManager is here.
Ken Taylor’s library is here.
Ryan Downing offers another variant called PersWiFiManager.
Update: Khoi Hoang has further developed wifi manager and created a more advanced version called ESP_WiFiManager. ESP_WiFiManager is available on github or through the Arduino IDE library manager.
At the time of writing Ken Taylor’s library is not available through the Arduino library manger so you need to install the library the old fashioned way; download from Github, unzip and copy the folder to the Library folder inside the Arduino folder.
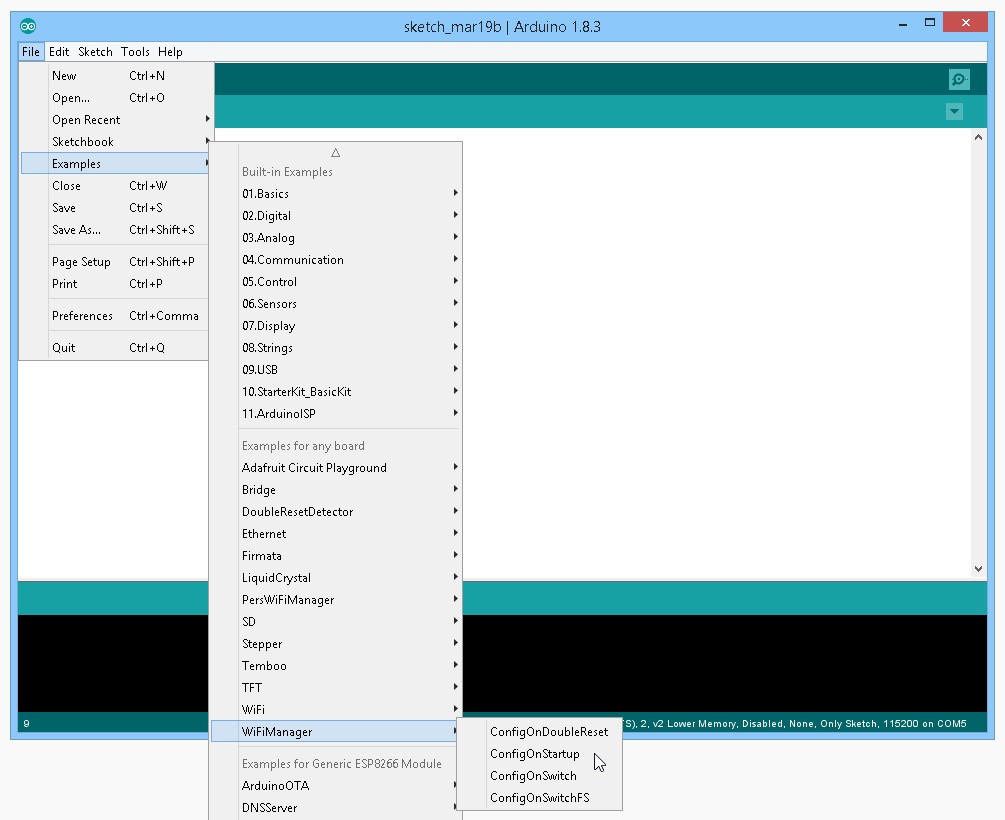
After installing the library restart the IDE and you should have a WifiManager entry under Examples. Open the ConfigOnStartup example. This is a basic sketch to show how things work.
/* This example will open a configuration portal for 60 seconds when first powered up. ConfigOnSwitch is a a bettter example for most situations but this has the advantage that no pins or buttons are required on the ESP8266 device at the cost of delaying the user sketch for the period that the configuration portal is open. Also in this example a password is required to connect to the configuration portal network. This is inconvenient but means that only those who know the password or those already connected to the target WiFi network can access the configuration portal and the WiFi network credentials will be sent from the browser over an encrypted connection and can not be read by observers. */ #include <ESP8266WiFi.h> //https://github.com/esp8266/Arduino //needed for library #include <ESP8266WebServer.h> #include <DNSServer.h> #include <WiFiManager.h> //https://github.com/kentaylor/WiFiManager // Onboard LED I/O pin on NodeMCU board const int PIN_LED = 2; // D4 on NodeMCU and WeMos. Controls the onboard LED. void setup() { // put your setup code here, to run once: // initialize the LED digital pin as an output. pinMode(PIN_LED, OUTPUT); Serial.begin(115200); Serial.println("\n Starting"); unsigned long startedAt = millis(); WiFi.printDiag(Serial); //Remove this line if you do not want to see WiFi password printed Serial.println("Opening configuration portal"); digitalWrite(PIN_LED, LOW); // turn the LED on by making the voltage LOW to tell us we are in configuration mode. //Local intialization. Once its business is done, there is no need to keep it around WiFiManager wifiManager; //sets timeout in seconds until configuration portal gets turned off. //If not specified device will remain in configuration mode until //switched off via webserver. if (WiFi.SSID()!="") wifiManager.setConfigPortalTimeout(60); //If no access point name has been previously entered disable timeout. //it starts an access point //and goes into a blocking loop awaiting configuration if (!wifiManager.startConfigPortal("ESP8266","password")) //Delete these two parameters if you do not want a WiFi password on your configuration access point { Serial.println("Not connected to WiFi but continuing anyway."); } else { //if you get here you have connected to the WiFi Serial.println("connected...yeey :)"); } digitalWrite(PIN_LED, HIGH); // Turn led off as we are not in configuration mode. // For some unknown reason webserver can only be started once per boot up // so webserver can not be used again in the sketch. Serial.print("After waiting "); int connRes = WiFi.waitForConnectResult(); float waited = (millis()- startedAt); Serial.print(waited/1000); Serial.print(" secs in setup() connection result is "); Serial.println(connRes); if (WiFi.status()!=WL_CONNECTED) { Serial.println("failed to connect, finishing setup anyway"); } else { Serial.print("local ip: "); Serial.println(WiFi.localIP()); } } void loop() { delay(10000); // put your main code here, to run repeatedly: } |
The Wifi Manger requires 2 other libraries, DNSServer and ESP8266WebServer
#include <DNSServer.h> #include <ESP8266WebServer.h> |
These are included in the ESP8266 core and therefore you should already have them installed.
Compile and upload this sketch to the ESP8266.
The first time the sketch runs there is no saved network so it will start its own network called what ever name is specified in the startConfigPortal statement. In this case it is “ESP8266” with a password of “password”.
wifiManager.startConfigPortal("ESP8266","password")) |
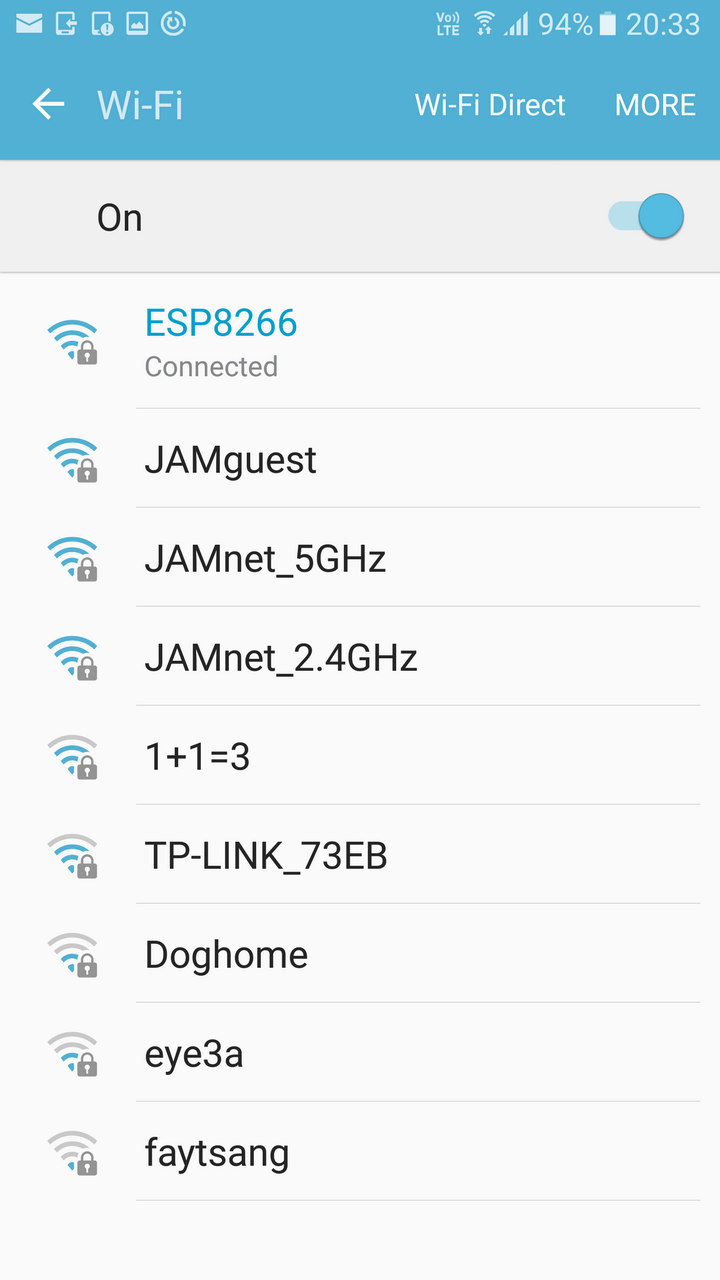
Using a wifi device, scan for networks and you should see ESP8266 listed. Select it and enter the password “password” to connect.
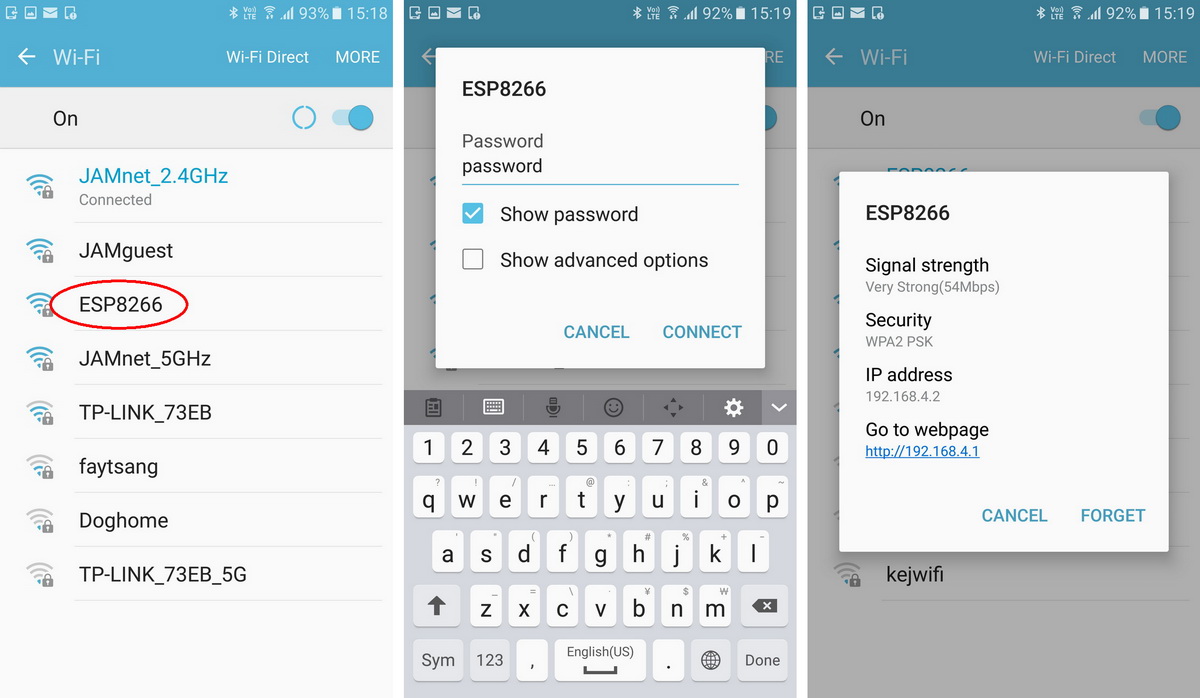
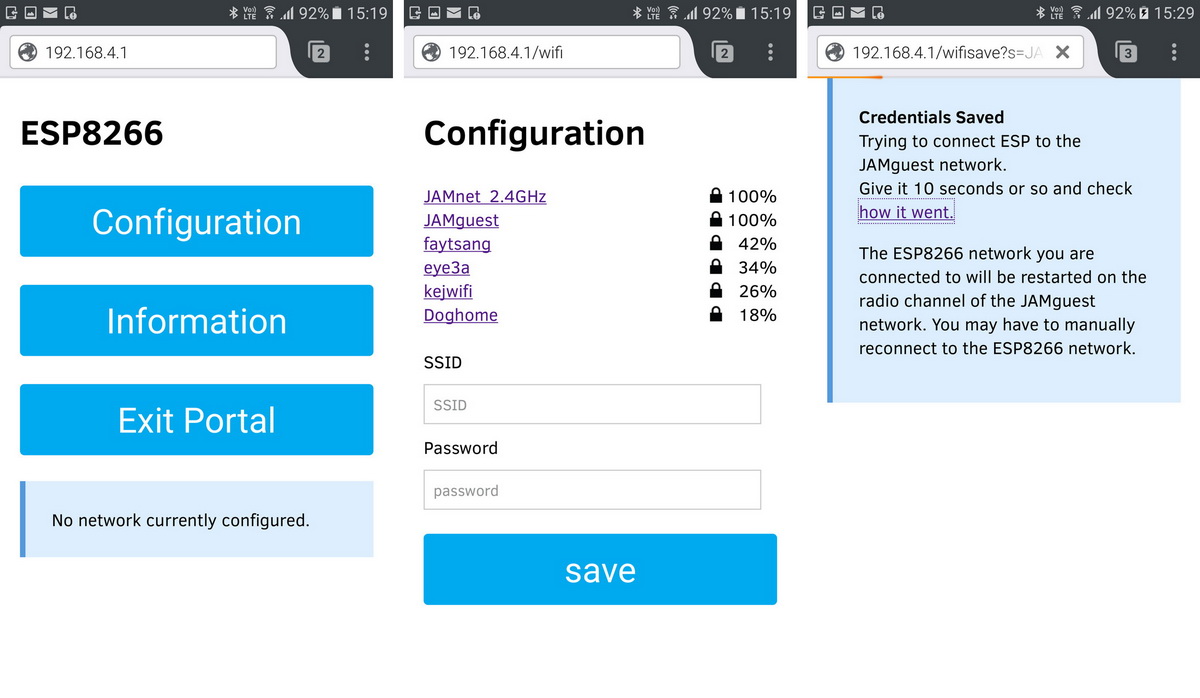
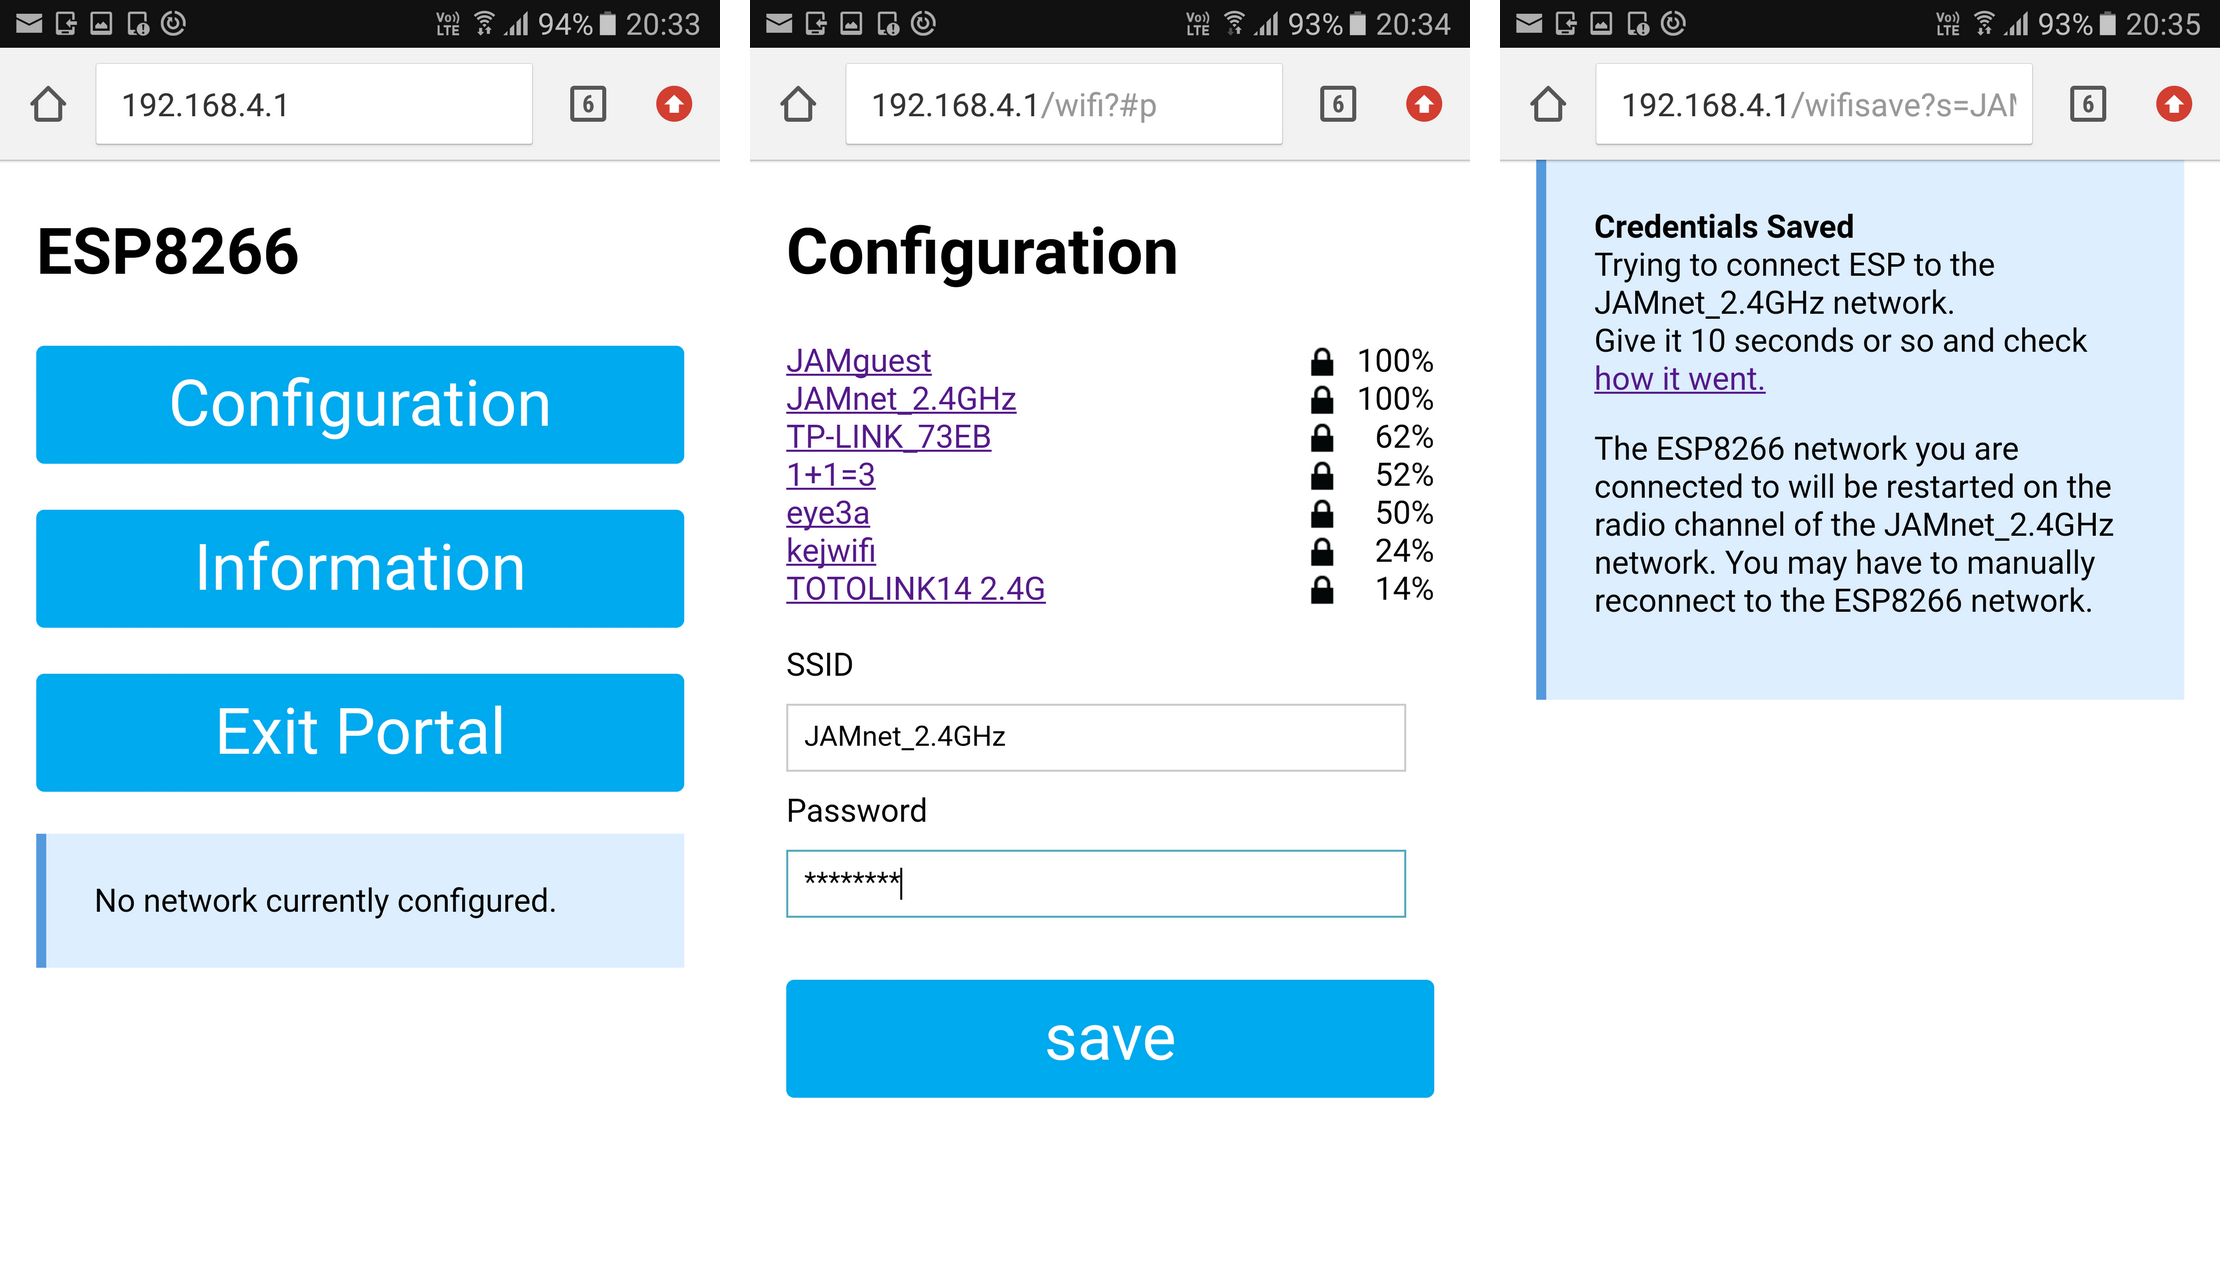
Using your web browser of choice, go to 192.168.4.1 and you should get the WifiManger main page. Click the “Configuration” button and you should see a list of available networks. Select one, enter the password and click “save” to connect.
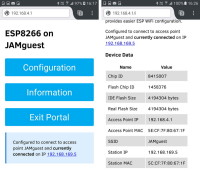
After the ESP8266 has connected to the local network the main connection page is updated. You can also click the “Information” link to get additional information.
Here I have connected to JAMguest.

In use I find the library not quite 100% reliable and have had some connections issues after joining the local network. Sometimes my wifi device (mobile phone) will lose the connection to the ESP8266 and jump back to my home network. However, this is not a big problem since it is a one time operation. After the the network credentials have been entered they are stored and ESP8266 will auto-connect.
ConfigOnStartup is the most basic of the examples, other examples include ConfigOnSwitch and ConfigOnDoubleReset.
ConfigOnSwitch relies on a switch connected to the ESP8266. When the switch is closed on boot up the configuration page is shown. ConfigOnDoubleReset is a little smarter. This uses resets to determine if the configuration page should be displayed. If the ESp8266 is reset twice within a given time it triggers AP mode and the configuration page.
Using WifiManager in our own sketches
The next step is to add the WifiManager library to the ESP8266_LED_Control_05_Station_Mode_with_mDNS sketch. To do this we simply replace the code that is responcible for connecting to the local wifi network with the new wifiManager commands. The new lines required are:
#include <DNSServer.h> #include <ESP8266WebServer.h> #include <WiFiManager.h> ... ... WiFiManager wifiManager; wifiManager.autoConnect("ESP8266","password"); |
When added to the previous sketch it gives us:
/* * Sketch: ESP8266_LED_Control_06_Station_Mode_with_mDNS_and_wifiManager * Control an LED from a web browser * Intended to be run on an ESP8266 */ #include <ESP8266WiFi.h> //#include <DNSServer.h> #include <ESP8266WebServer.h> #include <WiFiManager.h> #include <ESP8266WiFi.h> #include <ESP8266mDNS.h> // change these values to match your network //char ssid[] = "MyNetwork_SSID"; // your network SSID (name) //char pass[] = "Newtwork_Password"; // your network password WiFiServer server(80); String header = "HTTP/1.1 200 OK\r\nContent-Type: text/html\r\n\r\n"; String html_1 = "<!DOCTYPE html><html><head><meta name='viewport' content='width=device-width, initial-scale=1.0'/><meta charset='utf-8'><style>body {font-size:140%;} #main {display: table; margin: auto; padding: 0 10px 0 10px; } h2,{text-align:center; } .button { padding:10px 10px 10px 10px; width:100%; background-color: #4CAF50; font-size: 120%;}</style><title>LED Control</title></head><body><div id='main'><h2>LED Control</h2>"; String html_2 = ""; String html_4 = "</div></body></html>"; String request = ""; int LED_Pin = D1; void setup() { pinMode(LED_Pin, OUTPUT); Serial.begin(115200); delay(500); Serial.println(F("Serial started at 115200")); Serial.println(); // We start by connecting to a WiFi network //Serial.print(F("Connecting to ")); Serial.println(ssid); //WiFi.begin(ssid, pass); //while (WiFi.status() != WL_CONNECTED) //{ // Serial.print("."); delay(500); //} //Serial.println(""); //Serial.println(F("[CONNECTED]")); //Serial.print("[IP "); //Serial.print(WiFi.localIP()); //Serial.println("]"); // WiFiManager WiFiManager wifiManager; wifiManager.autoConnect("ESP8266","password"); // or use this for auto generated name ESP + ChipID //wifiManager.autoConnect(); // if you get here you have connected to the WiFi Serial.println("Connected."); if (!MDNS.begin("esp8266")) { Serial.println("Error setting up MDNS responder!"); } else { Serial.println("mDNS responder started"); } // start a server server.begin(); Serial.println("Server started"); } // void setup() void loop() { // Check if a client has connected WiFiClient client = server.available(); //if (!client) { return; } if (client) { // Read the first line of the request request = client.readStringUntil('\r'); Serial.println("request:"); Serial.println(request); if ( request.indexOf("LEDON") > 0 ) { digitalWrite(LED_Pin, HIGH); } else if ( request.indexOf("LEDOFF") > 0 ) { digitalWrite(LED_Pin, LOW); } // Get the LED pin status and create the LED status message if (digitalRead(LED_Pin) == HIGH) { // the LED is on so the button needs to say turn it off html_2 = "<form id='F1' action='LEDOFF'><input class='button' type='submit' value='Turn off the LED' ></form><br>"; } else { // the LED is off so the button needs to say turn it on html_2 = "<form id='F1' action='LEDON'><input class='button' type='submit' value='Turn on the LED' ></form><br>"; } client.flush(); client.print( header ); client.print( html_1 ); client.print( html_2 ); client.print( html_4); delay(5); // The client will actually be disconnected when the function returns and 'client' object is detroyed } } // void loop() |
I have commented out rather than deleted the lines that are no longer required. This allows you see exactly what code the wifiManager replaces. Because I already have mDNS, which uses the ESP8266mDNS.h library the DNSServer.h library is not needed and also commented out.
Upload the sketch and give it a go.
Connect your mobile device to the ESP8266 network. SSID is “ESP8266” and the password is “password”.
After you have connected, open a browser and go to 192.168.4.1. You should see the connection portal. Select your network and enter the password. Wait a few seconds and then cick the link on the final page.
If the connection is successful the main page should now show the details for the network.
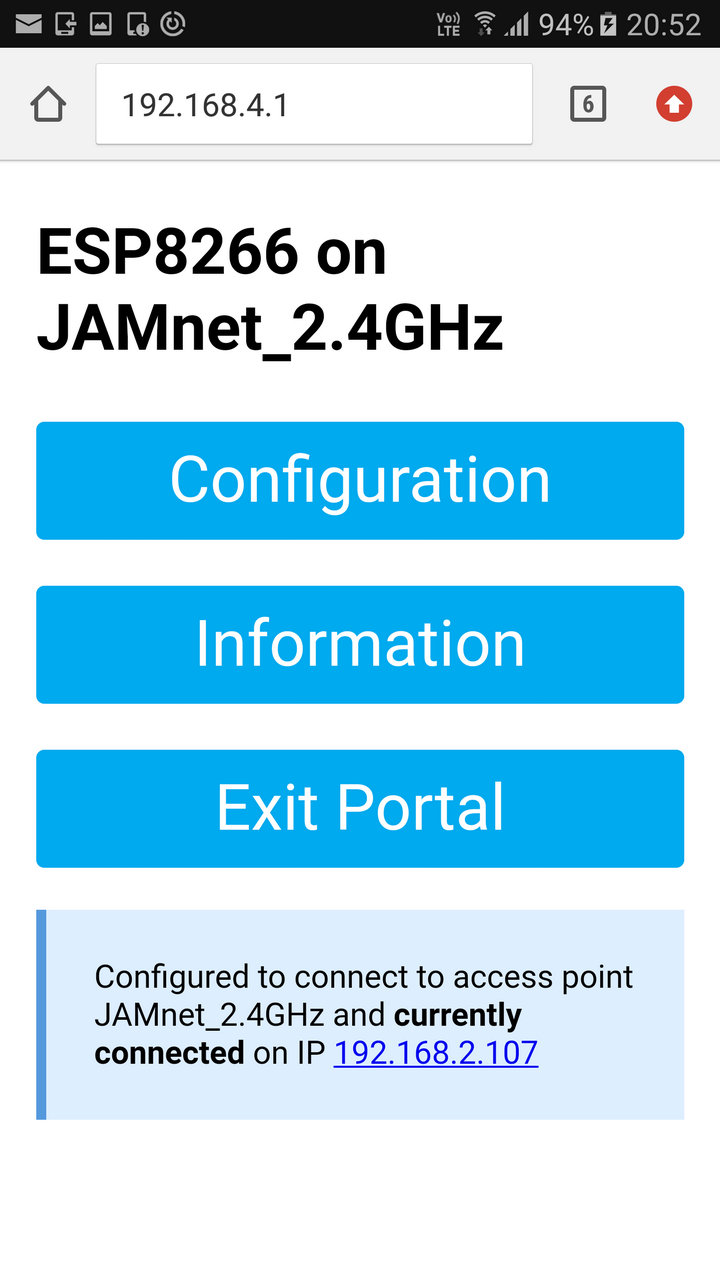
Here you can see the ESP8266 is connected to JAMnet_2.4GHz and has an IP address of 192.168.2.107.
If you now go to 192.168.2.107 you will find you still have the connection portal not the LED control webpage. The portal is still active.
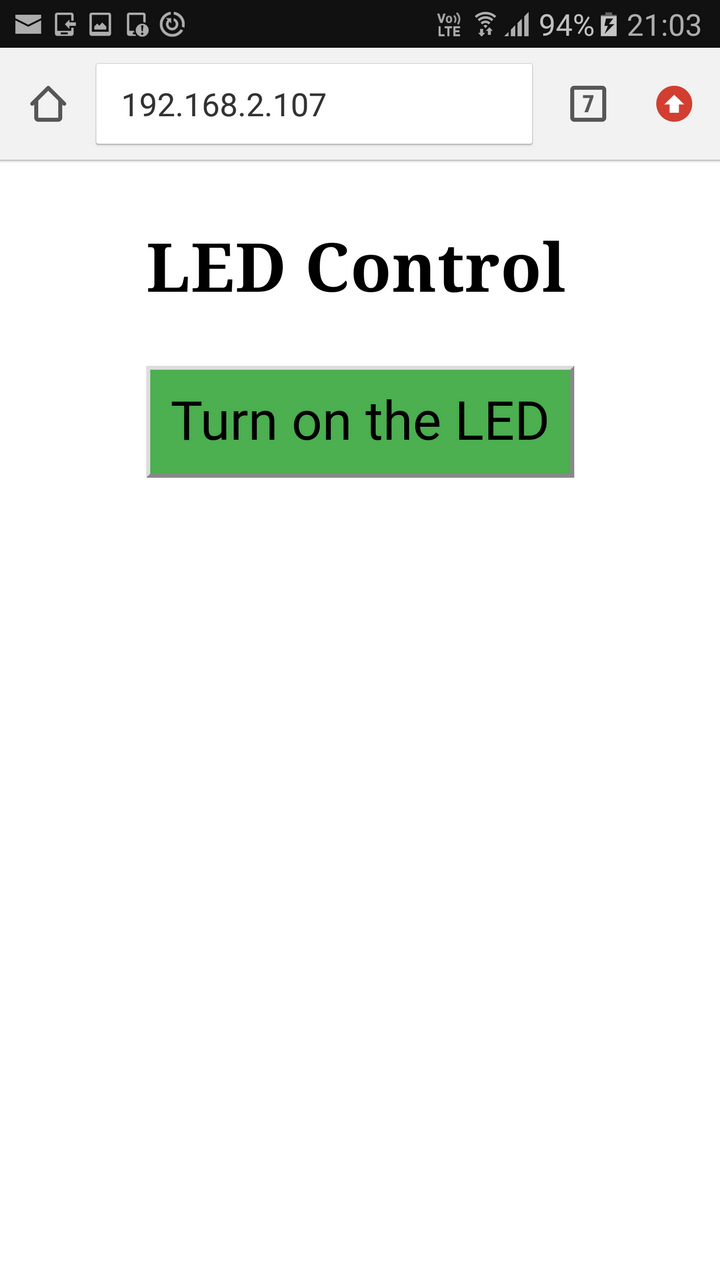
To stop the wifiManager portal click “Exit Portal”. When the portal closes so does the ESP8266 AP. Connect to your regular wifi network and try 192.168.2.107 again. You should now get the LED Control page.
Since I am using an Android device I have to use the IP address. On a PC I can use either the IP address or the url esp8266.local.
And that’s all there is to it.
To erase the saved connection details, use resetSettings() just after you initialize the wifimanager library.
// WiFiManager WiFiManager wifiManager; wifiManager.resetSettings(); wifiManager.autoConnect("ESP8266","password"); |
Downloads
Arduino sketch: ESP8266_LED_Control_06_Station_Mode_with_mDNS_and_wifiManager
We now have a fairly nice website with a very handy connection portal. One this you will notice though, the webpage refreshes every time the button is clicked. We see what we can do about this is the next part using AJAX and javascript. Coming sometime soonish.
Update
Since writing this guide I have changed how I use WiFi Manager.
I occasionally had issues with the ESP8266 not auto-connecting and sometimes it appeared the network credentials were not saved (the were but WiFi Manager seemed not to know). This lead me to start checking for saved credentials before calling WiFi Manager and only calling the library if I wanted the connection portal.
Remember that, if there are saved credentials the ESP8266 will try to connect even if you haven’t asked it to.
if (WiFi.SSID() != "") { // try to connect using the saved credentials. // time out after 10 seconds. Serial.print("Trying to connect to "); Serial.println( WiFi.SSID()); int count = 0; WiFi.mode(WIFI_STA); while ( (WiFi.status()!=WL_CONNECTED) && ( count< 20) ) { lcd.print("."); Serial.print("."); count++; delay(500); } } if ( WiFi.status()!=WL_CONNECTED ) { Serial.println("No saved credentials or the connection failed. Opening the connection portal."); Serial.println(""); char APname[] = "ESP8266_IOT"; char APpass[] = "12345678"; WiFiManager wifiManager; wifiManager.startConfigPortal( APname, APpass); // Reset may be required. // ESP.reset(); } |
Hi,
I have a question.
The Tzapu’s WifiManager is already installed.
Can I install the Ken Taylor’s library and use it to overwrite the Tzapu’s WifiManager folder?
Or do I need to copy it to another folder?
Best regards
Both libraries have the same name so you can only have one of them at a time. This means you need to delete the Tzapu WifiManager when copying Ken Taylor’s library.
Thank you
Hi,
thank you very much for the tutorial.
Everything is explained very well, and my sketch worked right from the beginning.
As I would like to display the found WiFi networks in my own way in my iOS or Android App, not using the predefined Configuration Portal of the WiFi Manager, is there any way to do so?
I’d prefer to get the SSID data in JSON format, for example, create my own SSID list etc., and upload the SSID/password back to the library in order to try to connect to the selected router.
Any hint is very much appreciated. :-)
Best regards,
FlightX
A scan command is built in but you will need to format the data yourself.
Have a look at https://github.com/esp8266/Arduino/blob/master/libraries/ESP8266WiFi/examples/WiFiScan/WiFiScan.ino This is an example of scanning the available networks.
hi
Im having a slight issue with Tzapu WifiManager after i enter the wifisettings it saves it so if i unplug and all it will reconnect to the last connection
with this verson i have to reenter everything eveytime I unplug it.
is there a way that this version can retain the settings and all for the wifi and recoonect to the last connection when unplug and back? what do I need to do to make that work?
thanks
Nick
Hi,
Really an awesome library , have you by any chance ported this over for use on MKR1010 using WifiNINA library?
regards
Brad
I too am interested in finding a WiFiManager for the MKR WiFi 1010. I wish I had the knowledge and time to do it myself but I am just a home hobbist that just wants to make a wifi enabled fan and maybe a wifi controlled bbq smoker for temperature regulation.
You may get better luck asking on the Arduino Forum.
Hi @Frank, @Brad, did you found any software for the MKR1000 / 1010
thank you
stoffl
I’m getting this error uploading the sketch via the Arduino UNO:
https://forum.allaboutcircuits.com/threads/how-to-program-esp8266-to-connect-to-wifi.161458/
I’ve connected Rx to Rx, TX to TX, gpio0 and Gnd to Gnd, Vcc to 3v3 and to Enable via a 10k ohm.
Nice update of the wifi manager!
It remembers the wifi networks with passwords. Where are the passwords stored?
Only with
wifiManager.resetSettings();
they a re deleted.
Hi
Thanks for this amazing tutorial,i have 2 questions about this wifi manager
1-it doesn’t store previous setting and it is forgotten when unplugged …
Is there any solution?
2-unfortunately if the password of connected network charges,we couldn’t change the settings unless reset esp which is not good! I used that added command for reset settings in else of client true but not working properly at the beginning…
Any solution?
Any help is appreciated bro
Thanks
First of all thanks for this!
What I’m trying to do is use WiFi Manager to configure both an 8266 server and one or more 8266 clients. Of course that means that I need to get the clients the IP address of the server and since that can change from power cycle to power cycle I need to force a static IP address. It appears this can be done with…
IPAddress ip(192, 168, 10, 203);
IPAddress gateway(192, 168, 10, 1);
IPAddress subnet(255, 255, 255, 0);
wifiManager.setSTAStaticIPConfig(ip, gateway, subnet);
if (!wifiManager.startConfigPortal(“”)) {code] else {code}
In fact when I insert this into the code it appears to accept it. That is, on the configuration portal the three parameters come up as defaulted in the code.(I can also change them there if I want.) When I click save they also appear in the debug serial stream. However when the wifi connection is established the IP address is set to one that the router supplies and not the one requested. I must be missing something. Any hints would be greatly appreciated.
Im on an ESP01s and I get this in the serial monitor and the esp never gets on the dhcp server list:
V⸮@ѭ⸮⸮⸮K⸮⸮⸮⸮B#⸮⸮⸮⸮⸮*WM: Request redirected to captive portal
*WM: Handle root
*WM: Request redirected to captive portal
*WM: Handle root
*WM: Request redirected to captive portal
*WM: Handle root
*WM: After waiting…
*WM: 6.80
*WM: seconds
*WM: Timed out connection result:
*WM: WL_NO_SSID_AVAIL
Not connected to WiFi but continuing anyway.
After waiting 69.18 secs in setup() connection result is 1
failed to connect, finishing setup anyway
wifiManager.setSTAStaticIPConfig(IPAddress(192,168,xx,xxx), IPAddress(192,168,xx,1), IPAddress(255,255,255,0));
Hi ,
I am using tzapu wifimanager to connect with any one of the Available network.
1. Connecting to ‘AutoConnectAP’
2.When i enter http://192.168.4.1/ – Sometime its opening Wifi Config Page,but many of the time ‘AutoConnectAp’ automatically disconnecting,so i am not able to connect to Available network
I haven’t used the library for quite a while but do remember having similar issues. At the time I wasn’t too concerned since I would use the connection manager just once and then forget about it.
I am now working on a new project that will use wifimanager but it is not in a state to publish and I am not sure how long it will take to finish.
At this point all I can suggest is you ask on the Arduino or ESP forums or even the library Github page.
EDIT: Have a look at IotWebConf a WiFiManager alternative. I haven’t used this yet but it looks interesting.
https://www.esp8266.com/viewtopic.php?f=32&t=18416
I’m using wifimanager with esp8266webserver and when I send html pages with server.send, it doesn’t work for me and in the debug appears Request redirected to captive portal. What can it be?
Hi,
Thanks for the detailed information. In the paragraph
“If you now go to 192.168.2.107 you will find you still have the connection portal, not the LED control webpage. The portal is still active.
To stop the wifiManager portal click “Exit Portal”. When the portal closes so does the ESP8266 AP. Connect to your regular wifi network and try 192.168.2.107 again. You should not get the LED Control page.”
I think you may have wanted to say “You should now get the LED Control Page.” Otherwise it doesn’t make sense.
Jim.
thanks. I have updated the text.
hi,
How can I use my own android app/iOS app/web portal to configure the ESP8266 on demand instead of using the inbuilt web portal at 192.168.4.1?
Hello, ThankQ for the great video n i like u r tutorial, only thing i have a doubt is when i pressed the RESET Button previous credentials are not automatically saving and again asking for the new one, will U help to solve this.
Hi,
I am having a slight issue with Ken Taylor’s library,
when i use Ken Taylor’s library, get compilation errors.(Arduino: 1.8.12 (Windows 10), Board: “Generic ESP8266 Module, esp8266 V2.6.3)
and when I use your code with Tzapu’s WifiManager library ,
than compilation done and work but some issue also i have.
Wifi Configuration page open in mobile , when I enter the SSID and Password click on “save”, esp8266 connected with the given WiFi network SSID, but disconnect from mobile and not showing ESP8266 in Mobile wifi , and not able to access LED ON/OFF Page. Please help me how to solve.
Compilation errors:~
Arduino: 1.8.12 (Windows 10), Board: “Generic ESP8266 Module, 80 MHz, Flash, Legacy (new can return nullptr), All SSL ciphers (most compatible), dtr (aka nodemcu), 26 MHz, 40MHz, DOUT (compatible), 1MB (FS:64KB OTA:~470KB), 2, nonos-sdk 2.2.1+100 (190703), v2 Lower Memory, Disabled, None, Only Sketch, 115200”
In file included from C:\Users\DHARMENDRA\AppData\Local\Arduino15\packages\esp8266\hardware\esp8266\2.6.3/tools/sdk/libc/xtensa-lx106-elf/include/sys/stdio.h:6:0,
from C:\Users\DHARMENDRA\AppData\Local\Arduino15\packages\esp8266\hardware\esp8266\2.6.3/tools/sdk/libc/xtensa-lx106-elf/include/stdio.h:63,
from C:\Users\DHARMENDRA\AppData\Local\Arduino15\packages\esp8266\hardware\esp8266\2.6.3\cores\esp8266/Arduino.h:32,
from sketch\ESP8266_LED_Control_06_Station_Mode_with_mDNS_and_wifiManager.ino.cpp:1:
C:\Users\DHARMENDRA\AppData\Local\Arduino15\packages\esp8266\hardware\esp8266\2.6.3/tools/sdk/libc/xtensa-lx106-elf/include/sys/pgmspace.h:25:130: error: ‘const char HTTP_HEAD []’ redeclared as different kind of symbol
#define PROGMEM __attribute__((section( “\”.irom.text.” __FILE__ “.” __STRINGIZE(__LINE__) “.” __STRINGIZE(__COUNTER__) “\””)))
^
C:\Users\DHARMENDRA\Documents\Arduino\libraries\WiFiManager-master_Tzapu/WiFiManager.h:32:24: note: in expansion of macro ‘PROGMEM’
const char HTTP_HEAD[] PROGMEM = “{v}”;
^
In file included from E:\delhi_project\ESP8266\adding wifiManager_config_8266_runtime\ESP8266_LED_Control_06_Station_Mode_with_mDNS_and_wifiManager\ESP8266_LED_Control_06_Station_Mode_with_mDNS_and_wifiManager\ESP8266_LED_Control_06_Station_Mode_with_mDNS_and_wifiManager.ino:9:0:
C:\Users\DHARMENDRA\AppData\Local\Arduino15\packages\esp8266\hardware\esp8266\2.6.3\libraries\ESP8266WebServer\src/ESP8266WebServer.h:33:39: error: previous declaration of ‘HTTPMethod HTTP_HEAD’
enum HTTPMethod { HTTP_ANY, HTTP_GET, HTTP_HEAD, HTTP_POST, HTTP_PUT, HTTP_PATCH, HTTP_DELETE, HTTP_OPTIONS };
^
exit status 1
Error compiling for board Generic ESP8266 Module.
Output on Serial Monitor :~
Serial started at 115200
*WM:
*WM: AutoConnect
*WM: Connecting as wifi client…
*WM: Status:
*WM: 0
*WM: No saved credentials
*WM: Connection result:
*WM: 0
*WM:
*WM: Configuring access point…
*WM: ESP8266
*WM: password
*WM: AP IP address:
*WM: 192.168.4.1
*WM: HTTP server started
*WM: Request redirected to captive portal
*WM: Request redirected to captive portal
*WM: Request redirected to captive portal
*WM: Request redirected to captive portal
*WM: Handle root
*WM: Handle root
*WM: Request redirected to captive portal
*WM: Handle root
*WM: Request redirected to captive portal
*WM: Handle root
*WM: Request redirected to captive portal
*WM: Handle root
*WM: Request redirected to captive portal
*WM: Handle root
*WM: Handle root
*WM: Request redirected to captive portal
*WM: Request redirected to captive portal
*WM: Handle root
*WM: Request redirected to captive portal
*WM: Request redirected to captive portal
*WM: Request redirected to captive portal
*WM: Request redirected to captive portal
*WM: Request redirected to captive portal
*WM: Handle root
*WM: Scan done
*WM: DUP AP: vaayu
*WM: Rohini Suta Das
*WM: -47
*WM: avani
*WM: -74
*WM: Ivrit
*WM: -78
*WM: vaayu
*WM: -78
*WM: Mata
*WM: -81
*WM: SHIVANI
*WM: -86
*WM: Airtel_7330788540
*WM: -89
*WM: Sent config page
*WM: Request redirected to captive portal
*WM: WiFi save
*WM: Sent wifi save page
*WM: Connecting to new AP
*WM: Connecting as wifi client…
*WM: Status:
*WM: 0
*WM: [ERROR] WiFi.begin res:
*WM: 6
*WM: Connection result:
*WM: 4
*WM: Failed to connect.
*WM: Request redirected to captive portal
*WM: Request redirected to captive portal
*WM: Request redirected to captive portal
*WM: Request redirected to captive portal
*WM: Handle root
*WM: Scan done
*WM: No networks found
*WM: Sent config page
*WM: Scan done
*WM: Sent config page
*WM: Scan done
*WM: DUP AP: vaayu
*WM: DUP AP: vaayu
*WM: DUP AP: Meet 4G
*WM: Rohini Suta Das
*WM: -49
*WM: avani
*WM: -74
*WM: Mata
*WM: -79
*WM: Ivrit
*WM: -79
*WM: vaayu
*WM: -81
*WM: Nandlal
*WM: -86
*WM: SHIVANI
*WM: -86
*WM: Meet 4G
*WM: -88
*WM: Harlalka
*WM: -88
*WM: Tenda_5F4870
*WM: -89
*WM: Sent config page
*WM: WiFi save
*WM: Sent wifi save page
*WM: Connecting to new AP
*WM: Connecting as wifi client…
*WM: Status:
*WM: 0
*WM: [ERROR] WiFi.begin res:
*WM: 6
*WM: Connection result:
*WM: 3
Connected.
mDNS responder started
Server started
*WM: freeing allocated params!
The ESP8266 core has been updated and WiFi Manager is no longer 100% compatible. The issue is the line
const char HTTP_HEAD[] PROGMEM = “{v}”;
Find the Wifi Manager library files and inside:
WiFiManager.cpp
WiFiManager.h
find HTTP_HEAD and replace with another name, something like WM_HTTP_HEAD. You will need to replace all occurrences.
hi, i face an issue ,when i save password after Saving Credentials the main page not shows the details for the network.
Good evening! I would like to know how to hide the network that is shown after I connect in my AP to configure in which network I want my ESP to connect.
I have a problem. when power is reconnected, must be include the password and ssid. how to solve this problem?
The Esp8266 should automatically save the network credentials when a connection is made. Arduino cores up to 1.0.2 use EEPROM and cores 1.0.3 and later use Preferences.
This behavior can be controlled with the setAutoConnect function. https://github.com/esp8266/Arduino/blob/master/doc/esp8266wifi/station-class.rst#setautoconnect
hi, I’m facing a problem connecting my ESP8266 with a user ID based network. it doesn’t provide me with an appropriate option to insert an ID and password.
what should I do now?
IP details are not being saved for me…
After a successful connection to my network, when i reconnect to AP Config there is no ip…?
What could be wrong?
Using 8266 DoubleReset
The ESP8266 should automatically save the credentials but there are a couple of things can upset it.
1 – ensure you do are not using wifiManager.resetSettings(); This wipes and saved credentials.
2 – If still not saving, you may need to adjust the memory configuration when compiling. Make sure you have the correct flash size selected. Using FS.format() can also wipe saved details. See the following thread https://github.com/tzapu/WiFiManager/issues/91