In the first part I explained how to set up the IDE and got the basic blink sketch working. Here I go through building a web page control panel to control the LED remotely. I will start with a basic web page and then slowly refine it so we end with a simple but elegant control panel.
For this example I will be using the ESP8266 as an access point (AP Mode). This means the ESP8266 will create its own little network which we can connect to. The ESP8266 will then serve a small web page which we can view on a mobile device or any web enabled device such as a laptop.
I still have the LED connected to pin D1 but now I want to turn it on and off from a web page viewed on a mobile device. The web page will need 2 buttons, one for on and one for off. It would be nice if it also showed the current LED status. Something like “LED is on” and “LED is off”. Since this is a first example of a web control the actual web page should be as simply as possible.
I won’t go in to detail about creating web pages, if you are new to this there are many other sites to help you.
IP address
To view a web page you need to enter it’s url or IP address. In the following examples I will be using the default IP address of 192.168.4.1. This means, after connecting to the ESP8266 I set a browser to go to 192.168.4.1.
Strings
A typical Arduino has very limited memory and due to how Strings (with a capital S) eat and corrupt memory using Strings is, at best, frowned upon, and at worst, seen as pure evil. If you search the Arduino forums nearly all comments advocate using char arrays (strings with a small s), of course nobody ever offers to teach string manipulation using char arrays.
The ESP8266 has a lot more memory than a regular Arduino and allows for some flexibility and my take on this is to use the tool or command that allows you to get the job done. This means I am happy using Strings (big S) if they offer a quick solution and I don’t mind suggesting to other people that Strings can be OK. They should be used sparingly where possible though.
In practice I freely mix strings and Strings. I use string constants for text that does not change and Strings for text that will change at runtime. I try to separate the text in to parts to make this easier to organize and will often have things like:
const char header[] = “webpage top bit”;
const char body1[] = “body text that does not change”;
String body2 = “this is going to change at some point. Your IP is {ip}”; // will replace {ip} when I know what it is it.
const char bottom[] = “webpage bottom bit”;
In my opinion, the key is to focus on your goal. If your goal is to get a sketch and website working, use the tools and commands that get you there. Worry about the finer details later. If your goal is advanced text manipulations using char arrays and pointers, then go for it, it can be a valuable skill to have.
ESP8266wifi library
Thanks to libraries using the ESP8266 to create web apps is fairly easy and the ESP8266 core comes with several libraries including ESP8266WiFi which I am using in the following example.
No webServer Library!
In these guides I only use the wifi library, no web-server library. The webserver library could very easily be dropped in to the example sketches but it is not really required and I wanted to, at least a little bit, explain some of the common HTTP requests.
When a web browser requests a webpage from a server, it sends a HTTP request (covered later, scroll down). The HTTP request contains information and instructions about what the browsers is expecting. The webserver library parses the request in the background hiding the details from the user. This can be a good thing, makes development quicker, but is not always required.
I feel is worthwhile knowing the basics of the HTTP request and so, in these guides, parse the requests manually. For the most part I use simple GET requests (easy to deal with) and don’t want the extra overhead the webserver library adds.
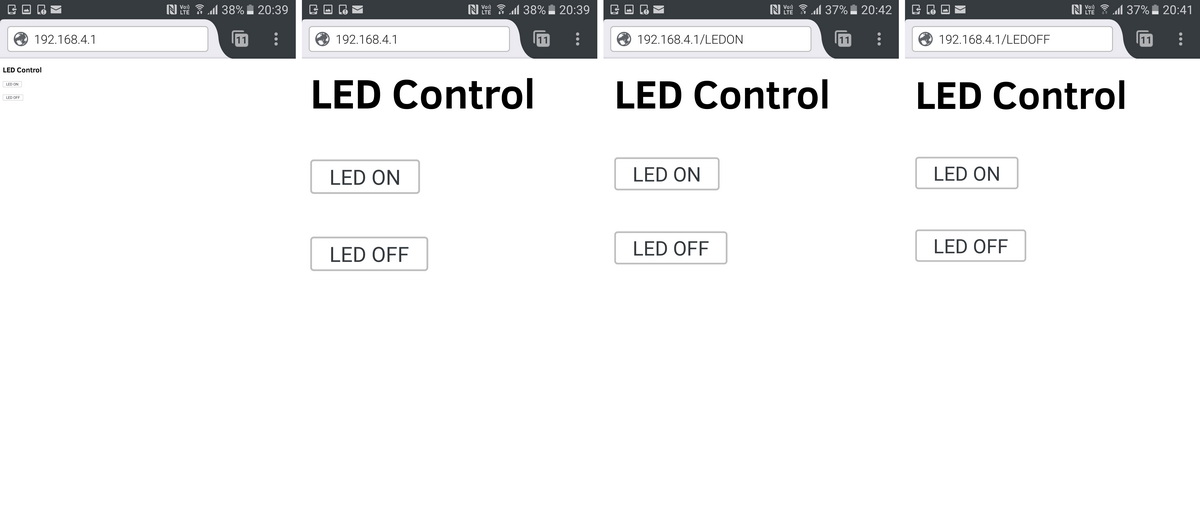
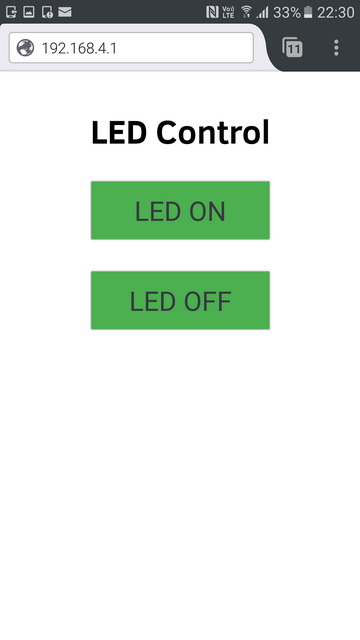
The basic web page
I will start with a very basic web page and try to explain what it does.
<!DOCTYPE html>
<html>
  <head>
    <title>LED Control</title>
  </head>
  <body>
    <div id='main'>
	<h2>LED Control</h2>
	<form id='F1' action='LEDON'>
	  <input class='button' type='submit' value='LED ON' >
	</form>
	<br>
	<form id='F2' action='LEDOFF'>
	  <input class='button' type='submit' value='LED OFF' >
	</form>
	<br>
    </div>
  </body>
</html> |
<!DOCTYPE html> - Tell the browser we are using html 5 <html> - Start the html <head> = Start the head section <title>LED Control</title> - Call the page LED Control. The title is displayed in the browser tab </head> - close the head section <body> - Open the body section. <div id='main'> = start a div. This comes in handy a little later. <h2>LED Control</h2> - Display a title at the top of the page <form id='F1' action='LEDON'> - I am using forms that contain a button <input class='button' type='submit' value='LED ON' > - The LED ON button. The button has a class called "button". This is used later. </form> <form id='F2' action='LEDOFF'> <input class='button' type='submit' value='LED OFF' > - The LED OFF button </form> <br> </div> </body> </html> |
The above will display a title and 2 buttons. Each button is inside its own form. Using 2 forms means I have 2 actions.
1, action=’LEDON’ for when the ON button is clicked, and
2, action=’LEDOff’ for when the off button is clicked.
The action value gets appended to the ip address such as
1, 192.168.4.1/LEDON, and
2, 192.168.4.1/LEDOFF.
and when the ESP8266 receives the request (more later) the “LEDON” and “LEDOFF” part can be checked for and acted upon if found.
The sketch
/* * Sketch: ESP8266_LED_Control_02 * Control an LED from a web browser * Intended to be run on an ESP8266 * * connect to the ESP8266 AP then * use web broswer to go to 192.168.4.1 * */ #include <ESP8266WiFi.h> const char WiFiPassword[] = "12345678"; const char AP_NameChar[] = "LEDControl" ; WiFiServer server(80); String header = "HTTP/1.1 200 OK\r\nContent-Type: text/html\r\n\r\n"; String html_1 = "<!DOCTYPE html><html><head><title>LED Control</title></head><body><div id='main'><h2>LED Control</h2>"; String html_2 = "<form id='F1' action='LEDON'><input class='button' type='submit' value='LED ON' ></form><br>"; String html_3 = "<form id='F2' action='LEDOFF'><input class='button' type='submit' value='LED OFF' ></form><br>"; String html_4 = "</div></body></html>"; String request = ""; int LED_Pin = D1; void setup() { pinMode(LED_Pin, OUTPUT); boolean conn = WiFi.softAP(AP_NameChar, WiFiPassword); server.begin(); } // void setup() void loop() { // Check if a client has connected WiFiClient client = server.available(); if (!client) { return; } // Read the first line of the request request = client.readStringUntil('\r'); if ( request.indexOf("LEDON") > 0 ) { digitalWrite(LED_Pin, HIGH); } else if ( request.indexOf("LEDOFF") > 0 ) { digitalWrite(LED_Pin, LOW); } client.flush(); client.print( header ); client.print( html_1 ); client.print( html_2 ); client.print( html_3 ); client.print( html_4); delay(5); // The client will actually be disconnected when the function returns and 'client' object is detroyed } // void loop() |
Sketch details
At the top of the sketch the ESP8266wifi library is added and the password and ssid for the ESP8266 server is set. The ssid is the name that is broadcast by the ESP8266. Remember that we are using the ESP8266 in AP mode so it will create its own network. The network will be called “LEDControl”.
#include <ESP8266WiFi.h> const char WiFiPassword[] = "12345678"; const char AP_NameChar[] = "LEDControl" ; |
I have condensed the html and placed it inside 4 Strings. The Strings will be sent to a connected web browser when a request is made. I have used several variables to make it easier to see but just one can be if wished.
String html_1 = "<!DOCTYPE html><html><head><title>LED Control</title></head><body><div id='main'><h2>LED Control</h2>"; String html_2 = "<form id='F1' action='LEDON'><input class='button' type='submit' value='LED ON' ></form><br>"; String html_3 = "<form id='F2' action='LEDOFF'><input class='button' type='submit' value='LED OFF' ></form><br>"; String html_4 = "</div></body></html>"; |
To tell the browser what type of file we are sending and what format the file is in we use a HTTP header. In this case we are using HTTP1.1 and plain text.
String header = "HTTP/1.1 200 OK\r\nContent-Type: text/html\r\n\r\n"; |
When the LED On button is clicked, /LEDON is added to the address and when the LED OFF button is clicked “LEDOFF” is added. I check for these with
if ( request.indexOf("LEDON") > 0 ) { digitalWrite(LED_Pin, HIGH); } else if ( request.indexOf("LEDOFF") > 0 ) { digitalWrite(LED_Pin, LOW); } |
indexof returns the position of the search text or 0 if it is not found. This means if the result is > 0 we know we have a match. If we have “LEDON” we turn the LED on with “digitalWrite(LED_Pin, HIGH);” and if we have “LEDOFF” we turn the LED on with “digitalWrite(LED_Pin, LOW);”
HTTP requests
When a web browser contacts a web server it makes a request. The request is in plain text and can contain various types of information. Using Firefox on an Android mobile phone, when I connect to the ESP8266 using address 192.168.4.1 the request contains:
GET / HTTP/1.1
Host: 192.168.4.1
User-Agent: Mozilla/5.0 (Android 6.0.1; Mobile; rv:51.0) Gecko/51.0 Firefox/51.0
Accept: text/html,application/xhtml+xml,application/xml;q=0.9,*/*;q=0.8
Accept-Language: en-GB,en;q=0.5
Accept-Encoding: gzip, deflate
Connection: keep-alive
Upgrade-Insecure-Requests: 1
Cache-Control: max-age=0
Now if I click the LEDON button I get:
GET /LEDON HTTP/1.1
Host: 192.168.4.1
User-Agent: Mozilla/5.0 (Android 6.0.1; Mobile; rv:51.0) Gecko/51.0 Firefox/51.0
Accept: text/html,application/xhtml+xml,application/xml;q=0.9,*/*;q=0.8
Accept-Language: en-GB,en;q=0.5
Accept-Encoding: gzip, deflate
Referer: http://192.168.4.1/
Connection: keep-alive
Upgrade-Insecure-Requests: 1
You will notice the extra “LEDON” in the first line. If I click the LEDOFF button it would be “LEDOFF”. This is the bit we need to know whether or not the LED is being turned on or off. Because it is in the first line, the first line is all we need and since the lines end with a carriage return (\r) character we can read just the first line with:
request = client.readStringUntil('\r'); |
We can then check the request variable to see if contains either “LEDON” or LEDOFF”. We do not need to worry about the rest of the request.
For more details about HTTP requests start with the List of HTTP header fields at wikipedia, HTTP headers at MDN, and Header Field Definitions over at w3.org
Giving it a go
Connect the LED, upload the code and connect to the ESP8266 from a mobile device using the ip address 192.168.4.1 (the default ip address for the ESP8266wifi library).
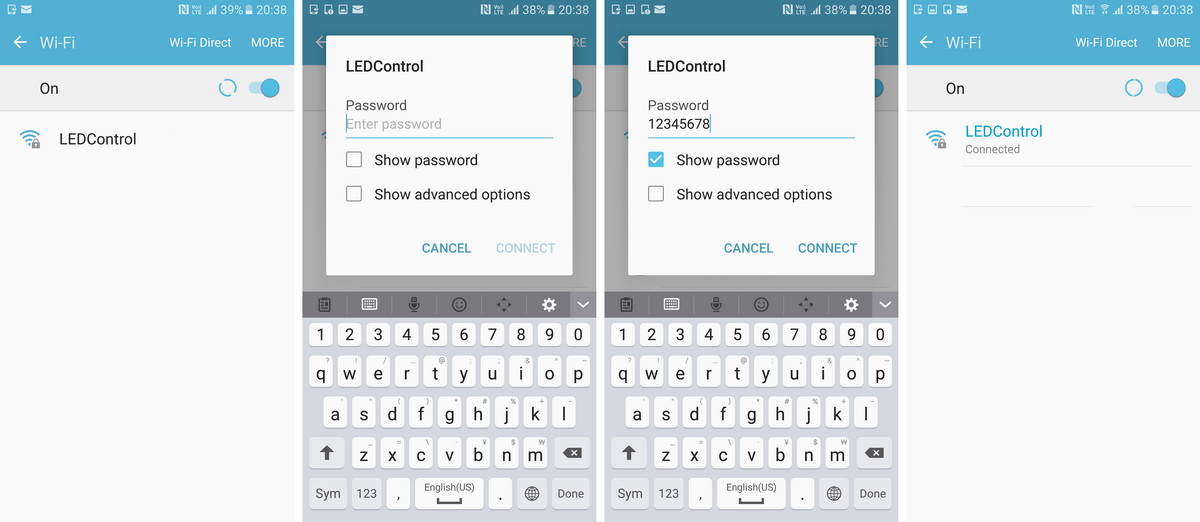
Because we defined a password when we initialized the server we need to enter it when we connect.
The first thing you will notice is that the page is very small. It is very very small. Zoom in and click the “LED ON” button. If everything is good the LED will turn on. Then, just for the pure joy of it, click the “LED OFF” button (after zooming in again) to turn off the LED.
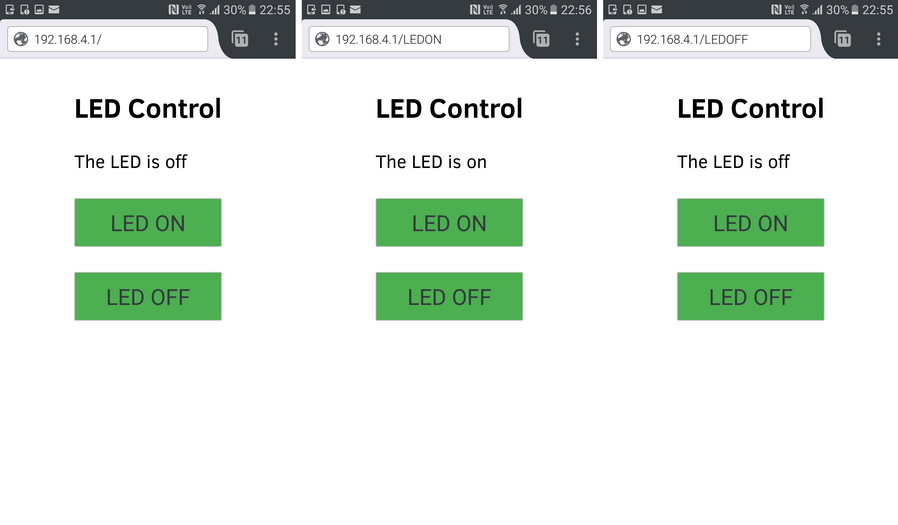
Unless you have really good eyesight and very thin fingers we need to make the text larger. We could just change the font size but when using a browser on a regular PC the text would be too big. A better way is to tell the browser to resize if we are on a mobile device and we can do this using the meta “viewport” tag. And since we are adding meta statements let’s add the correct character encoding tag as well. Meta statements go in the head section and I have placed these above the title tag.
<head> <meta name='viewport' content='width=device-width, initial-scale=1.0'/> <meta charset='utf-8'> <title>LED Control</title> </head> |
This should make the page a little larger.
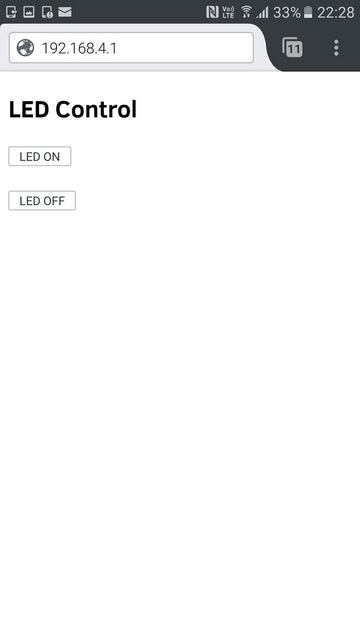
The page is bigger but still on the small size. To change this we can use css. First we make the text bigger with
body {font-size:140%;} |
This makes all text 40% bigger. To make the page a little more presentable next we centre by adding css the the div “main”
#main {display: table; margin: auto; padding: 0 10px 0 10px;} |
Since I am adding css I might as well add a bit more to make the page a even prettier. The buttons are very plain and we can change this with
.button {padding:10px 10px 10px 10px; width:100%; background-color: #4CAF50; font-size: 120%;} |
and finally let’s center the page title with
h2 {text-align:center;} |
CSS also goes in the head section and is enclosed in “style” tags. Adding all the above we get
<head>
<meta name="viewport" content="width=device-width, initial-scale=1.0"/>
<meta charset="utf-8">
<style>
body {font-size:140%;}
#main {display: table; margin: auto;  padding: 0 10px 0 10px; }
h2,{text-align:center; }
.button { padding:10px 10px 10px 10px; width:100%;  background-color: #4CAF50; font-size: 120%;}
</style>
<title>LED Control</title>
</head> |
The new sketch looks like this (the only difference is the html used). Download link at the bottom of the page.
/* * Sketch: ESP8266_LED_Control_02A * Now with added CSS * Control an LED from a web browser * Intended to be run on an ESP8266 * * connect to the ESP8266 AP then * use web broswer to go to 192.168.4.1 * */ #include <ESP8266WiFi.h> const char WiFiPassword[] = "12345678"; const char AP_NameChar[] = "LEDControl" ; WiFiServer server(80); String header = "HTTP/1.1 200 OK\r\nContent-Type: text/html\r\n\r\n"; String html_1 = "<!DOCTYPE html><html><head><meta name='viewport' content='width=device-width, initial-scale=1.0'/><meta charset='utf-8'><style>body {font-size:140%;} #main {display: table; margin: auto; padding: 0 10px 0 10px; } h2,{text-align:center; } .button { padding:10px 10px 10px 10px; width:100%; background-color: #4CAF50; font-size: 120%;}</style><title>LED Control</title></head><body><div id='main'><h2>LED Control</h2>"; String html_2 = "<form id='F1' action='LEDON'><input class='button' type='submit' value='LED ON' ></form><br>"; String html_3 = "<form id='F2' action='LEDOFF'><input class='button' type='submit' value='LED OFF' ></form><br>"; String html_4 = "</div></body></html>"; String request = ""; int LED_Pin = D1; void setup() { pinMode(LED_Pin, OUTPUT); boolean conn = WiFi.softAP(AP_NameChar, WiFiPassword); server.begin(); } // void setup() void loop() { // Check if a client has connected WiFiClient client = server.available(); if (!client) { return; } // Read the first line of the request request = client.readStringUntil('\r'); if ( request.indexOf("LEDON") > 0 ) { digitalWrite(LED_Pin, HIGH); } else if ( request.indexOf("LEDOFF") > 0 ) { digitalWrite(LED_Pin, LOW); } client.flush(); client.print( header ); client.print( html_1 ); client.print( html_2 ); client.print( html_3 ); client.print( html_4); delay(5); // The client will actually be disconnected when the function returns and 'client' object is detroyed } // void loop() |
and that little bit of css has completely changed how the web page looks
LED status
The page now looks a lot nicer but we still don’t know if the LED is on or off. To add a status we need to check the D2 pin and if it is HIGH the LED is on and if it is LOW we know the LED is off. We can then add a message in the web page showing the LED status.
To make things easier I have introduced a new String variable called “html_LED”. This will be used to store the LED status message. In the main loop we check the pin status and create the appropriate LED status message. The should be placed after we have checked for “LEDON” and “LEDOFF” and set the D2 pin.
// Get the LED pin status and create the LED status message if (digitalRead(LED_Pin) == HIGH) { html_LED = "The LED is on<br><br>"; } else { html_LED = "The LED is off<br><br>"; } |
and below that we need to add “html_LED” when we send the html to the connected device with
client.print( header ); client.print( html_1 ); client.print( html_LED ); client.print( html_2 ); client.print( html_3 ); client.print( html_4); |
The full sketch. Download link at the bottom of the page.
/* * Sketch: ESP8266_LED_Control_02B * Now with added CSS and LED status * Control an LED from a web browser * Intended to be run on an ESP8266 * * connect to the ESP8266 AP then * use web broswer to go to 192.168.4.1 * */ #include <ESP8266WiFi.h> const char WiFiPassword[] = "12345678"; const char AP_NameChar[] = "LEDControl" ; WiFiServer server(80); String header = "HTTP/1.1 200 OK\r\nContent-Type: text/html\r\n\r\n"; String html_1 = "<!DOCTYPE html><html><head><meta name='viewport' content='width=device-width, initial-scale=1.0'/><meta charset='utf-8'><style>body {font-size:140%;} #main {display: table; margin: auto; padding: 0 10px 0 10px; } h2,{text-align:center; } .button { padding:10px 10px 10px 10px; width:100%; background-color: #4CAF50; font-size: 120%;}</style><title>LED Control</title></head><body><div id='main'><h2>LED Control</h2>"; String html_LED = ""; String html_2 = "<form id='F1' action='LEDON'><input class='button' type='submit' value='LED ON' ></form><br>"; String html_3 = "<form id='F2' action='LEDOFF'><input class='button' type='submit' value='LED OFF' ></form><br>"; String html_4 = "</div></body></html>"; String request = ""; int LED_Pin = D1; void setup() { pinMode(LED_Pin, OUTPUT); boolean conn = WiFi.softAP(AP_NameChar, WiFiPassword); server.begin(); } // void setup() void loop() { // Check if a client has connected WiFiClient client = server.available(); if (!client) { return; } // Read the first line of the request request = client.readStringUntil('\r'); if ( request.indexOf("LEDON") > 0 ) { digitalWrite(LED_Pin, HIGH); } else if ( request.indexOf("LEDOFF") > 0 ) { digitalWrite(LED_Pin, LOW); } // Get the LED pin status and create the LED status message if (digitalRead(LED_Pin) == HIGH) { html_LED = "The LED is on<br><br>"; } else { html_LED = "The LED is off<br><br>"; } client.flush(); client.print( header ); client.print( html_1 ); client.print( html_LED ); client.print( html_2 ); client.print( html_3 ); client.print( html_4); delay(5); // The client will actually be disconnected when the function returns and 'client' object is detroyed } // void loop() |
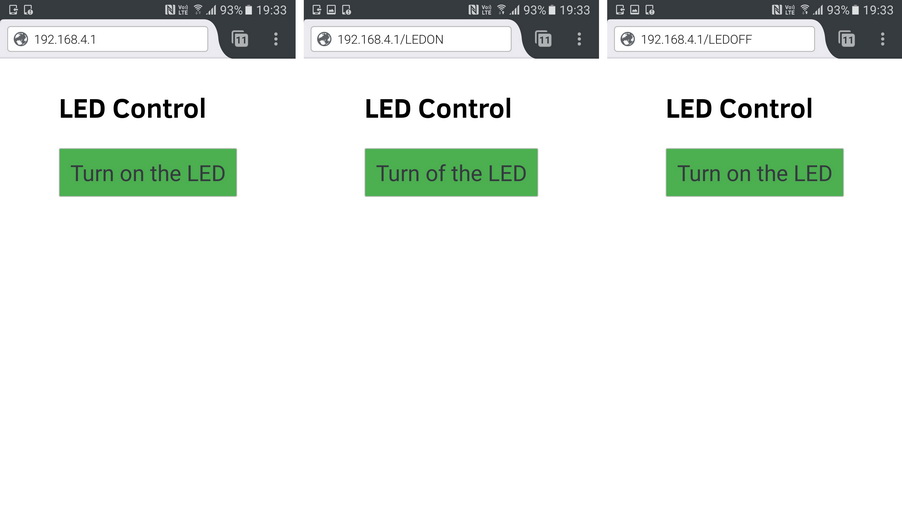
LED status part 2. One button
I personally do not like to have multiple buttons controlling the same thing. We have one LED so we should be able to use just one button. Since we are checking the LED status before we send out the html file, we can change the html we send based on the LED status. We are already doing this with the LED status message so why not do it with the buttons (or more specifically the button).
Using a single button, if the LED is off, the button can say “Turn on the LED” and if the LED is on, it can say “Turn off the LED”. An easy way to do this is to copy the appropriate form to a String before sending.
Using the same idea as with the LED status message change the String variables that contain the html
String header = "HTTP/1.1 200 OK\r\nContent-Type: text/html\r\n\r\n";
String html_1 = "<!DOCTYPE html><html><head><meta name='viewport' content='width=device-width, initial-scale=1.0'/><meta charset='utf-8'><style>body {font-size:140%;} #main {display: table; margin: auto;  padding: 0 10px 0 10px; } h2,{text-align:center; } .button { padding:10px 10px 10px 10px; width:100%;  background-color: #4CAF50; font-size: 120%;}</style><title>LED Control</title></head><body><div id='main'><h2>LED Control</h2>";
String html_2 = "";
String html_4 = "</div></body></html>"; |
and then, after we know the LED status we copy 1 of 2 forms in to html_2
// Get the LED pin status and create the LED status message
if (digitalRead(LED_Pin) == HIGH)
{
    // the LED is on so the button needs to say turn it off
    html_2 = "<form id='F1' action='LEDOFF'><input class='button' type='submit' value='Turn of the LED' ></form><br>";
}
else
{
    // the LED is off so the button needs to say turn it on
    html_2 = "<form id='F1' action='LEDON'><input class='button' type='submit' value='Turn on the LED' ></form><br>";
} |
Notice that both forms have the same id value
Then send the html using
client.print( header ); client.print( html_1 ); client.print( html_2 ); client.print( html_4); |
The final sketch
Download link at the bottom of the page.
/* * Sketch: ESP8266_LED_Control_02C * Now with added CSS and a single button * Control an LED from a web browser * Intended to be run on an ESP8266 * * connect to the ESP8266 AP then * use web broswer to go to 192.168.4.1 * */ #include <ESP8266WiFi.h> const char WiFiPassword[] = "12345678"; const char AP_NameChar[] = "LEDControl" ; WiFiServer server(80); String header = "HTTP/1.1 200 OK\r\nContent-Type: text/html\r\n\r\n"; String html_1 = "<!DOCTYPE html><html><head><meta name='viewport' content='width=device-width, initial-scale=1.0'/><meta charset='utf-8'><style>body {font-size:140%;} #main {display: table; margin: auto; padding: 0 10px 0 10px; } h2,{text-align:center; } .button { padding:10px 10px 10px 10px; width:100%; background-color: #4CAF50; font-size: 120%;}</style><title>LED Control</title></head><body><div id='main'><h2>LED Control</h2>"; String html_2 = ""; String html_4 = "</div></body></html>"; String request = ""; int LED_Pin = D1; void setup() { pinMode(LED_Pin, OUTPUT); boolean conn = WiFi.softAP(AP_NameChar, WiFiPassword); server.begin(); } // void setup() void loop() { // Check if a client has connected WiFiClient client = server.available(); if (!client) { return; } // Read the first line of the request request = client.readStringUntil('\r'); if ( request.indexOf("LEDON") > 0 ) { digitalWrite(LED_Pin, HIGH); } else if ( request.indexOf("LEDOFF") > 0 ) { digitalWrite(LED_Pin, LOW); } // Get the LED pin status and create the LED status message if (digitalRead(LED_Pin) == HIGH) { // the LED is on so the button needs to say turn it off html_2 = "<form id='F1' action='LEDOFF'><input class='button' type='submit' value='Turn of the LED' ></form><br>"; } else { // the LED is off so the button needs to say turn it on html_2 = "<form id='F1' action='LEDON'><input class='button' type='submit' value='Turn on the LED' ></form><br>"; } client.flush(); client.print( header ); client.print( html_1 ); client.print( html_2 ); client.print( html_4); delay(5); // The client will actually be disconnected when the function returns and 'client' object is detroyed } // void loop() |
And here is the final web page
Downloads
Download the above sketches: ESP8266_LED_Control_02(ABC).
Hey, good tutorial. Can you create a slider so that we can control the led brightness?
I’ll see what I can do in the next update.
Cool! Thanks you saved me from hours of web searching, many thanks!
can you create a program to control more than 1 led on same web page?
Google for Rui Santos and randomnerdtutorials. He has was you’re looking for and other great stuff
A
B C
D
Can you tell me how to arrange 4 buttons like this (above)?
Thank you
Remo
very good work Martin
My Compliment
can i have the circuit design for this
See the bottom of part one – https://www.martyncurrey.com/esp8266-and-the-arduino-ide/
I want to use this code to run my water pump trough my mobile phone via esp8266. I want to add timer function in this code so that I could sen time for water pump to run and then switch off automatically ( e.g. I want it to run pump for 5, 10 or 20 minutes , I send this time from my mobile phone to esp8266) How can I do this , Please help…
Hi Marty! How do I get the sensor value (Temperature) to display on a web page like your example. Tks
bjr very good tutorial please try to create an android application thanks to api inventor who will play the same role as in your tutorial, how to do it
Amazing Tutorial!!! All that I need for a project: Access point and html.
Great !!
Some things saved me a lot of time. Thanks!
well done, worked 1st time for me. im a rookie & code hardly works 1st time for me.
I would like to give away my appreciations to author. My problem was the organization of the receiption of a string via UART, symbol by symbol receiption accumulation into some buffer. The ” request = Serial2.readStringUntil(‘\n’); ” learned here has solved the task. Many thanks!
You make it easier to understand. thanks a lot
Hi Martyn,
Great tutorial thank you. Newbie question, How does the Code/ESP know to use 192.168.4.1? I have loaded this code and I can see LEDControl in my WiFi available list but when I try to connect it says failed to connect cannot find 192.168.4.1.
Can you please help me understand.
Cheers Mark
192.168.4.1 is the default IP address built in to the ESP8266 core. You can change the IP address by using the softAPConfig (local_ip, gateway, subnet) command. See https://arduino-esp8266.readthedocs.io/en/latest/esp8266wifi/soft-access-point-class.html for full details.
There shouldn’t be any reason for 192.168.4.1 not to work as long as you have connected to the ESP8266 AP network. Or unless you are using a device with a firewall.
I am having the same problem accessing 192.168.4.1, I get a connection timeout error, I am connected to the wifi put out by the esp8266.
I will keep playing around with it, I am a esp newbie also!
hello Martyn, very good project, I am working in the same thing but with push button intro to….
do you can help me please
Have a look at the later guides.
What the differences between this method and server.on (.. ) Method?
The server.on (.. ) method is part of the ESP8266WebServer library. The library (amongst other things) parses the request and then matches it to the available server.on (.. ) functions.
Using the library can be better when you have a lot of different pages or are using GET and POST submissions, however, for simple websites, especially where there is only one or two pages I prefer not to use the library.
The ESP8266WebServer library makes using secure websites (HTTPS) a lot easier.
If you are new to ESP8266 it is worth looking in to HTTP requests. Having a basic understanding of what they are and what information they may contain will help you understand what is happening even when using the ESP8266WebServer library.
Bonjour
Excellentes explications
félicitations
Thank you for the well-explained examples; they’ve been very helpful for a beginner like me. I look forward to trying out more of your pages soon.