The HC-06 is a slave only BT module that is fairly easy to use with the Arduino using serial communication. Once it is connected it simply relays what it receives by bluetooth to the Arduino and whatever it receives from the Arduino it sends to the connected device. There are several slightly different versions of the HC-06, however, all seem to use the same firmware and have the same AT commands. The ones I have are labelled as zs-040. I also have some HC-05s which share the same PCB and are also labelled as zs-040.
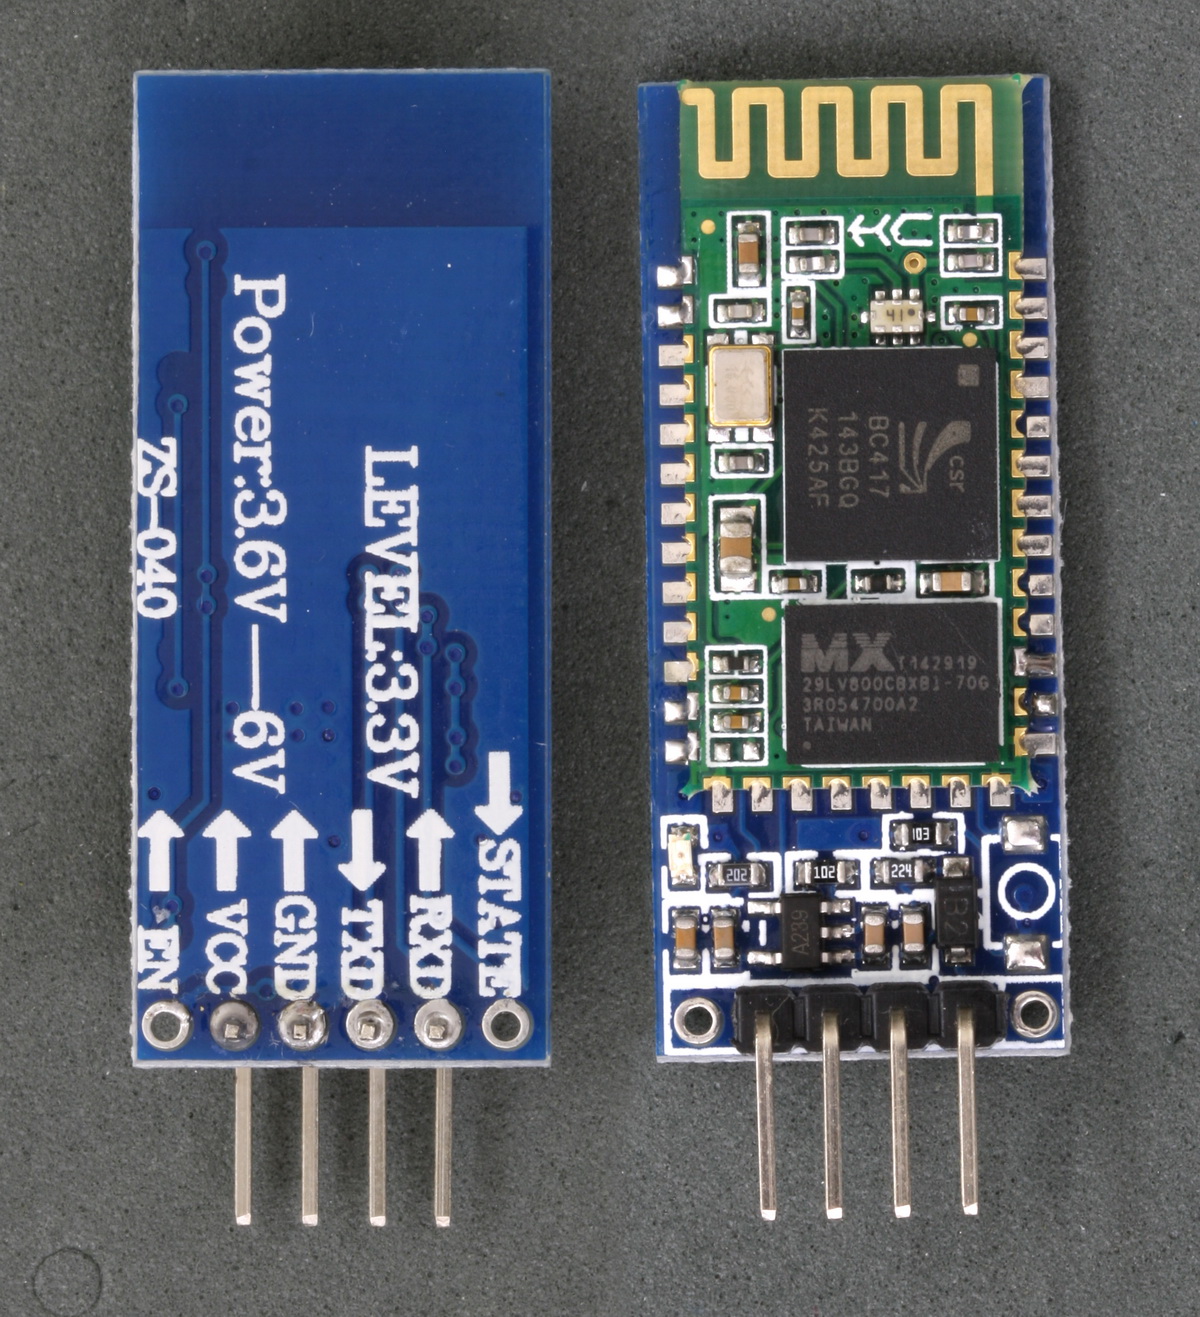
The HC-06 defaults to AT mode at power on. This is indicated by a rapidly flashing LED. After the HC-06 is connected to another device the LED stops flashing and is constant on.
Connections
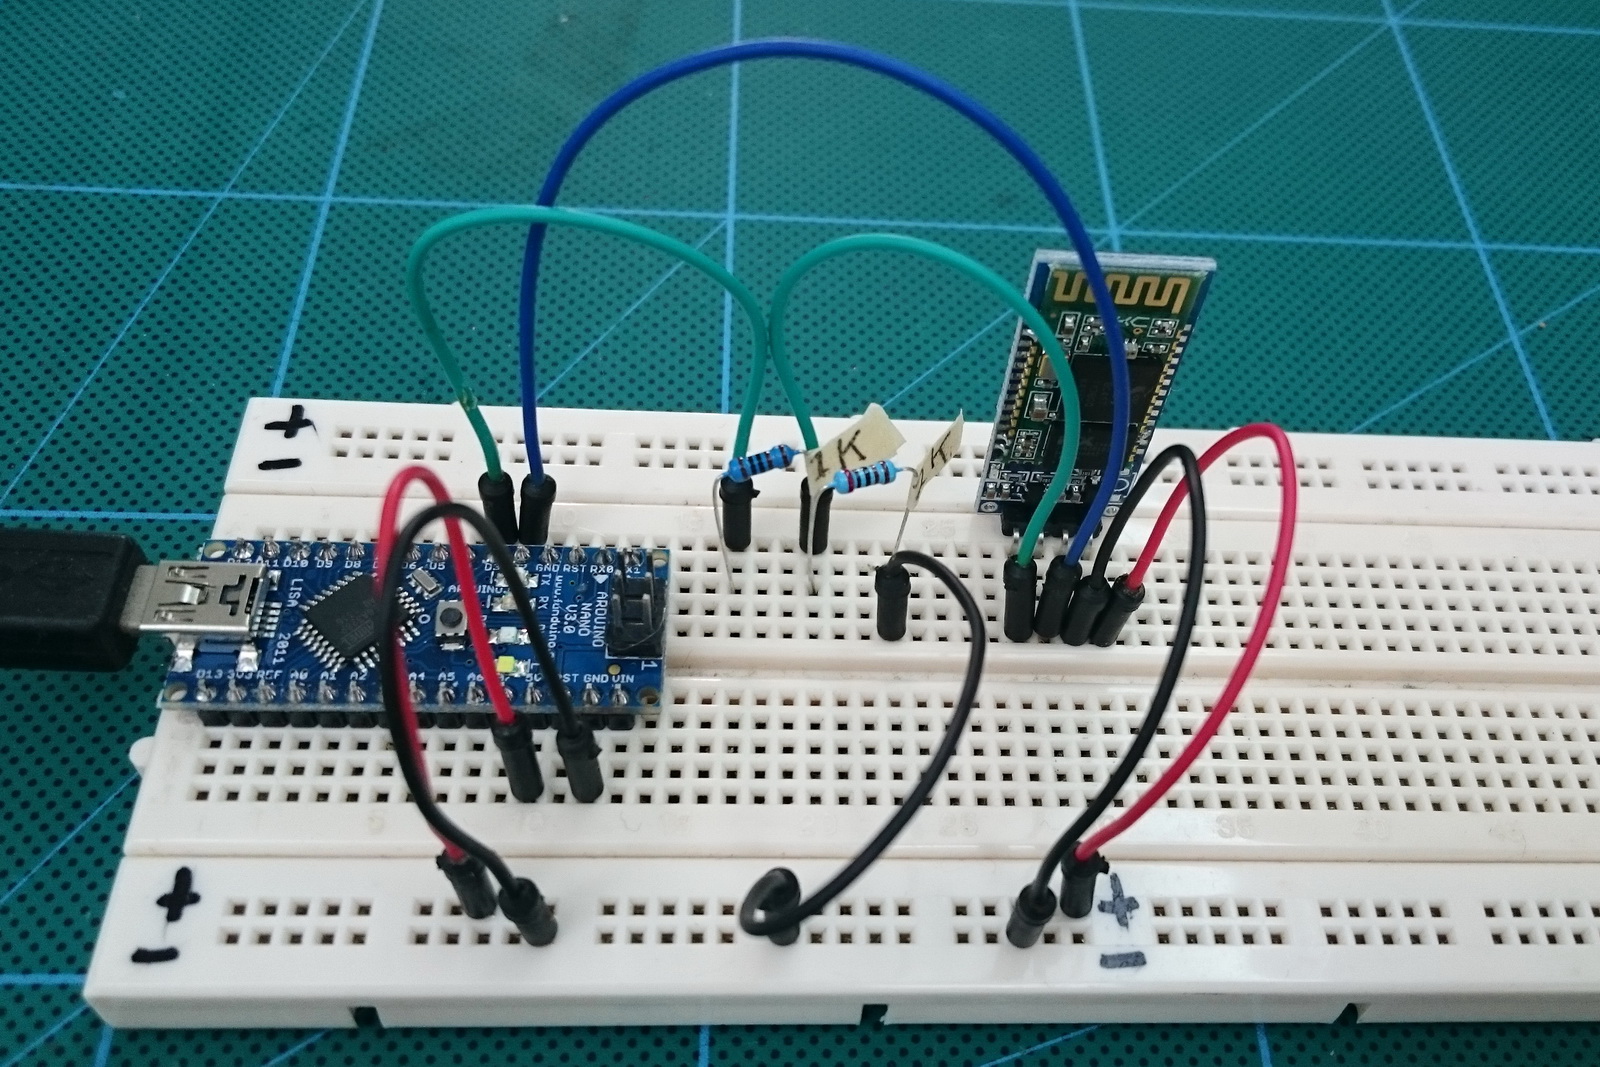
The Bluetooth module the ZS-040 is based on, the EGBT-046S, is a 3.3V device. The HC-06 breakout board has a 3.3v regulator that allows a larger input voltage to be used, in the range of 3.6 to 6 volts. The RX pin can still only accept 3.3V though. This means a voltage divider is required to connect to a 5V Arduino. A simple voltage divider can be created using 2 resistors. I am using a 1K ohm resistor and a 2K ohm resistor. The Arduino will read 3.3V as a HIGH so the HC-06 TX pin can be connected directly to the Arduino.
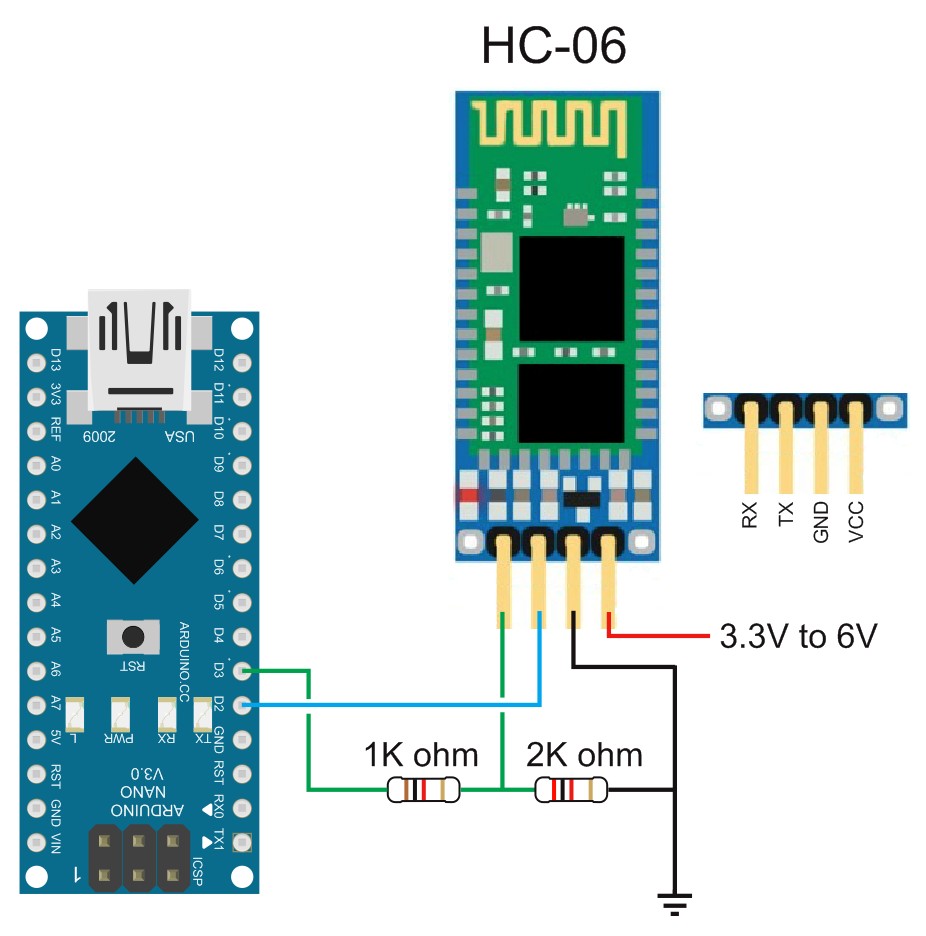
HC-06 Vin to 5V (can be from the +5V out from the Arduino)
HC-06 GND to common GND
HC-06 RX to Arduino pin D3 (TX) via a voltage divider
HC-06 TX to Arduino pin D2 (RX) connect directly
Test Communication With The HC-06
After connecting everything we need to talk to the HC-06. We can do this by using software serial on the Arduino. I use software serial to talk to Bluetooth modules and use the hardware serial for debugging.
The following sketch takes whatever is entered in to the serial monitor on a host computer and relays it to the HC-06. The sketch also takes whatever the HC-06 outputs and forwards it to the serial monitor. The Arduino is acting like a relay station between the serial monitor and the BT module.
The HC-06s I have have a default baud rate of 9600. Other modules have a different baud rate. If 9600 doesn’t work try other speeds. 38400 is also very common. Once you have communication working you can change the baud rate to suit your needs.
// Basic Bluetooth sketch HC-06_01 // Connect the Hc-06 module and communicate using the serial monitor // // The HC-06 defaults to AT mode when first powered on. // The default baud rate is 9600 // The Hc-06 requires all AT commands to be in uppercase. NL+CR should not be added to the command string // #include <SoftwareSerial.h> SoftwareSerial BTserial(2, 3); // RX | TX // Connect the HC-06 TX to the Arduino RX on pin 2. // Connect the HC-06 RX to the Arduino TX on pin 3 through a voltage divider. // void setup() { Serial.begin(9600); Serial.println("Enter AT commands:"); // HC-06 default serial speed is 9600 BTserial.begin(9600); } void loop() { // Keep reading from HC-06 and send to Arduino Serial Monitor if (BTserial.available()) { Serial.write(BTserial.read()); } // Keep reading from Arduino Serial Monitor and send to HC-06 if (Serial.available()) { BTserial.write(Serial.read()); } } |
The HC-06 zs-040 expects commands to be in upper case and does not require carriage return and new line (\r\n) characters.
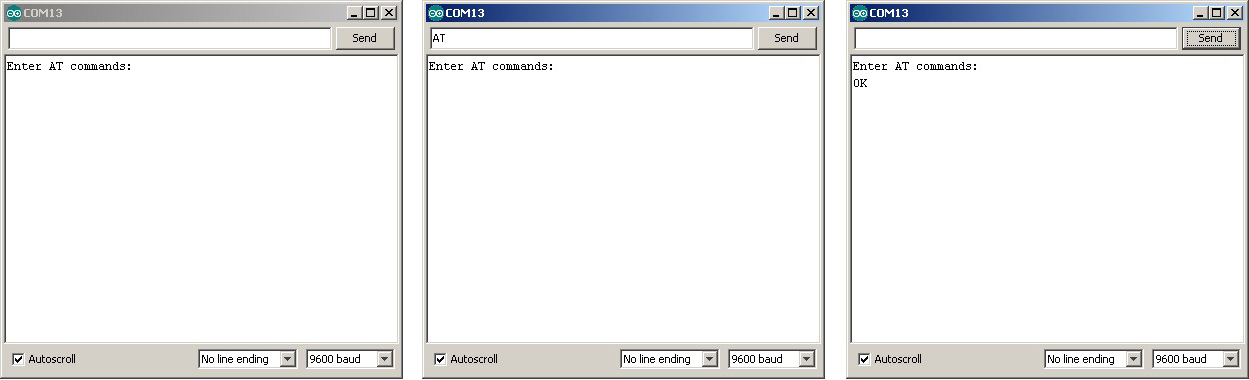
Open the serial monitor and select a baud rate of 9600 and ensure “No line ending” is selected from the drop down list at the bottom of the window.
Enter “AT” (no quotes) into the top text box and hit Send. If the HC-06 likes you it will say OK. AT is a basic communications test command that allows you to check the HC-06 is connected and communicating.
AT Commands
The HC-06 has a limited number of commands. You can rename the device, change the baud rate, and change the PIN/password. That’s about it.
| Command | Reply | Comment |
| AT | OK | Communications test |
| AT+VERSION | OKlinvorV1.8 | Firmware version. |
| AT+NAMEmyBTmodule | OKsetname | Sets the modules name to “myBTmodule” |
| AT+PIN6789 | OKsetPIN | Set the PIN to 6789 |
| AT+BAUD1 | OK1200 | Sets the baud rate to 1200 |
| AT+BAUD2 | OK2400 | Sets the baud rate to 2400 |
| AT+BAUD3 | OK4800 | Sets the baud rate to 4800 |
| AT+BAUD4 | OK9600 | Sets the baud rate to 9600 |
| AT+BAUD5 | OK19200 | Sets the baud rate to 19200 |
| AT+BAUD6 | OK38400 | Sets the baud rate to 38400 |
| AT+BAUD7 | OK57600 | Sets the baud rate to 57600 |
| AT+BAUD8 | OK115200 | Sets the baud rate to 115200 |
| AT+BAUD9 | OK230400 | Sets the baud rate to 230400 |
| AT+BAUDA | OK460800 | Sets the baud rate to 460800 |
| AT+BAUDB | OK921600 | Sets the baud rate to 921600 |
| AT+BAUDC | OK1382400 | Sets the baud rate to 1382400 |
To get the modules firmware version enter “AT+VERSION” (no quotes):
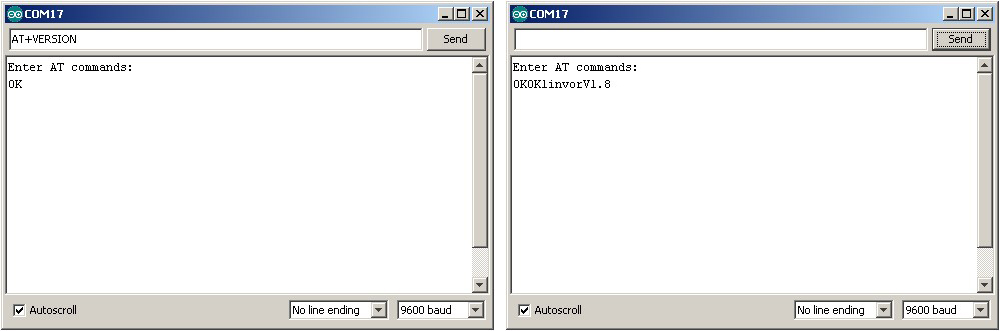
The modules I have report they are using version linvorV1.8 which seems to be common for many HC-06s.
Note: Windows cannot use baud rates above 115200. If you are using Windows and you accidentally set the baud rate higher than 115200 you’re screwed!
After confirming that the HC-06 is working and communicating we can try to connect to an Android device.
HC-06 Connecting to an Android Device
Since the HC-06 is a slave only device, the connection must be started by another device. Below are the steps to pair and then connect with an Android device.
I am using an app called Bluetooth Terminal which is no longer available on google play (updated Nov 2023).
A quick search will show many alternatives.
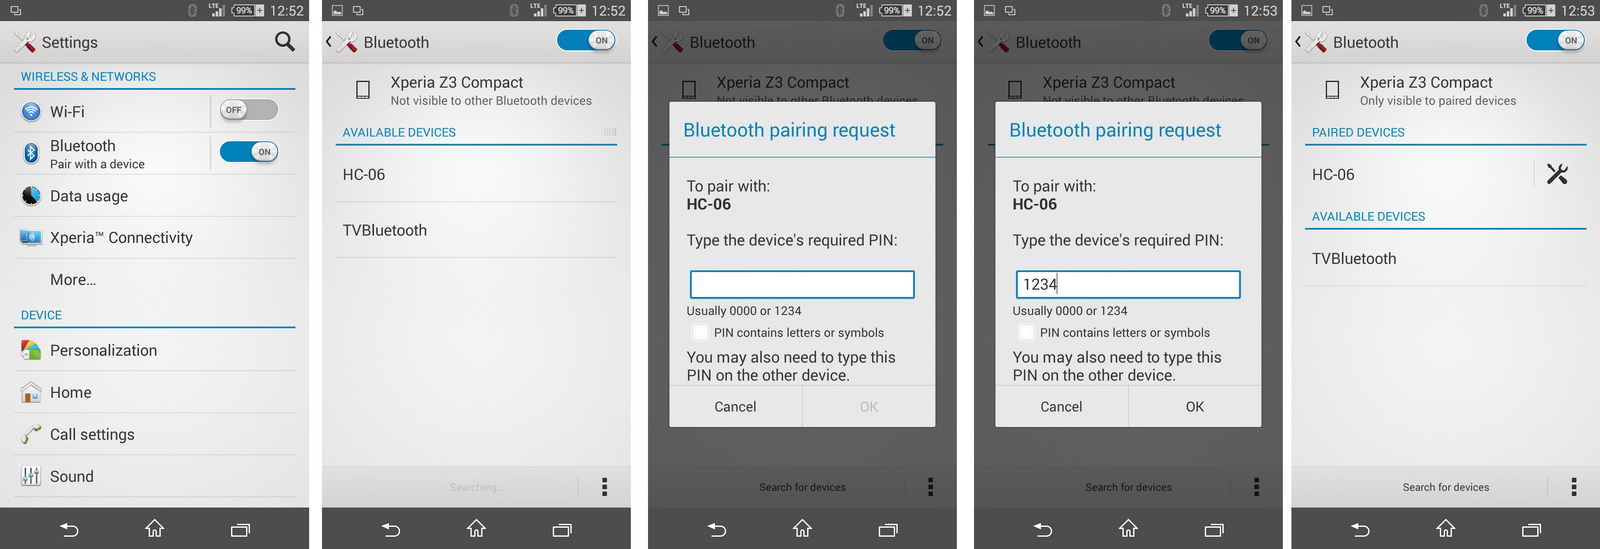
Before you can connect to the HC-06 you need to pair it.
Power on the HC-06. The LED will flash rapidly.
Open Settings on the Android device and select Bluetooth.
If your device does not auto-scan you will need to manually scan for available bluetooth devices. The HC-06 should appear in the list.
Select the HC-06. You will be asked for the pin. The default pin is “1234”.
The modules name may include the mac address; a series of hexadecimal numbers.
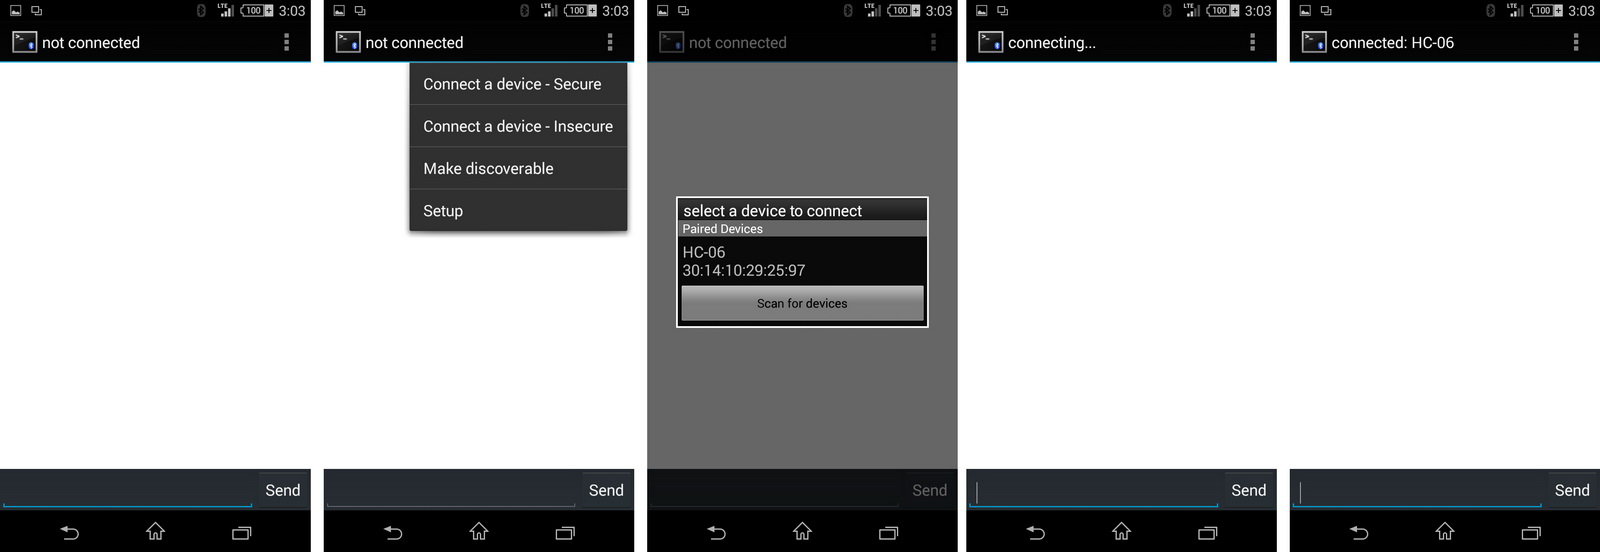
After the HC-06 is paired you need to communicate with it somehow. To test things are working you can use a BT terminal program such as Bluetooth Terminal available on Google Play
Install and open Bluetooth Terminal.
Open the menu, icon at the top of the screen.
Select “Connect a device – Insecure”. This brings up a list of available devices.
Select the HC-06
Once connected, “connected: HC-06” is displayed at the top of the screen.
Make sure the Arduino serial monitor is open and everything you enter into the Android Bluetooth Terminal will be echoed in the serial monitor.

In the Arduino serial monitor, select “Both NL & CR” at the bottom of the window and whatever you type in the serial monitor will be sent to the Android Bluetooth Terminal.
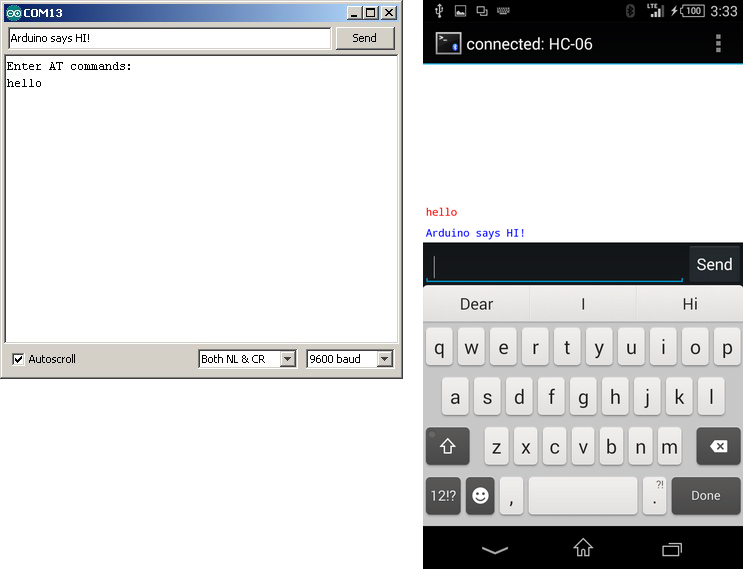
If NL&CR are not selected, the Arduino will still send the data but the Bluetooth Terminal program will not display it until it receives a carriage return / newline.
Next step. Turning an LED on and off.
Turning a LED On and Off by Bluetooth
I have updated and moved the Turning an LED on and off guide to its own post
Update
I have new HC-06 zs-040 modules that have the hc01.comV2.0 firmware. See here.
This download zip seems to be missing the .aia file. I only see the .ino and compiled .apk.
Can you please post the .aia file so we have the blocks to work with?
Thanks!
Hi Steve,
have updated the download. Now includes the app inventor aia file and also the correct Arduino sketch.
where is the download link?
Martyn,
Thanks for posting.
Small issue – the Arduino sketch makes use of Arduino pins 2 & 3 for Rx & Tx, respectively using SoftwareSerial, but your description states “HC-06 RX to Arduino TX via a voltage divider, and HC-06 TX to Arduino RX (connect directly).” So, I tried both ways, but suspect that pins 2 & 3 are correct?
In any event, I’m unable to get any AT command responses from my HC-06 module…all I see in the serial monitor window is the prompt: “Enter AT commands:”
Tried with multiple baud rates and line endings, to no avail.
I know this BT module is working, because I tested with the echo sketch and an LED controller sketch (found elsewhere) without issue. Both of these examples used the hardware Tx/Rx pins (0 & 1 on my Arduino Uno).
Any thoughts?
“HC-06 RX to Arduino TX via a voltage divider, and HC-06 TX to Arduino RX (connect directly)” refers the software serial on pins 2 and 3, however, other pins can be used such as 10 and 11.
If you are not using the serial monitor on the host computer You can connect the BT module to the hardware serial but I use this for communication with the serial monitor on the host computer for debugging.
Check your connections: Arduino pin2 to HC-06 TX and Arduino pin 3 to HC-06 RX (with a voltage divider)
Remember that the HC-06 expects commands to be upper case and do not add CR+NL when typing AT commands.
When sending commands from the serial monitor check that the LED connected to the hardware serial is flashing.
You can also add an LED to show when data is being sent through the software serial
Yes. Its enough to connect EN to Arduino 3.3V. And after that in my case started working.
This is a great tutorial, but I’m unable to send AT commands from the serial terminal. When I attempt to connect from Tera Term, the same results. The hc-06 led is flashing and not steady. However the Android connects to the HC-06 , as indicated by steady led and the ability to control leds and motors. Any help is appreciated.
Tom,
do you have communication between the Arduino and the HC-06 with At commands working?
Are you adding \r\n to the end of the text?
Someone reported they had issues with the latest IDE. When they tried an earlier version everything worked fine.
If you cannot get it working after double checking everything try a different terminal app.
Are you using the exact same BT module? There are now newer versions (JY-MCU BT_BOARD V1.06) that require a pullup resistor on the Arduino RX line. If you think you may have the JY-MCU V1.06 board see http://mcuoneclipse.com/2014/03/30/getting-bluetooth-working-with-jy-mcu-bt_board-v1-06/ for details.
This is very good tutorial.
thank you.
Very good tutorial.
Hey Martyn,
This post was very helpful, I asked you about connecting two hc-06’s and instructed me to use a hc-05 and an hc-06. with a little bit of work i was able to figure out from your post how to get the hc-05 to receive AT commands through a serial port on my pc. I am unable to achieve this with the hc-06, I have double checked my wiring and it is all in its proper place and even attempted using some of the sketches you have posted on your blog to get it into a command mode to receive the AT commands, some blogs mention of putting a high to key 26 i do believe on the hc=06 to get it into command mode, and that the commands have to be entered within a time limit or the device ignores it. any help with this will be greatly appreciated.
thanks again
Unlike the HC-05 which you need to manually enter, the HC-06 defaults to AT mode. The HC-06 is in AT mode when first started.
A couple if things to note; the HC-06 requires AT commands to be uppercase and do not add carriage return and new line characters (\r\n).
Re-read the above guide and if you have followed the above and are still having problems you need to check the baud rate. Most HC-06s are set to 9600 but some differ. First try 38400 and then all the others.
The AT mode worked at 9600 baud. I changed the baud to 1200 and now I am unable to return back to 9600 baud using AT commands.
The bluetooth module only responds to the command “AT” but not to any other commands like “AT+NAME” or “AT+VERSION” or any other for that matter. This being the case, the module isn’t responding to “AT+BAUD4” to change it back to its default baud rate.
Got it back to 9600 baud by doing a hard reset of the module. I did this by pulling the Pin 11 (RESET pin) to the ground and power cycling it. Then I went to AT mode and gave the command “AT+BAUD4”. It worked.
hey Martyn
ive Bluetooth module named ZS-040 and it has 6 pins instead of 4. 2 extra for state and one for en
I tried connecting only 4 of them but my module isn’t lighting up
where should I connect those two pins in my arduino uno
please help!!
Regards :)
The 6 pin version is the HC-05. See
https://www.martyncurrey.com/arduino-with-hc-05-bluetooth-module-in-slave-mode/
https://www.martyncurrey.com/arduino-with-hc-05-bluetooth-module-at-mode/
Thankyou, after a couple of hours headscratching I have finally changed the settings on my HC-06 without having to wait for an FTDI Adapter, I simply wired 4 pins directly to the arduino uno as the BT adapter says 3.3-6v and its all good to fit to the Naze32 now. Good work and thanks again.
Hello Martyn, one of the few places where to find info on HC-05
Can you confirm that without the voltage divider on the IN line (for signals at 5V), the HC-05 doesn’t read the signal ?
Thanks
The HC-05 will work without the voltage divider and many people connect directly to a 5V signal without a problem. However, the Bluetooth module (the small module not the HC-05 breakout) is a 3.3v device and other people have reported damaging the boards when used with 5V. The damage may not happen straight away and so it may not be obvious. For the sake of 2 cheap resistors why take the chance.
I have 4 of the ZS-040 adapters. I am trying to learn the code but every time I try to connect to the bluetooth it just says connection rejected. When I put in the AT commands I get nothing back.
Any Ideas?
I’m looking to do some master to multiple slaves to multipule slaves. I know they can not talk all at once which is fine but I really need to figure this out. any site I can look at for advanced bluetooth code?
There are now a few different modules that use the zs-040 breakout board and you need to determine which ones you have.
If they are visible in Android Settings => scan for devices what is the name they show?
Are the they BLE devices? If yes they may not pair in Settings and you will need a BT v4 compatible app to see them properly.
Do they have a blue LED at top left on the small daughter board? If yes see the bottom of the https://www.martyncurrey.com/bluetooth-modules/ post.
If you are sure they are Bluetooth V2.0/2.1 then double check the connections to the Arduino. Make sure you have then the right way around (RX to TX and TXD to RX) and that you have the correct value resistors.
I don’t have an example to show how to set up a network but basically you need to connect to each slave device one at a time.
– Connect to module 1, get data, close connection.
– Connect to module 2, get data, close connection.
– Connect to module 3, get data, close connection, etc.
I have a 4 node network (1 master, 3 slaves) running at home controlling a turtle aquarium. The connecting and reconnecting is not as quick as I would like but I don’t really need an instant connection so I connect to each node every 10 seconds or so. I use the STATE pin on the HC-05 to show I have a connection and then I use a very basic handshake system (a HELLO it’s module 1/2/3 here message) to show which node is connected.
I don’t connect to each module in turn, I connect to the water heater every second connection. This allows to me check the water temp more frequently just in case I am trying to boil the turtle.
I have managed to alter the serial parity on my HC-06 and now cant use it due to the fact that Arduino software serial won’t let me change the parity.
My question is simple. How to I restore the factory defaults to my HC-06?
Some special power-up sequence I hope! :-)
Thanks in advance,
-CT
You cannot restore factory defaults through hardware only software.
You will need a usb-serial adaptor and a full terminal program like putty which allow you to change the serial coms properties.
OK…got it. I know what the parity was changed to. I did manage to figure that out. I will use a terminal program and get it back to 9600, N,8,1.
Thanks!
Hi,Martyn
If I don’t use SoftwareSerial,I can’t command the BT,right?
Serial.read&write only for talk between serial monitor& arduino?
Unless use the MEGA.
In all the examples i use hardware serial to communicate with a host computer and the Arduino serial monitor.
On ATmega328 based Arduinos there is only one hardware serial so I ue software Serial or AltSoftSerial to talk to the Bluetooth module.
If you do not need to use the serial monitor then you can us the hardware serial to talk to the Bluetooth module.
If you need hardware serial for both then, yes, you need an Arduino such as the Mega which has more than one hardware serial.
When I develop new projects for myself I use hardware serial to talk to the BT module and a usb-serial adapter and software serial to talk to the serial monitor. When everything is working I remove the serial monitor parts from the code.
Thanks so much, your code really works!
There is so much wrong information around, like “connect pin 26 to Vcc for AT mode on HC06”!!!
Hi Martyn
Thanks for the insightful post. Out of curiosity, I measured the voltage arriving at the RX pin of the EGBT-046S (without using a voltage divider). It measured 3.28v so it seems as if the breakout board is doing some voltage regulation.
Does this seem plausible?
Warm regards,
Ted
Woops! It turns out I was measuring the wrong pin. The RX pin of the EGBT-046S is indeed ~4.7v so a voltage divider is most definitely needed.
Ted
sir i have hc 06 bluetooth module. after power up led is blinking with interval 2 sec approx. but i can’t find bluetooth signal from my mobile. it also does not accept any at command. help me
Hi Martyn
I dont want to connect it to Arduino, but rather a standard RS232 device.
In advance of connecting things up, do you know with the ZS-040 (HC-06) board will it drive the Rx port of a standard RS232 device OK?
I do plan to use the resisitive split on the Rx port of the ZS-040 module of course.
Regards and Thanks
The signals should be OK but if you try, be careful with the voltages. RS232 signal voltages can be anything up to 25v. Check the voltages your device uses.
Hi, i’ve got it work right, so i can turn on/off the led. The problem is when i turn on and turn off very quickly, it stucks and i have to reset the arduino to work well again. I do not know if it is limited by the baud rate or whatever. I’ve tried to thange the baud rate from my initial 9600 to some other, but it fails, i can not get it work if i change the baud rate.
Don’t really understand the problem. Are you referring to one of the other posts?
Is there some way to put external led in hc-06 module? I checked the state pin and i cant see any signal of change in there. The onboad led blink, but if my application stay inside some box i cant see no one signal of functioning. Thanks for help.
By the way my card is not this, it is this model http://www.dx.com/p/hc-06-serial-port-passthrough-wireless-slave-transceiver-bluetooth-module-for-arduino-382686#. WXlRQ4jyvRY. Thank you.
Forget friend, the state PIO dont have any signal in this version, so i have soldered a wire in the led PIO directly to the state pin what i previous had added too.
Hi Marty,
I hv problem with my HC 06. After enter AT comand there are no answer (OK). Can you help me to solve the problem.
I am having the same problem with the last couple batches of HC-06 I received. No response to AT commands. I cannot rename them nor can I tell when firmware version is on them because of this.
Hi Martyn
Great run through.
Have you, or anyone else tried the iPhone Bluetooth connectivity?
My Raspberry Pi can find the HC-06, but my iPhone can not.
Thoughts?
The iPhone is BLE. The HC-06 is Bluetooth Classic. The two use different protocols and cannot talk to each other.
This is the best example to get value from monitor serial and execute AT command in HC06, works perfectly to me!
Thank you!
Martyn, Thank you very much for your tutorial, it was so easy to follow, thank you again for sharing your knowledge.
Glad it was helpful.
Hi,
Why is needed the resistances, because if se a ardiono not nano is not necessary. Thanks a lot
If you mean the voltage divider it is because the Bluetooth RX pin is 3.3v and the Arduino Nano is 5V.
Many people do connect the Arduino directly to the BT module and report that it works but the specs say the chip is 3.3v only so I play safe.
Hi Martyn, I’ve written an app (R Pi) to change the name and pin on an SPP-C, my app sends the AT command followed by /r/n and the module reports back correctly. However (worryingly) the BT name hasn’t changed or is corrupt. I am sending the commands immediately and together (no time between commands), should there be a delay after sending an AT command ? or could something i havn’t thought of be happening here ? TIA
I’m not at home and cannot check but I think the delay between commands has to be at least 100ms. Add some delays and see what happens.
Good tutorial! Thanks!
I can’t get a response to my AT commands. I have tried various digital pins (2,3,4,10,12). The commands sent are all entered with capital letters. The screen is locked on: “Enter AT commands:”
What can I do?
Great tutorial !
With the HC-06 I received from China with version is V3.0-20170609, to get it working I had to terminate AT commands with NL and CR.
Except that, very effective tutorial !
Thanks !
Hi could you explain how you did it as I can get AT+NAME=HELLOWORLD and hit the enter key and it comes back ok if I put AT+VERSION and it comes back with
V3.0-20170609 I put AT+PSWD4321 and hit enter I get error .
Could you please explain in detail how to change the pin please?
Cathy
AT+PSWD:”1234″ should work
Hi I have a zs040 and it has a bc352 chip instead of a bc417 version 3??? I can change name by AT+NAME=HELLO Send In Hercules and then enter On keyboard and name changes to HELLO .
for password or pin I put AT+PIN4321 send in Hercules than enter on keyboard and error so I try AT+PSWD send in Hercules than enter on keyboard it comes back pin 1234 so I try to change pin by AT+PSWD=4321 Send in Hercules than enter on keyboard and error …so would you know how to change pin ???
Fixed it is AT+PSWD=“4321” enter notice the “ marks they must be there or it will not work
Thanks for posting the update
Hi, I encounter a problem when trying this tutorial.
I can send data from serial monitor and write to android Bluetooth Terminal. Everything works fine here. But when I’m trying the other way around by typing in Bluetooth Terminal and send, nothing’s happened. No data written at serial monitor, and it seems like Bluetooth Terminal doesn’t send anything. Hope you can give insight on what’s wrong? Thanks.
In almost all cases like this it is an issue with the connection or the software.
1. Check you have the correct pin defined for the RX pin.
2. Check the connections to the RX pin.
If this doesn’t work go back a step and try AT commands; make sure you have the module talking to the Arduino and then add the BT terminal app again.
Just follow this instruction and set the baud rate to 9600 in code …and change the both NL and CR to (no line ending) to get the AT command for the latest arduino ide 1.8.8….The AT command works well.
plz i need this dump firmware linvor v1.8. could you help me?
With the Mega 2560 use pins 10 and 11
2 and 3 won’t work.
https://www.arduino.cc/en/Reference/SoftwareSerial
Thanks for this tutorial. I have been working 2 days to get the HC 06 to work. Finally your tutorial and the referenced article – I am there. A solid light… and two-way communication.
Hi, Martyn
my hc-05 is version 4.0 20190815
enter AT mode by TTL and Teraterm, some common AT command is normal and reply ok, such as AT, AT+NAME, AT+PSWD, AT+UART
but in AT+POLAR=1,0 or AT+POLAR? doesn’t work
I even ry to connect pin2=34 in 3.3V before power, still reply : ERROR:[0]
any suggestion ? thanks.
Este site me ajudou muito estava com problema de trocar o nome do HC-06 deu tudo certo consegui mudar o nome e outros parâmetros a minha duvida era que em outros HC-06 tinha que piscar mais lentamente 1pisca por seg agora dispositivo pode piscar 2 pisca por segundo que conseguimos enviar comandos AT e trocar o NOME ,uma coisa que interessante é o divisor de tensão 1K e 2K.
Is it possible communicate with module by code directly? I want to change baud rate from code directly, not from serial communication window. Is it possible?